
Hi guys
I'm very new to the welding game and have a lot of hobby jobs that require welding aluminium. I've watched the aluminium welding videos but unfortunately I can't relay all the information about machine settings etc to my machine. I'm running a Bosswell 200 amp AC/DC pulse tig welder but no matter what try I cannot seem to get a puddle going I've got:
100% argon gas - no leaks that i can find
I used a sanding disc to clean alloy surfaces
not using the foot peddle just yet
if you guys could give me a rough guide as to what setting the dials need to be at to get me as close as possible to a pool I can work with it would be greatly appreciated TIA
Tig welding tips, questions, equipment, applications, instructions, techniques, tig welding machines, troubleshooting tig welding process

- weldin mike 27
-
Weldmonger

-
Posts:
-
Joined:Fri Apr 01, 2011 10:59 pm
-
Location:Australia; Victoria
Hey mate,
Everything looks pretty good. Ditch the sanding disc, you are most likely contaminating the aluminium. Get yourself a stainless steel wire brush, new, clean and keep it only for ally. Try again from there, and we'll see whats what.
Mick
Everything looks pretty good. Ditch the sanding disc, you are most likely contaminating the aluminium. Get yourself a stainless steel wire brush, new, clean and keep it only for ally. Try again from there, and we'll see whats what.
Mick
You might have the same problem as I'm having with my welder. It seem to do 'something' in AC, but the oxide layer is not being cleaned and just floats on the molten metal. On your pictures I also don't seen any evidence of cleaning action.
Seems like the AC part of my welder is defective, the manufacturer will swap it.
Here is my thread with many useful suggestions by other people: http://forum.weldingtipsandtricks.com/v ... =5&t=13150
Did you try welding steel in DC? Does this work?
Oliver
Seems like the AC part of my welder is defective, the manufacturer will swap it.
Here is my thread with many useful suggestions by other people: http://forum.weldingtipsandtricks.com/v ... =5&t=13150
Did you try welding steel in DC? Does this work?
Oliver
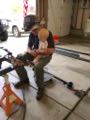
Hey guys thanks heaps for getting back to me. so with the tungsten I'm not sure what size it is as it was not mentioned and came with the machine but it only fits a small copper tip in the torch I will today if possible buy a set of tips so I have everything. I'm welding 3mm plate and 1.5mm square tubing when I do get a stablish arc it melts the tip quite quickly into a ball which from the vids tells me its either too hot from the setting or im getting too close but I cant seem to stop it from happening any thoughts?, I have checked the gas flow its at 20 on the argon gauge and I can feel plenty of gas coming out, one thing I have noticed is I have only two types of ceramic tips for the gas I'm wondering are they both too small and I'm getting insufficient gas coverage? I was using the small one I think its approx 4-5mm and the other is 8-10mm wide. I checked and the torch is plugged into the -ve terminal, the instructions seem clear on this, I will get the wire brush and re-clean the surface. I really don't know how to check for a defective AC? if possible I will try to get a short vid with it starting up and see what u guys think. once again thank you all for the info anything to further the cause is greatly appreciated you guys rock
- Attachments
-
- IMAG0179.jpg (23.14 KiB) Viewed 1581 times
before you try welding anything clean your piece of and light up on it
move the torch around and see if there is any cleaning action going on.
this will at least tell you that your balance and gas are in the ballpark.
craig
move the torch around and see if there is any cleaning action going on.
this will at least tell you that your balance and gas are in the ballpark.
craig
htp invertig 221
syncrowave 250
miller 140 mig
hypertherm plasma
morse 14 metal devil
syncrowave 250
miller 140 mig
hypertherm plasma
morse 14 metal devil
Bill Beauregard
- Bill Beauregard
-
Weldmonger
-
Posts:
-
Joined:Thu Jan 24, 2013 9:32 pm
-
Location:Green Mountains of Vermont
Aluminum is like the 60'S song "Age Of Aquarius" If it is right, you are happy. If it is wrong, you may have more than one issue to fix.
The first red flag for me is no foot pedal. Immagine your car or truck without one. "I want to learn with fewer controls, so I won't use the accelerator" Aluminum needs a LOT of heat at the beginning, then less as the piece heats up, and not much at the end. I can't think of success without heat control.
Short arc, torch at 80 degrees to the joint, welder set on kill, start with 18 CFH pure argon, #8 cup, gas lens, 3/32" tungsten anything but pure, Tungsten shape is not yet important, but it must be clean.
Aluminum cleaned with acetone, and paper towel, if oxidised, scrub the Hell out of it with a clean stainless brush.
Start on flat plate. Run beads until you are confident all is perfect.
Then switch to a joint, you are about to become unhappy. Open joints cause turbulence, and gas coverage issues.
Have you tried it in 2T with the foot pedal, and no pulse? 2T with the foot pedal is a bit more intuitive for starting. I've never messed with a machine that can do 4T, but most of the intro videos that I've seen are geared toward using a foot pedal in 2T operation.
Just a thought. I've read a number of threads where people get messed up by using the 4T setting and don't have all of the settings optimized and get poor results.
Just a thought. I've read a number of threads where people get messed up by using the 4T setting and don't have all of the settings optimized and get poor results.
Bill Beauregard
- Bill Beauregard
-
Weldmonger
-
Posts:
-
Joined:Thu Jan 24, 2013 9:32 pm
-
Location:Green Mountains of Vermont
- weldin mike 27
-
Weldmonger
-
Posts:
-
Joined:Fri Apr 01, 2011 10:59 pm
-
Location:Australia; Victoria
4 the means 4 ups and down of the button. As in press and release to start and press and release to stop. The time you hold the button down in each time can be your up slope /down slope on some machines
sounds like ac balance is way out.steve42 wrote:.........when I do get a stablish arc it melts the tip quite quickly into a ball ........
the dial is probably the other way around. set it at 30 and try it.
tweak it until it breaks
noddybrian
- noddybrian
-
Weldmonger
-
Posts:
-
Joined:Thu Jan 24, 2013 12:13 pm
On nearly every Chinesium Tig I seen if there are any markings on the AC balance knob they are meaningless so advise of setting 30% based on quality domestic machines is'nt quite relevant - but it's certainly wrong side of center - rule of thumb on an import set it about 10 oclock - maybe down to 9oclock if metal is really clean - everything else looks OK except if learning I would'nt use 4T as it just complicates things till you have the basics sorted - though the settings shown will work fine - low initial amps so you can establish an arc & get a feel of where the torch is & get a good arc length followed by a decent high setting for the actual weld & a little down slope to taper off - if it were me trying to show someone that never welded I'd leave it on 2T & just set enough main amps to get a puddle fast & control heat with filler & travel speed on a larger test piece - when heat build up gets too much stop & cool metal - once comfortable this way with a good feel for amps required move on to using the foot pedal.
Brand new to the forum and brand new to TIG welding. I had a similar problem with the dirty sooty welds. I happened all of a sudden it seemed, you know making really bad hot and cold welds learning to keep the tungsten out of the puddle.
Then the really bad arc and would not even make a puddle on the work piece. Happened after regrinding the tungsten.
I struggled with settings, then the next morning out of desperation replaced my grinding wheel and reground the electrode. Solved my problem.
I think I was contaminating my tungsten with the dirty grinding wheel. I think.
Opinions?
noddybrian
- noddybrian
-
Weldmonger
-
Posts:
-
Joined:Thu Jan 24, 2013 12:13 pm
It's possible but not likely - it's difficult to get much contamination from a grinding wheel onto a tungsten in my opinion - obviously if it's a critical / code weld all care should be taken when grinding but for practice / hobby stuff I have used anything to hand to grind without issue - if the wheel is too course or you spin the tungsten too fast with a drill it can leave enough patterns on the tungsten to cause issues - for reasons unkown to me the Chinesium Tig welders seem to suffer much worse with this than real brand ones - it's also possible just by taking the tungsten out & putting it back there is a defect in the collet or body so the tungsten is not centered or the collet is partially restricting the gas - this can alter each time the tungsten is moved causing much head scratching!
Bill Beauregard
- Bill Beauregard
-
Weldmonger
-
Posts:
-
Joined:Thu Jan 24, 2013 9:32 pm
-
Location:Green Mountains of Vermont
Dipping tungsten in aluminum can contaminate well up the shaft, all the way to the gas lense. I've heard you should break the tungsten, and regrind. That seems wasteful. In my dip very frequently days I started grinding well up the shaft of the tungsten. I have a dedicated bench grinder laid on its back so the wheels turn away, This drags contamination off the tip instead of pushing it up the shaft.
Using the fine stone on said grinder, I have three grooves worn in the stone. I start left, move right. It works well for me.
Willie
Using the fine stone on said grinder, I have three grooves worn in the stone. I start left, move right. It works well for me.
Willie
Downwindtracker2
- Downwindtracker2
-
Workhorse

-
Posts:
-
Joined:Sun Mar 11, 2018 9:36 pm
-
Location:BC
One of the things about having so many interests, you can take techniques and tools from one discipline and apply then to another. Gunsmiths have little knowledge of uses of epoxys, where as to wooden boat builders it's simply common knowledge. When I watched a Eastwood how to vid, they used on of those junk 4x36/6" belt sander with a 3M pink belt to grind a tungsten. There is much better , a Veil 1"x42". Lee Valley sells them, as well you can get them from the manufacturer http://www.leevalley.com/en/home/Search.aspx?action=n . Lee Valley also sells the belts, in fact I have 3 of the proper 80grit belts hanging on the wall.
https://www.youtube.com/watch?v=EN02NIj1oVo, That's another one of it's uses. I made a jig for wood chisels They are from Quebec so most of the vids of are in French.
https://www.youtube.com/watch?v=EN02NIj1oVo, That's another one of it's uses. I made a jig for wood chisels They are from Quebec so most of the vids of are in French.
Man of foolish pursuits
Millermatic 250x MIG
Magnum (Hugong) Wave 200KD ac/dc TIG
Liquid Air O/A torch
Millermatic 250x MIG
Magnum (Hugong) Wave 200KD ac/dc TIG
Liquid Air O/A torch
Downwindtracker2 wrote:One of the things about having so many interests, you can take techniques and tools from one discipline and apply then to another. Gunsmiths have little knowledge of uses of epoxys, where as to wooden boat builders it's simply common knowledge. When I watched a Eastwood how to vid, they used on of those junk 4x36/6" belt sander with a 3M pink belt to grind a tungsten. There is much better , a Veil 1"x42". Lee Valley sells them, as well you can get them from the manufacturer http://www.leevalley.com/en/home/Search.aspx?action=n . Lee Valley also sells the belts, in fact I have 3 of the proper 80grit belts hanging on the wall.
https://www.youtube.com/watch?v=EN02NIj1oVo, That's another one of it's uses. I made a jig for wood chisels They are from Quebec so most of the vids of are in French.
Ok so I switched to the size 8 cup, using lanthanated 2.4mm tungsten, gas at 18, and changed settings to no pulse, and I'm using the foot peddle and eureka !! I think the foot peddle made the biggest difference now just to get the desired cleaning action and we are good. so here is my first ever weld I did two lines with just the torch and they looked pretty clean so I tried with dipping the stick gonna need some practice a big thank you to everyone who commented I definitely would not have figured it out without your help of course all comments are welcome to help better the skill would be greatly appreciated thanks guys
- Attachments
-
- IMAG0181.jpg (36.59 KiB) Viewed 1457 times
-
- IMAG0180.jpg (28.52 KiB) Viewed 1457 times
Return to “Tig Welding - Tig Welding Aluminum - Tig Welding Techniques - Aluminum Tig Welding”
Jump to
- Introductions & How to Use the Forum
- ↳ Welcome!
- ↳ Member Introductions
- ↳ How to Use the Forum
- ↳ Moderator Applications
- Welding Discussion
- ↳ Metal Cutting
- ↳ Tig Welding - Tig Welding Aluminum - Tig Welding Techniques - Aluminum Tig Welding
- ↳ Mig and Flux Core - gas metal arc welding & flux cored arc welding
- ↳ Stick Welding/Arc Welding - Shielded Metal Arc Welding
- ↳ Welding Forum General Shop Talk
- ↳ Welding Certification - Stick/Arc Welding, Tig Welding, Mig Welding Certification tests - Welding Tests of all kinds
- ↳ Welding Projects - Welding project Ideas - Welding project plans
- ↳ Product Reviews
- ↳ Fuel Gas Heating
- Welding Tips & Tricks
- ↳ Video Discussion
- ↳ Wish List
- Announcements & Feedback
- ↳ Forum News
- ↳ Suggestions, Feedback and Support
- Welding Marketplace
- ↳ Welding Jobs - Industrial Welding Jobs - Pipe Welding Jobs - Tig Welding Jobs
- ↳ Classifieds - Buy, Sell, Trade Used Welding Equipment
- Welding Resources
- ↳ Tradeshows, Seminars and Events
- ↳ The Welding Library
- ↳ Education Opportunities