Tig welding tips, questions, equipment, applications, instructions, techniques, tig welding machines, troubleshooting tig welding process
Post Reply
TamJeff
  • Posts:
  • Joined:
    Tue Dec 04, 2012 4:46 am

Don't know if this is the appropriate space. Just some welding geek stuff I find interesting. I remember when I started fab work, these were the kinds of things I thought were intimidating. I call these "Cats paws", because that's the first thing that popped into my head when I first came across this type of joint. A lot of people overlook these as an alternative to an ordinary miter or brace. Also, it can be nicely 'let in' to the tube for a friction free fit for fluid, wiring etc, or to avoid a point blank attachment for a brace in structural tubing situations, or as a way to repair an area where a brace has failed and will fail again if replaced the same way.

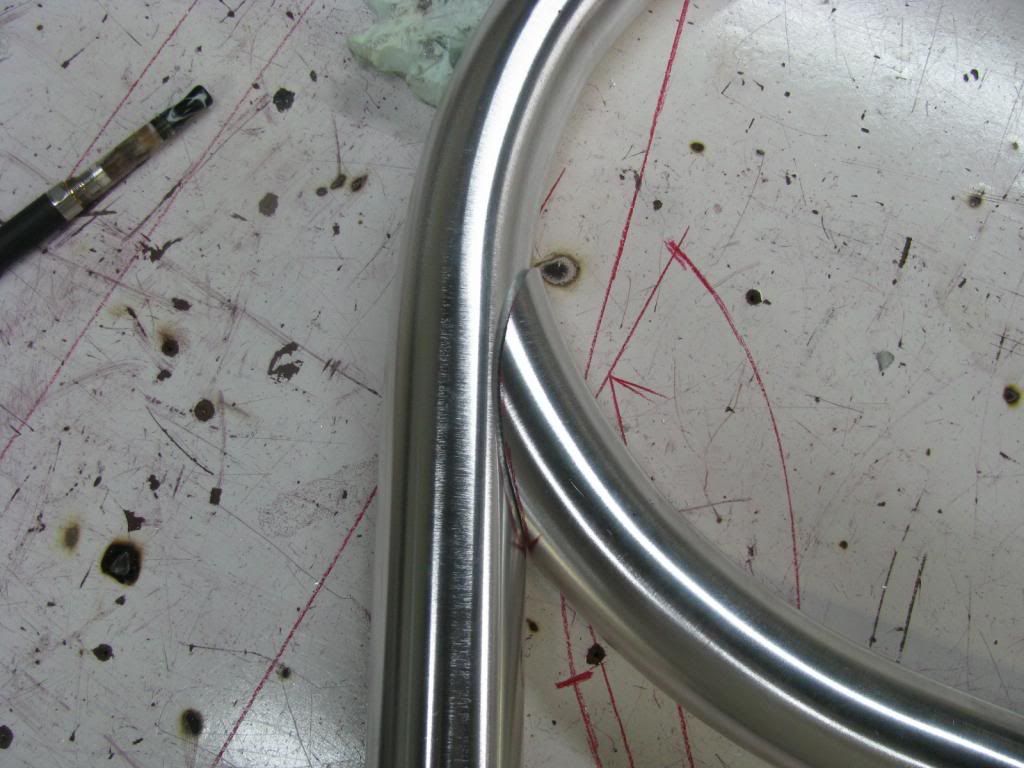
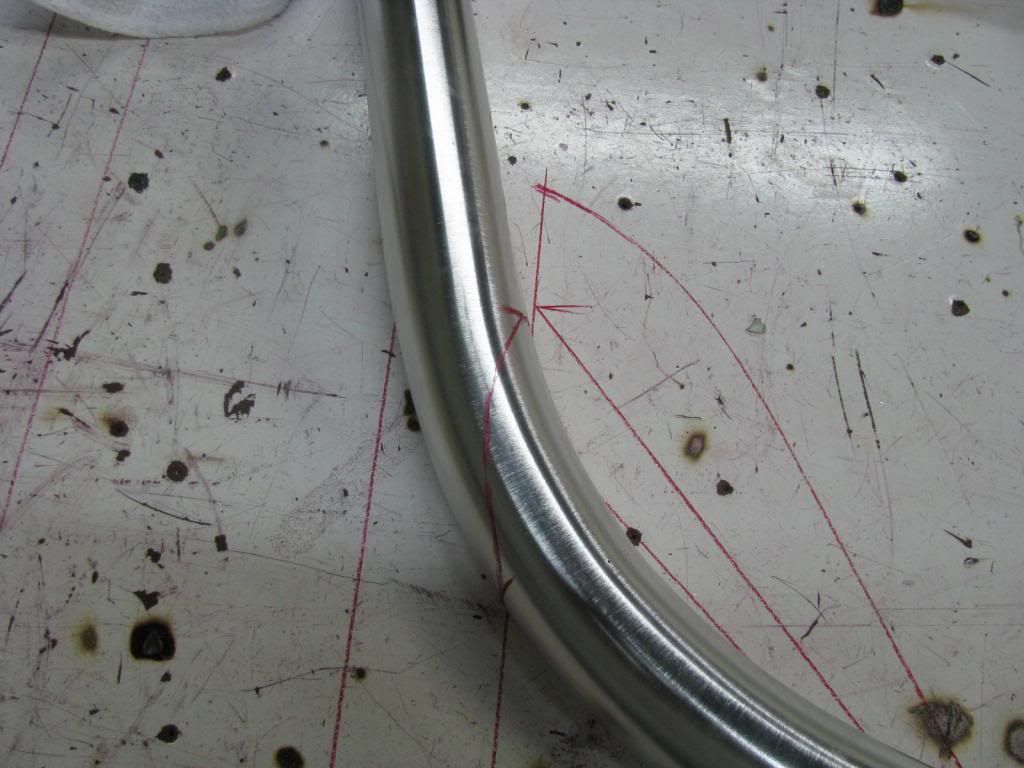
Start out with a bend. I used a 75 deg in this situation but 60 would have worked. I basically just use a line on my table. The lines on the table here were leftover from a previous project. You can also draw in the situation that fits a specific layout target. I just needed these to be identical. Line up where you need the scarph, and put two reference marks. One at the toe (top of photo) and one at the heel.
Image

Then draw in your cope profile. I see these in my sleep so I can eyeball them by now at any angle. Other tube fabricators will know what I mean by this. If you aren't familiar with tubing, you can exaggerate these profiles and sneak up on them a little at a time.
Image

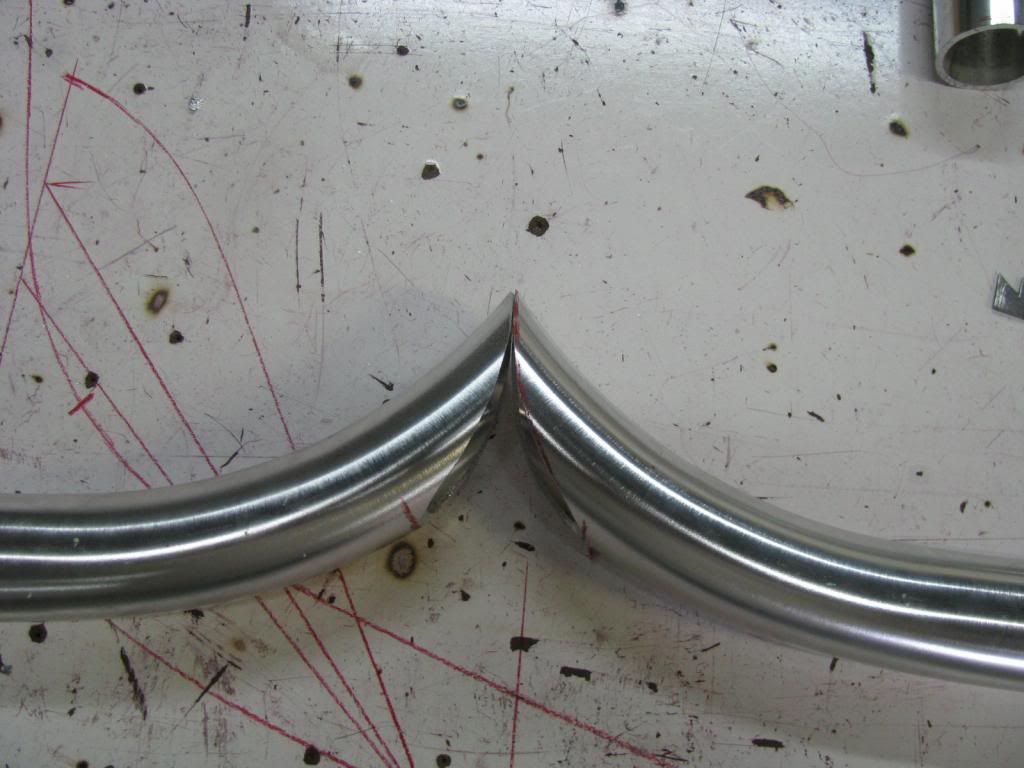
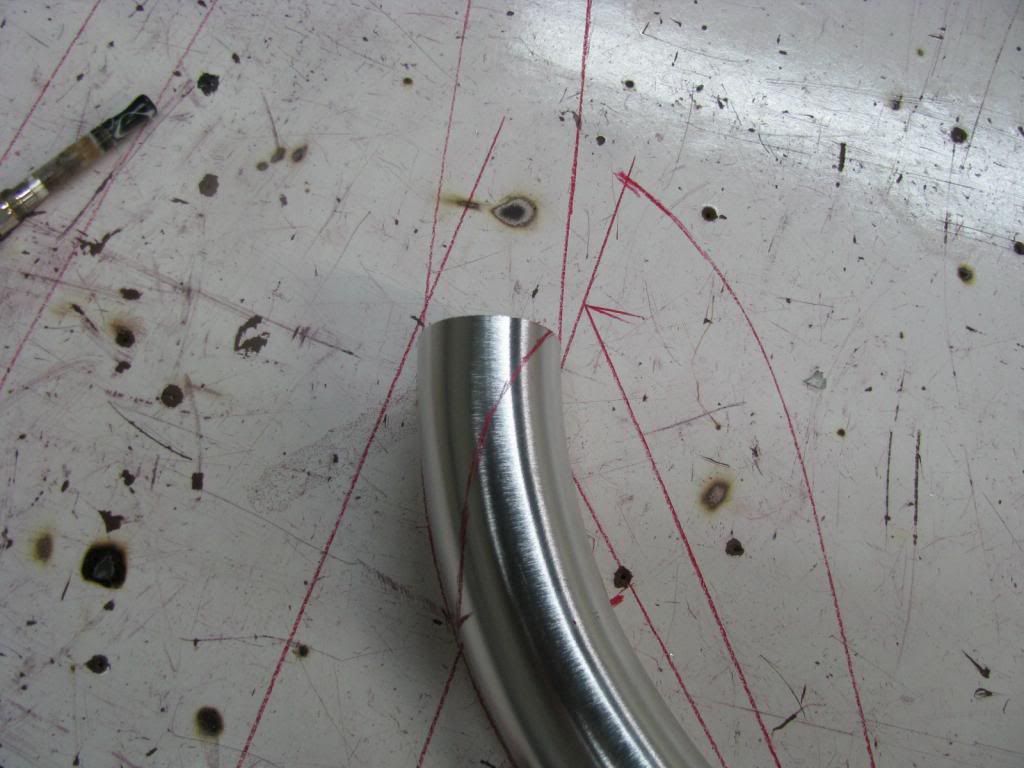
Then just whack the toe off at the line. I use a band saw for 99% of my fit ups. This makes it easier to see where to start the cut that would normally be hidden from view at the saw and keeps the blade from wandering down the curve off of the line.
Image

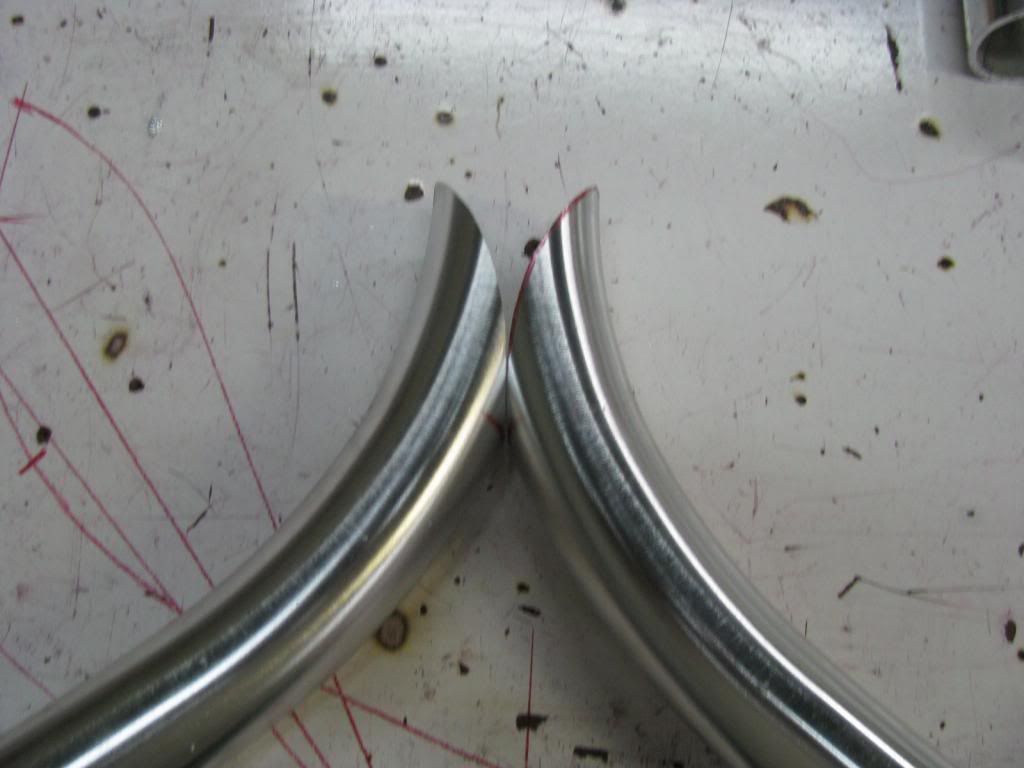
The rest is obvious. You can either trim the 2nd dimension wall thickness shoulders of the profile with the saw, or you can use a die grinder to make it fit really snug. I don't like to finish aluminum too sharply. I don't like welding aluminum on a sharp edge. I leave about a 16th land along the profile. If you were letting this in for plumbing applications, you would have mating bevels ideally, in which to get consistent penetration throughout.
Image
Last edited by TamJeff on Fri Feb 01, 2013 2:15 pm, edited 1 time in total.
Miller ABP 330, Syncrowave 250, Dynasty 300 DX.
Honorary member of the Fraternity of Faded Tee Shirts.
TamJeff
  • Posts:
  • Joined:
    Tue Dec 04, 2012 4:46 am

Finally, if you have to cut a mate to this one, repeat the above process but draw around the whole bend so you can fit the second one in the exact same spot for reference, repeat the steps above, put your copes toe to toe. . .
Image

And then just roll them onto each other and see if the heels land together.
Image
Miller ABP 330, Syncrowave 250, Dynasty 300 DX.
Honorary member of the Fraternity of Faded Tee Shirts.
awill4wd
  • Posts:
  • Joined:
    Thu Jan 31, 2013 3:57 am
  • Location:
    Berwick, Melbourne, Australia

Great tips TamJeff, and I love the work you do.
On the boat tube welding you do is the tubing anodised?
The pics of the welding work you do don't appear to be anodised but I thought I'd ask as the main players down south in Florida seem to use anodised tubing exclusively and use the "bump" welding technique rather than remove the anodising around the weld area.
Regards Andrew from Oz.
We are Tig welders, gravity doesn't worry us.
Miller Dynasty 350
OTC hybrid wave 300 amp inverter Tig at work (Now retired)
Kemppi MLS 2300 inverter, 230 amps of welding brilliance for home use
User avatar
  • Posts:
  • Joined:
    Thu Jan 06, 2011 11:40 pm
  • Location:
    Near New Orleans

Oh, you and Jeff are going to get along great!

8-)
TamJeff
  • Posts:
  • Joined:
    Tue Dec 04, 2012 4:46 am

Yes, it is anodized and that's how we get it delivered to us. I haven't seen anyone else that welds it quite like I do, really. There's probably 6 different ways that I use, dependent on the type of joint. I'll be more careful with these the closer I get to the toe. We don't remove the anodized.
That's a brush finish anodized in the pics above.
Miller ABP 330, Syncrowave 250, Dynasty 300 DX.
Honorary member of the Fraternity of Faded Tee Shirts.
awill4wd
  • Posts:
  • Joined:
    Thu Jan 31, 2013 3:57 am
  • Location:
    Berwick, Melbourne, Australia

TamJeff wrote:Yes, it is anodized and that's how we get it delivered to us. I haven't seen anyone else that welds it quite like I do, really. There's probably 6 different ways that I use, dependent on the type of joint. I'll be more careful with these the closer I get to the toe. We don't remove the anodized.
That's a brush finish anodized in the pics above.
Thanks Jeff.
Could you give us some tips on your anodising welding techniques?
Going over some of the pics you've posted I notice no etching alongside the welds with the welds tight against the anodising.
Do you use the "bump" technique of is it continuous welding for you?
Any info you would be willing to share would be appreciated.
Regards Andrew from Oz.
We are Tig welders, gravity doesn't worry us.
Miller Dynasty 350
OTC hybrid wave 300 amp inverter Tig at work (Now retired)
Kemppi MLS 2300 inverter, 230 amps of welding brilliance for home use
TamJeff
  • Posts:
  • Joined:
    Tue Dec 04, 2012 4:46 am

awill4wd wrote:
TamJeff wrote:Yes, it is anodized and that's how we get it delivered to us. I haven't seen anyone else that welds it quite like I do, really. There's probably 6 different ways that I use, dependent on the type of joint. I'll be more careful with these the closer I get to the toe. We don't remove the anodized.
That's a brush finish anodized in the pics above.
Thanks Jeff.
Could you give us some tips on your anodising welding techniques?
Going over some of the pics you've posted I notice no etching alongside the welds with the welds tight against the anodising.
Do you use the "bump" technique of is it continuous welding for you?
Any info you would be willing to share would be appreciated.
Regards Andrew from Oz.
With anodized, you want to take advantage of aluminum's capillary nature. You can get the metal to melt slightly with the heat of it's own molten filler puddle, using the arc stream to keep it like that until it bites in at the edges. It's a very fine line where this happens, yet obvious at the same time once you get used to studying it. I use a bump method when welding awkward positions overhead sometimes, manual pulse in both forward and reverse directions at other times. If you really want to teach yourself to weld anodized decoratively, weld it manual pulse, reverse travel, with no less than 225 amps AC, and let off the switch or pedal as soon as each puddle reaches adequate size,shape and fill. Keep your puddles close together and backwash a little in the same motion to blend (one step forward and a half back) the previous puddle. Welding in reverse will keep the contaminate pushed back and gas directly on the puddle. Once you get the hang of that and accustomed to watching what happens, move on to other techniques and amp ranges. You will soon find that you can leave the button or pedal mashed and start cooking along without stopping. If you don't do anodized frequently or need to make real money at it, you can do some really nice and sound beads with just the pulse technique in reverse, tack on tack. The beads won't be as shiny as forward travel ones in my pics, but they typically get(or should anyway) painted with rustoleum aluminum silver paint anyway.

Hope this helps.

Imagine trying to find an ideal position anywhere in this situation. There is instances here where the bump method would be a good one. I typically fit the front legs on these types of structures in the boat. it is hard to creatively clamp or hold the parts in place and they are often just being held in place by a prayer until you get a tack on.
Image

Another poster (ajskater?) in another thread mentioned pulsing with the pedal. That is actually the best forward travel welding technique for anodized and for people who are comfortable using the pedal. When you use that, use a slight reverse backwash to flame dress the beads as you let up on the amps in the same motion when moving onto the next puddle. It will buy you time to get the edges nice, and laying the torch down momentarily will scrub the beads more shiny in addition to smoothing them out.

ETA: Just noticed in the photo above that I used cats paw braces on the front legs.
Last edited by TamJeff on Sat Feb 02, 2013 2:50 am, edited 3 times in total.
Miller ABP 330, Syncrowave 250, Dynasty 300 DX.
Honorary member of the Fraternity of Faded Tee Shirts.
BDoubleU

Nice work, good description of bump welding ... It's an art! What kind of machine do you use?
weldfusion.com
TamJeff
  • Posts:
  • Joined:
    Tue Dec 04, 2012 4:46 am

BDoubleU wrote:Nice work, good description of bump welding ... It's an art! What kind of machine do you use?
Mostly; Miller synchrowave 250 at 250 amps, or a Miller Dynasty 300. The Dynasty in the photo above. Best machine I have ever welded aluminum with. . .Miller Aircrafter 330 SST.

Thank you BDoubleU.
Miller ABP 330, Syncrowave 250, Dynasty 300 DX.
Honorary member of the Fraternity of Faded Tee Shirts.
TamJeff
  • Posts:
  • Joined:
    Tue Dec 04, 2012 4:46 am

I also noticed that I have my E-cig in the photos. I quit smoking regular cigarettes a year ago after 35 years. On days that are full of intense fab and welding, I break out the e-cig. I don't drink or anything else, really. Gotta do something in between. lol
Miller ABP 330, Syncrowave 250, Dynasty 300 DX.
Honorary member of the Fraternity of Faded Tee Shirts.
awill4wd
  • Posts:
  • Joined:
    Thu Jan 31, 2013 3:57 am
  • Location:
    Berwick, Melbourne, Australia

Thanks for your detailed description Jeff.
I'll just try to get my head around a couple of things if I may?
I'm a right hand Tig welder so weld travel for me is right to left with filler fed from the left hand.
With your "reverse" welding technique would your torch angles remain the same as normal Tig welding or would you stand the torch up a bit closer to 90 degrees? (assuming fillet weld joint)
Also I'm assuming the weld travel now to be left to right and now the filler is being introduced into the trailing edge of the weld pool rather than the leading edge?
I think I'll have to source some anodised tube to experiment with but I'm always up for a challenge.
Cheers Andrew from Oz.
We are Tig welders, gravity doesn't worry us.
Miller Dynasty 350
OTC hybrid wave 300 amp inverter Tig at work (Now retired)
Kemppi MLS 2300 inverter, 230 amps of welding brilliance for home use
TamJeff
  • Posts:
  • Joined:
    Tue Dec 04, 2012 4:46 am

Yes, you hold the torch the same way and feed the trailing edge. It gives you a great view of the tungsten etc. I weld both left and right handed nearly equal amount of time. Imagine getting around pipes all day. There is no way I could do it all right handed. I would have to flip the work around and position myself a lot. I can typically weld 270 degrees of a circle from one spot just about, before I have to put my head around the other side.

First thing you will notice, or first thing to look for in reverse is how the contaminant is kept pushed back out of the way. You should see about half a puddle of clean weld going on there and that's what you use to set up the zone.
Miller ABP 330, Syncrowave 250, Dynasty 300 DX.
Honorary member of the Fraternity of Faded Tee Shirts.
BDoubleU

Yep - the 330 ABP is often spoken very highly of for anodized ... have you been able to "mimic" the arc with the Dynasty? Seems like the focused arc might be a benefit.
weldfusion.com
TamJeff
  • Posts:
  • Joined:
    Tue Dec 04, 2012 4:46 am

The other thing I enjoy about the older machines and pure tungsten, is the flashlight that remains after you stop. Especially with as many times as I often need to re-position and refocus. Also, the Dynasty doesn't have full time HF. It doesn't want to restart until after the post flow has counted down and the voltages on the meter have zero'd. It just beep beep beeps until you either wait for it or scratch start it. I can get it to work if I am quick on the draw and restart before the tungsten cools, but that's kind of stressful too.

I was reading a pamphlet from Miller. They claim that the Dynasty was not an ideal machine for welding anodized. They instead, recommend the synchrowave.

The synchrowave, altho a good machine, was always the last choice of the pros in my shop. They all went for the Aircrafters, with the SW being just good enough comparatively. I got to use both side-by-side. I have been using the SW mostly, and even after all these years using it, I still really have to focus with it to turn out beads nearly as nice as the Aircrafter or ABP, and it can be downright obnoxious overhead.
Miller ABP 330, Syncrowave 250, Dynasty 300 DX.
Honorary member of the Fraternity of Faded Tee Shirts.
Post Reply