
Does anyone have any ideas on what the heck is going in with my tungstens? I notice that after welding for a while, they get pretty badly "frosted" looking, and the ends tend to split, with little protrustions at the tip too.
I am using (and have only ever used) 1.5% lanthanated (gold band) from HTP (which I believe may be purchasing them from CK Worldwide). This one pictured is 3/32", and I was welding with A/C on a thick cast aluminum piece, 60 Hz (machine pre-set), no pulse, 200 AMPs at max footpedal, and about 25% DCEP, on an everlast "super200P".
Is there something wrong with the tungsten? Could too much high frequency starting voltage cause this? Or is this just supposed to be normal behavior for a lanthanated tungsten after a while?
Thanks.
Tig welding tips, questions, equipment, applications, instructions, techniques, tig welding machines, troubleshooting tig welding process
that appears to be a contamination issue ?...I have always used pure tungsten for any aluminum work...also notice that you are at a pretty long stickout....how much of it is showing pre-weld?...if you set it up slightly recessed you get a "flashlight arc" ....but, i am no expert...

i had the same issue..i dont like lanth. try ceriated
your stick out is fine..thats a gas lense, but if i were you i would set my gas at 15cfh and use a regular colletbody and cup...i use a #6 also...gas lense cools the weld down too soon with aluminum....
your stick out is fine..thats a gas lense, but if i were you i would set my gas at 15cfh and use a regular colletbody and cup...i use a #6 also...gas lense cools the weld down too soon with aluminum....
Thanks for the help brainstorming guys...
Regarding collet body and cup selection and gas flow rate, I have a feeling its not the cause of my frosted and split tips, because I have tried a variety of cups and collet bodies and gas flows, with a standard collet body with #4-#10 cup, and a gas lens from #5-#8, (at a variety of flowrates) and none seems to prevent the tip from frosting and splitting. I seem to be getting the hang of setting the shielding gas flow now also, (IE: no black crud floating on the aluminum puddle, with a fluid puddle at the edges and no amount (or very minimal) "black smut" at the edges.)
I am varying my tungsten stickout, aiming for about 1/2 the cup width, but extend up to about a full cup width when necessary, depending on how tight the weld joint is, and I usually hold as tight of an arc as I can.
As for the lanthanated vs ceriated question, I have one stick of ceriated I could try, but its only 1/16". I wish it was 3/32" because that is the size lanthanated I have been using most. I need to undertake a lighter gage metal project, so I can try it.
Do you guys think that maybe I am just running too much current/heat for the size of tungsten I am using? I generally am running right below the heat that causes the tip to melt ('ball up'.) Maybe I should try running a 1/8" lanthanated with all other settings the same, and see if that fixes the problem. (I do have some 1/8"... not sure I've tried it more than just once or twice.)
Other things I have tried (that didn't work):
I thought it might have something to do with the way I am preparing my tungstens, so I tried sanding the tip smooth, rather than leaving my usual grinding stone finish on it, so it began with a real nice, smooth finish. However, while it did start out with a real nice arc, the tip still degraded the same way as it always has (frosted, split).
And I thought some high frequency (300 Hz) pulsing I was using might have been causing the tip degradation also, but recently I switched it off, and it made no difference tip still frosts and splits.
In my early days of learning TIG, I dipped the tungsten into the molten puddle quite a bit, so the metal got wicked up onto the tungsten tip. More recently, I am doing that much less, to the point where I have observed my tip degrading even when I have never touched my tip to the work. So at this point I believe that is not the cause either.
I'm not sure about the contamination. I do admit, I am getting it on my work a lot. On this piece of aluminum I lit up on most recently, when I lit the arc before I even made a puddle, black soot appeared all over the surface. With a perfectly ground tungsten, before I even made a puddle! That is on a surface I had just exposed by fresh die-grinding! It went away after I played light/moderate arc over the work, and brushed it again. Maybe one of my brushes or even the solvents I am using to clean the metal with is introducting contamination... so I definitely can't rule that out as the cause. I don't think it was a shielding gas issue, either... I lit up on other surfaces and no black soot.tigamajig wrote:that appears to be a contamination issue ?...I have always used pure tungsten for any aluminum work...also notice that you are at a pretty long stickout....how much of it is showing pre-weld?...if you set it up slightly recessed you get a "flashlight arc" ....but, i am no expert...
I am striving to optimize my setup with a sharper tip than the oldskool transformer AC "ball", to get more arc control. It really does work well for pinpointing the heat in corners and fillets... before my tip degrades at least.
For similar reasons, I have been striving to maintain as small of an arc length as I can, often about 1-2 tungsten widths when possible. I find a long arc length spreads the arc out a lot. I am practicing usually with as tight of an arc as I can maintain, without touching it into the puddle too much, and tungsten protrusion set so I can see the puddle and access it with the filler rod... thx!
I tried 1/8" tungsten this time, rather than 3/32". (Still 1.5% lanthanated from same manufacturer.)
You can see below how the 1/8" tungsten started off - nice and sharp, with a flat land on the end. In the other picture you can see how it ended up after just a few minutes of welding... (frosted and starting to split, just like the 3/32".) I left pulsing off, and welded with up to about 200 amps, and about 30% DCEP. Used a #7 gas lens with about 12 cfh (which seemed to work quite nicely for shielding.)
I found a related thread elsewhere on der interweb here:
http://www.millerwelds.com/resources/co ... hp?t=11866
(which unfortunately doesn't contain the answer I was hoping to find, either...)
Now I'm questioning whether it's possible for a lanthanated, ceriated, or thoriated tungsten to actually work well on AC aluminum? Has anyone gotten it to work???
- Attachments
-
- How the tungsten started out (shown positioned at beginning of weld)
- IMG_0022_small.JPG (34.17 KiB) Viewed 4289 times
-
- How the tungsten ended up, after only a few minutes of welding. (notice tungsten degradation)
- IMG_0024_small.JPG (52.96 KiB) Viewed 4289 times
-
- Weld beads completed in this test are shown in the bottom center and in upper right portions of this pic.
- IMG_0026_small.JPG (75.05 KiB) Viewed 4289 times
I spoke to Eddie of Diamond Ground Products about my issues with tip contamination. His main recommendation for me was to go with a diamond grinding wheel instead of aluminum oxide grinding wheel for tip preparation. He said the aluminum oxide particles can get embedded in the tungsten tip, and even though you can't see them with the naked eye, they will expand when heated up under the arc, and can cause the splitting / multiple protrusion issues.
I found an inexpensive, 4" diamond grinding wheel on ebay I am going to try.
Other suggestions to optimize my setup that I teased out of him were going with 2% lanthanated rather than 1.5% lanthanated for what I was doing (aluminum), and switching to a premium tungsten manufacturer (wolfram or sylvania, rather than a chinese made tungsten.)
have you had any luck finding a supplier that carries premium 2% lanthanated electrodes online? I've been using 1.5% for the last year or so and get decent results, but after seeing jody's review tonight, i figured I'd give the 2%s a shot, but I can't seem to find any at my normal suppliers. I can probably get them through airgas, but they only sell the el shit radnor tungstens. avoid those at all costs.
Diamond Ground Products sells 2% lanthanated. For online purchasing, they do have an ebay account "tungsten direct"; here is their 2% lanthanated ebay store selection:
http://stores.ebay.com/Tungsten-Direct_ ... ec0Q2em322
They also give out free samples too. I am having them send me some 3/32" to try out.
PS - I found Jody's review you mentioned, here: http://www.weldingtipsandtricks.com/tun ... -gtaw.html Nice! Pic at the bottom shows quite a variety of tip degradation...

I do all of my TIG work with Lanth - no issues. They will split, but only if I try to break them off without grinding a V in them first. I've had no other issues and think they are far superior to pure tungsten. When I was using Thoriated, they use to look like that some times, I suspect they are contaminated as discussed. I run 3/32" at 180 amps and have no issues with the frosting/splitting. It does look like too much amperage. I don't usually worry too much about grinding them to a point first.
Thanks for your observations and experience... always good to have additional data points.
My new 4" diamond grinding wheel came today, thanks to ebay. After fabricating a washer to adapt its inner diameter to fit my bench grinder's shaft, I got it all mounted up. (And to mount the washer permanently, I made use of Jody's "Tack weld like a laser" trick trick. Worked quite well using my tig's finger controlled on/off switch!)
The diamond wheel is 150 grit, I think. At least that number is printed on the package (with other chinese words.) It sure grinds through tungsten faster (perhaps 2-3x faster, with a lot less heat build up!) than the aluminum oxide wheels. And the grinding action is also quite smooth, so that I can hold the tungsten angled "into" the wheel, and it will not catch on the grit and go flying like the aluminum oxide wheel would do. So, I can also grind away from the tungsten tip now.
I found the diamond wheel causes a little less "chipping" of the tungsten edges than the aluminum oxide wheel would do. Its noticeable especially when "facing" such as making the flat spot on the tip.
I ground up the new diamond ground 2% lanthanated samples I also received, and my existing 1.5% lanthanated piece on it. Now I just need an excuse to go weld on some thick aluminum again.
- Attachments
-
- IMG_0006_small.JPG (117.87 KiB) Viewed 2559 times
-
- IMG_0009_small.JPG (106.83 KiB) Viewed 2559 times
I welded on a thick aluminum roadwheel a week or two ago. sorry no pics. But it was probably the largest, aluminum "heat sink" I've welded yet... 1/4"+ thick where I welded, and quite large thick surfaces to draw away the heat.
I managed to do the thick aluminum welding this time without experiencing *any* split tungsten or multiple protrusion issues!
The "tricks" I threw at it that I didn't do previously in this thread (when I was having multiple protrusions on my tungsten tip welding thick aluminum) were:
1. Pre-heated the work before welding using an air-propane torch
2. Turned down the DCEP % (from 30% down to 20%, the lowest my machine can do.)
3. Prepared tungsten using a clean diamond wheel, rather than an aluminum oxide grinding wheel. (Also, I ground away any areas of the tungsten that may have held contaminantion within.)
Before, I was probably just plain running these tungstens too hot. My air cooled torch is only 150 amps rated, yet I was welding at 180-200 amps for minutes. The pre-heating and turning down the DCEP both made a huge change in how much more quickly I could get a puddle.
But I also can't rule out yet the change I made in the way I prepare and care for my tungstens. (Using a clean diamond wheel, and being more careful about contamination.) Whatever was the cause, I've got my multiple protrusions problem licked! (And I didn't even need 2% lanthanated to do it. ) Thanks folks.
I managed to do the thick aluminum welding this time without experiencing *any* split tungsten or multiple protrusion issues!
The "tricks" I threw at it that I didn't do previously in this thread (when I was having multiple protrusions on my tungsten tip welding thick aluminum) were:
1. Pre-heated the work before welding using an air-propane torch
2. Turned down the DCEP % (from 30% down to 20%, the lowest my machine can do.)
3. Prepared tungsten using a clean diamond wheel, rather than an aluminum oxide grinding wheel. (Also, I ground away any areas of the tungsten that may have held contaminantion within.)
Before, I was probably just plain running these tungstens too hot. My air cooled torch is only 150 amps rated, yet I was welding at 180-200 amps for minutes. The pre-heating and turning down the DCEP both made a huge change in how much more quickly I could get a puddle.
But I also can't rule out yet the change I made in the way I prepare and care for my tungstens. (Using a clean diamond wheel, and being more careful about contamination.) Whatever was the cause, I've got my multiple protrusions problem licked! (And I didn't even need 2% lanthanated to do it.
I just did a 3/8" aluminum project, welded with 200 amps (no pulse, 20% EP balance), and the frosted, splitting tungstens were back. Tungsten was 1/8" diameter, 1.5% lanthanated, prepared on a diamond wheel.
*But* I think I finally figured out what is causing it! Overheating TIG torch, or torch power/gas cable. What I never realized is that the overheating of a torch or cable would manifest itself as a frosted and splitting tungstens. (And something else I didn't really connect at the time - contamination/oxidation of the weld puddle too.)
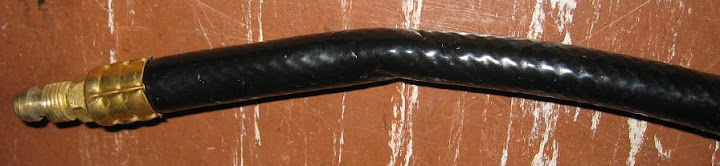
I think my WP-17 torch is just not up to doing 180-200 amps. My torch has the one-piece power/gas cable. Looks like a plastic/rubber hose, and it must have a conductor inside. I wonder if I split it apart, if the inside surface of the hose looks like its been melted...
*But* I think I finally figured out what is causing it! Overheating TIG torch, or torch power/gas cable. What I never realized is that the overheating of a torch or cable would manifest itself as a frosted and splitting tungstens. (And something else I didn't really connect at the time - contamination/oxidation of the weld puddle too.)
I think my WP-17 torch is just not up to doing 180-200 amps. My torch has the one-piece power/gas cable. Looks like a plastic/rubber hose, and it must have a conductor inside. I wonder if I split it apart, if the inside surface of the hose looks like its been melted...
I realize your post on the Diamond wheel from E-Bay was quite a while ago, but do you have a link to the seller? Ive been looking for one and haven't found one yet. Is that a Harbor Freight 3" grinder your using?
I got a sample of the Tri-Mix from Diamond Ground and like it way better then the red. I just requested a sample of the blue from them to try out. The Tri-Mix is fairly expensive, so I want to try the blue for comparison before placing a order from them.
I got a sample of the Tri-Mix from Diamond Ground and like it way better then the red. I just requested a sample of the blue from them to try out. The Tri-Mix is fairly expensive, so I want to try the blue for comparison before placing a order from them.
Millermatic 251
Spectrum 300 Plasma
Everlast PowerTig 250EX
Everlast PowerCool W300
Harris/Victor OA
Craftsman 13 Speed Drill Press
ProTools Air/Hydraulic Bender
48" Brake
Compressor, Notchers, Grinders, etc.
Spectrum 300 Plasma
Everlast PowerTig 250EX
Everlast PowerCool W300
Harris/Victor OA
Craftsman 13 Speed Drill Press
ProTools Air/Hydraulic Bender
48" Brake
Compressor, Notchers, Grinders, etc.
It may have been this one:
http://cgi.ebay.com/Flat-Round-3-9-Whee ... 812wt_1139
A whopping $6.60 shipped.
My bench grinder is 6" harbor freight model 37822. My comments on that grinder: a little underpowered compared to other good 6" grinders. For tungsten grinding however it works (if not overkill.)
http://cgi.ebay.com/Flat-Round-3-9-Whee ... 812wt_1139
A whopping $6.60 shipped.
My bench grinder is 6" harbor freight model 37822. My comments on that grinder: a little underpowered compared to other good 6" grinders. For tungsten grinding however it works (if not overkill.)
Thanks!jakeru wrote:It may have been this one:
http://cgi.ebay.com/Flat-Round-3-9-Whee ... 812wt_1139
A whopping $6.60 shipped.
My bench grinder is 6" harbor freight model 37822. My comments on that grinder: a little underpowered compared to other good 6" grinders. For tungsten grinding however it works (if not overkill.)
Millermatic 251
Spectrum 300 Plasma
Everlast PowerTig 250EX
Everlast PowerCool W300
Harris/Victor OA
Craftsman 13 Speed Drill Press
ProTools Air/Hydraulic Bender
48" Brake
Compressor, Notchers, Grinders, etc.
Spectrum 300 Plasma
Everlast PowerTig 250EX
Everlast PowerCool W300
Harris/Victor OA
Craftsman 13 Speed Drill Press
ProTools Air/Hydraulic Bender
48" Brake
Compressor, Notchers, Grinders, etc.
No problem. By the way, the Diamond ground guy I spoke to actually steered me away from their tri-mix tungsten for my application (multipurpose electrode, capable of doing thick aluminum / lots of power/heat). He said the 2% lanthanated would be a better choice. However I think my contamination problem (of both the work and the tungsten) when welding thick aluminum had more to do with my torch's coaxial argon/power hose overheating, and offgassing contaminants into the argon shielding gas.

Jakeru, I noticed on the Everlast board you said you were looking at a water cooled torch. I thought I read that you said that you were told it would run with or without water. If I read it correctly, you might want to double check that. My watercooled torches came with warnings about never running them without coolant or damage to the cooling hoses would occur. Maybe Everlasts are different, I dunno.
Highly skilled at turning expensive pieces of metal into useless but recyclable crap..
That's indeed what I understood from Mike (Everlast Support). I think he mentioned Everlast WP-18 torch could run without water with as much current as the Everlast aircooled WP-17 can handle. His point was that there would be no "usability drawback" to switching from the Everlast WP-17 to the WP-18.
If Mike say's it's o.k. then it must be. I just thought I'd mention it in case. Didn't want you to cook a torche.jakeru wrote:That's indeed what I understood from Mike (Everlast Support). I think he mentioned Everlast WP-18 torch could run without water with as much current as the Everlast aircooled WP-17 can handle. His point was that there would be no "usability drawback" to switching from the Everlast WP-17 to the WP-18.
Highly skilled at turning expensive pieces of metal into useless but recyclable crap..
The Everlast machines come with a water cooled torch (at least I think most or all of them do). They claim they can be run up to 170amps or so without a cooler. I got a cooler for my 250EX right from the start. Running under 150amps (I'm still learning and have been practicing on mostly 1/8 aluminum) with the cooler running actually makes my torch hand the coolest part of my body. The torch and cable feel cold to the touch. Their cooler works great.sschefer wrote:Jakeru, I noticed on the Everlast board you said you were looking at a water cooled torch. I thought I read that you said that you were told it would run with or without water. If I read it correctly, you might want to double check that. My watercooled torches came with warnings about never running them without coolant or damage to the cooling hoses would occur. Maybe Everlasts are different, I dunno.
Millermatic 251
Spectrum 300 Plasma
Everlast PowerTig 250EX
Everlast PowerCool W300
Harris/Victor OA
Craftsman 13 Speed Drill Press
ProTools Air/Hydraulic Bender
48" Brake
Compressor, Notchers, Grinders, etc.
Spectrum 300 Plasma
Everlast PowerTig 250EX
Everlast PowerCool W300
Harris/Victor OA
Craftsman 13 Speed Drill Press
ProTools Air/Hydraulic Bender
48" Brake
Compressor, Notchers, Grinders, etc.
StephanusThie
- StephanusThie
-
Active Member

-
Posts:
-
Joined:Tue Dec 14, 2010 1:55 am
Hi,
i'm a beginer in tig welding at "trial n error" level.
In your case, maybe the amp you set was too high.
i usually use 3/32 at only 175/180 amps. Wanna higer
Amps than that you should use 1/8 Tungs.
Hope this usefull..
i'm a beginer in tig welding at "trial n error" level.
In your case, maybe the amp you set was too high.
i usually use 3/32 at only 175/180 amps. Wanna higer
Amps than that you should use 1/8 Tungs.
Hope this usefull..
Miller Syncrowave 250 DX
Hypertherm Powermax65
Hypertherm Powermax65
Thanks Stephanus, but 1/8" tungsten didn't solve the problem. (Notice I tried that here a while back, but it didn't help: http://forum.weldingtipsandtricks.com/v ... 1361#p1361)
The problem ended up being (surprise!) overheating my "WP-17" torch's power/argon supply cable. The outer PVC shell of the cable assembly got melted inside, from the braided copper conductor not being thick enough to carry the currents being used without getting too hot for the PVC jacket. When the conductor got too hot it would melt the inside of the PVC jacket, which would offgass contaminated vapors into the argon gas. When this happened, it would contaminate both the workpiece and the hot tungsten itself.
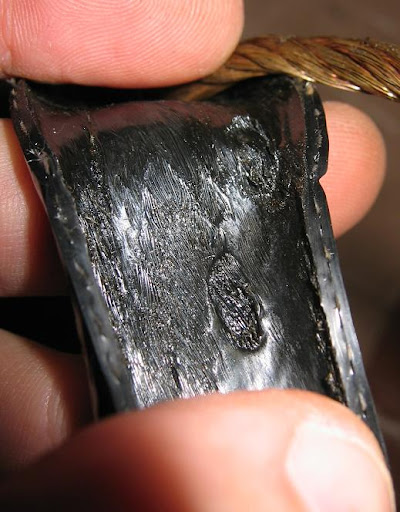
Since they say "seeing is believing", check out the pictures below of the cable autopsy. Externally, the only clues were deformation of the cable in spots, and also some inconsistent feeling "hard" or "thin" spots in the PVC cable jacket. Inside the cut apart cable jacket, you can see the melted inside wall in many spots. In some spots, I had to pull the conductor away from the cable wall with a good bit force, as the conductor had literally welded itself to the inside of the PVC cable jacket in places. If I kept on welding through this cable with high enough welding currents for long enough time, it is likely the hot conductor would have melted completely through the wall of the PVC cable jacket.
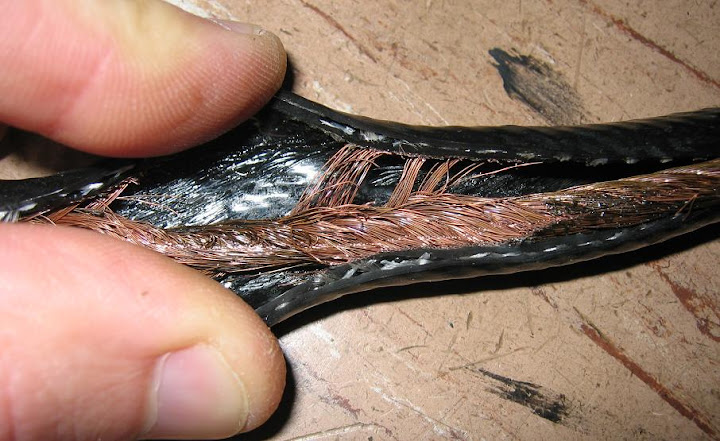

The "fix" here is to use a higher current capacity cable assembly. Such as cable assembly would have either a higher melting temperature jacket material (IE: silicone rubber material rather than PVC) and/or a thicker conductor (giving lower electrical resistance, so it would not heat up as much for a given amount of welding current.) Of course a watercooled cable assembly would also likely be effective in eliminating this problem, as the conductor would typically be immersed in liquid coolant, and the inert gas would travel to the torch through its own, separate hose.
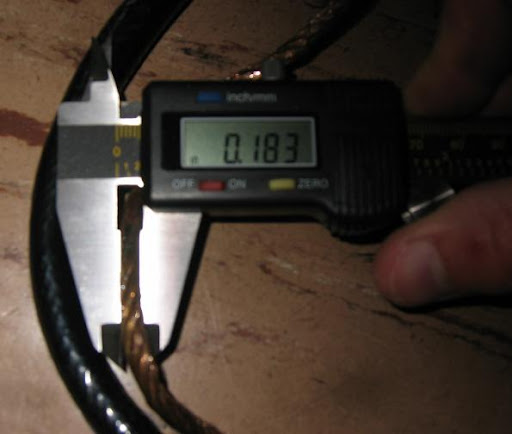
PS - based on the .183" OD of this multi-braided / stranded conductor, I'm guesstimating it to be about 6-8 AWG.
The problem ended up being (surprise!) overheating my "WP-17" torch's power/argon supply cable. The outer PVC shell of the cable assembly got melted inside, from the braided copper conductor not being thick enough to carry the currents being used without getting too hot for the PVC jacket. When the conductor got too hot it would melt the inside of the PVC jacket, which would offgass contaminated vapors into the argon gas. When this happened, it would contaminate both the workpiece and the hot tungsten itself.
Since they say "seeing is believing", check out the pictures below of the cable autopsy. Externally, the only clues were deformation of the cable in spots, and also some inconsistent feeling "hard" or "thin" spots in the PVC cable jacket. Inside the cut apart cable jacket, you can see the melted inside wall in many spots. In some spots, I had to pull the conductor away from the cable wall with a good bit force, as the conductor had literally welded itself to the inside of the PVC cable jacket in places. If I kept on welding through this cable with high enough welding currents for long enough time, it is likely the hot conductor would have melted completely through the wall of the PVC cable jacket.
The "fix" here is to use a higher current capacity cable assembly. Such as cable assembly would have either a higher melting temperature jacket material (IE: silicone rubber material rather than PVC) and/or a thicker conductor (giving lower electrical resistance, so it would not heat up as much for a given amount of welding current.) Of course a watercooled cable assembly would also likely be effective in eliminating this problem, as the conductor would typically be immersed in liquid coolant, and the inert gas would travel to the torch through its own, separate hose.
PS - based on the .183" OD of this multi-braided / stranded conductor, I'm guesstimating it to be about 6-8 AWG.
Jim, was that on a Everlast 18 water cooled torch? The wire is much bigger than any torch leads that I have. I wonder if that's how they compensate for the elevated TiN content in the Copper comming out of China. My Elast 18 also flows a ton of water compared to my WeldTec, Radnor and CK torches. I'm a little concerned that its moving too fast to absorb the heat. We have that problem with some of the Race Outboard motors when we mod the cooling systems.
I kinda look at the Elast torch as a freebie and I ordered a CK350 to replace it. I love my CK 200.
I kinda look at the Elast torch as a freebie and I ordered a CK350 to replace it. I love my CK 200.
Highly skilled at turning expensive pieces of metal into useless but recyclable crap..
This one I dissected is a 3 year old Everlast "WP-17" (aircooled) torch. (Pic attached.) I've heard as a general statement, a watercooled (such as WP-18) torch would typically be designed with a smaller (cheaper, lighter weight, more flexible) conductor than aircooled. Makes sense that the flowing liquid coolant would remove heat more efficiently than inert shielding gas would, so the torch could use a smaller conductor (having higher electrical resistance.)
I'm curious how large conductors inside other TIG torches are? This is the only one I've really seen a close look at inside.
Upon complete dissection of the WP-17 torch cable, one interesting finding was that the entire portion of the cable that was covered by the PVC jacket/sleeve (you can see in the picture) was melted inside. The only unmelted portion of cable was the last few inches near the TIG machine end, which is the portion that was not covered by the PVC jacket. This finding makes me believe that more current&duty cycle could be obtained by simply removing the PVC jacket.
- Attachments
-
- everlast_wp17.JPG (43.95 KiB) Viewed 1980 times
Return to “Tig Welding - Tig Welding Aluminum - Tig Welding Techniques - Aluminum Tig Welding”
Jump to
- Introductions & How to Use the Forum
- ↳ Welcome!
- ↳ Member Introductions
- ↳ How to Use the Forum
- ↳ Moderator Applications
- Welding Discussion
- ↳ Metal Cutting
- ↳ Tig Welding - Tig Welding Aluminum - Tig Welding Techniques - Aluminum Tig Welding
- ↳ Mig and Flux Core - gas metal arc welding & flux cored arc welding
- ↳ Stick Welding/Arc Welding - Shielded Metal Arc Welding
- ↳ Welding Forum General Shop Talk
- ↳ Welding Certification - Stick/Arc Welding, Tig Welding, Mig Welding Certification tests - Welding Tests of all kinds
- ↳ Welding Projects - Welding project Ideas - Welding project plans
- ↳ Product Reviews
- ↳ Fuel Gas Heating
- Welding Tips & Tricks
- ↳ Video Discussion
- ↳ Wish List
- Announcements & Feedback
- ↳ Forum News
- ↳ Suggestions, Feedback and Support
- Welding Marketplace
- ↳ Welding Jobs - Industrial Welding Jobs - Pipe Welding Jobs - Tig Welding Jobs
- ↳ Classifieds - Buy, Sell, Trade Used Welding Equipment
- Welding Resources
- ↳ Tradeshows, Seminars and Events
- ↳ The Welding Library
- ↳ Education Opportunities