
Basically got my notching rig set up and it works nicely. Still working over the bending side of things but I'm in touch with Bend Tech and it sounds promising. So I welded my first frame together this morning and I must say, it was a b&*ch. The handle for the frame is 3/8" stainless rod (solid). The frame itself is 3/8" OD stainless tubing with a 0.035" wall. Welding where the tubing intersects the rod is challenging. With two very dissimilar heat sinks, I'm having some trouble. My first instinct is to direct the heat into the rod and let the molten metal "overlap" onto the tubing (along with a little 0.035" filler rod) and accomplish the weld that way. I would be stating the obvious if I said that fit-up is critical and I'm paying attention to that so that I don't blow too many holes. I'm welding with a Lincoln PT185 so I have no bells and whistles beyond amperage control and pulse (which I tend to not use). I'm looking for any tips and tricks that might make this stainless steel project a little simpler and a little less stressful... Thanks in advance.
PS. Despite everything, once the welds are polished with a fine wire brush, they don't look all that bad. But they could look so much better.
Tig welding tips, questions, equipment, applications, instructions, techniques, tig welding machines, troubleshooting tig welding process

Two thoughts:
1. If the solid rod is the "handle" and you have notched the end to intersect the tubing, then the thickness of that solid bar is very thin at the intersection and should be easier to weld to the tubing. You "might" be using too much amperage if its blowing out on you. Make dead sure the tungsten is pointy-sharp (I like 60*) and hold a tight-tight-tight arc. You could probably get away with no filler on the tacks in 3-4 spots. Then come back and fillet weld with filler.
2. If you are blowing as above and the intersection is as I speculated, then you can actually grind a smaller chamfer into the notch end making a "gap" or bevel in the solid bar where it would meet the tubing. This provides a spot to add filler, more mass to grab some heat, and can aide in getting metal to flow to the tubing. 3/8" is pretty tricky stuff in my experience. Its small enough to be super delicate, but just thick enough to need adequate heat.
But given the above, stainless wets up really well with ample argon coverage, a bit of "pre-flow" and super clean material (filler too!). Blast tack it, let it cool a bit, then weld it out. Brush with a stainless wire brush promptly after welding to remove the color. If appearance matters, let it completely cool, then set up pulse, no filler, and run the torch methodically over the weld and make it pretty.
cj - Again, thanks for the advice. To clarify, the tubing butts into the solid handle and the tubing is "notched" to fit as tight as I can get it. If you're familiar with a C-stand (film industry tool) you'll get the picture. The solid "handle" is essentially a piece of rod sticking out from the frame to be held in a circular "clamp". Either way, your direction to "blast" tack it and then weld it up works great. I've learned in the years I've been doing this to not hesitate but just jump on that pedal, give the work a short, sharp application of heat and then back off. Playing around to see what might happen doesn't work.
Btw, check here to see what these frames look like (the top picture): https://modernstudio.com/products/modul ... flag-frame
You also answered my next question which was in regards sharpness of tungsten. I'll go ahead and make it into a pencil and I'm sure that will help. Tight, tight, tight arc is spot-on, too. I just wish my vision were a little better. I'm already getting super-close to the piece to see what's happening and sometimes having trouble seeing what's going on. Maybe some external light would help in addition to the light the arc is providing?
I must say that I hadn't thought of a final pulsed pass to even things out. Looks is important to me and I'm careful to make my products as clean as possible but I have never tried pulsing to get it looking perfect.
You're right, 3/8" is tough but I have to crank these items out and essentially "sell" them to my lighting guys so everything you've laid out is appreciated.
THKS!
remember that the notch needs its ends ground so the weld joint is a fillet joint all the way around.
pulse, use it if you have it. highest pulse rate you have.
i would mount the solid rod vertical, let gravity help. weld more on the solid side. turn the frame around so solid is always on the high side.
the trick i've done is to use the filler more like lay wire crossed with brazing. i typically use thicker filler because thats all i have. use the filler as a heat sink, weld onto the filler and wash it it into the joint.
tungeten as mentioned above. a hair strand gap for arc length, which is very hard to maintain on a curve. so tend to use it just for tacks so i can get tiny tiny tacks.
the other option here is to braze or silver solder them depending on strength and looks requirements.
tweak it until it breaks
Jody sells Furick clear cups (#12 would be my choice for stainless) and the extra light might really help you get when using a clear cup. CFH up to 30 with a #12.
Be sure to clean inside the tubing before welding it. And if the tube will be “closed” from the weld, you want a vent hole somewhere while you weld up the notched end.
Tweake and I differ on pulse rates. I use almost exclusively 50% on time, 25% background, 1.2 pps. I like the almost metronomic pulse rate when not using filler. I find the 50/25 ratio freezes fast and keeps enough heat that I don’t have to loiter. Your mileage may vary.
good idea with the clear cups. tho an #8 might be better for such tiny welds, even then its probably overkill.cj737 wrote: ↑Wed Jun 05, 2024 8:07 pm Jody sells Furick clear cups (#12 would be my choice for stainless) and the extra light might really help you get when using a clear cup. CFH up to 30 with a #12.
Be sure to clean inside the tubing before welding it. And if the tube will be “closed” from the weld, you want a vent hole somewhere while you weld up the notched end.
Tweake and I differ on pulse rates. I use almost exclusively 50% on time, 25% background, 1.2 pps. I like the almost metronomic pulse rate when not using filler. I find the 50/25 ratio freezes fast and keeps enough heat that I don’t have to loiter. Your mileage may vary.
i use slow pulse on thicker tubing, typically 1/16" wall sanitary tube. but i also use high pulse rates at times as it helps keep the weld small, more focused, less penetration (less blow through). it also requires more amps which is really handy on machines that do not do low amps well, especially with foot pedal.
tweak it until it breaks
The pulse rate being faster or slower really isn’t the variable controlling the heat. That is effected by the time and background percentage. Just making the distinction for clarity.
if your not changing % time then pulse rate is the variable and the heat does change with changing pulse rate. jody has recently done a video that actually shows the amperage difference changing the pulse rate does.
the on time and background time is a percentage of the pulse time. how long that pulse is depends on pulse rate.
1 pps with 50% on time means its on full for 0.5 seconds (for a 1 sec weld).
2 pps with 25% on time means its on full for 0.5 seconds.
sounds like its the same but however that not correct because the 2 pps are not joined together. they have separation. it has time to cool between pulses, then reheat the puddle again. two small pulses is not the same as one big one.
tweak it until it breaks
cj737 and tweake, some really good advice here. Thanks very much. I hadn't considered using thicker filler as a laywire technique. I'll give it a shot. I do have plenty of 1/16" 304 rod.
When you say that the notches need their ends ground to ensure a fillet weld all the way around, can you clarify? I assume you're talking about the long ends and ground down so that they're flat?
I am using a clear #8 now - it makes a difference.
And the concept of keeping the rod vertical is something I should have thought of myself.
Vent holes? Ah, so that's why the tubing spat molten stainless at me... Yes, remembered the vent holes a little too late.
On my PT185 machine, the only pulse control I have is 50/50, meaning, speed. I don't have an option to control background percentages. But I'll play around with it until I get something that works. Logically it should help.
Gentlemen, thanks again!
https://youtu.be/8IyHbwPDbyA?t=328
i think justin explains it well enough. especially the end pic.
i'll add that the really thin part of that tail becomes problematic when welding to solid rod. you often just blow it away and make a mess. so we grind it back so it makes a fillet joint.
i'll see if i can't find a better pic.
tweak it until it breaks
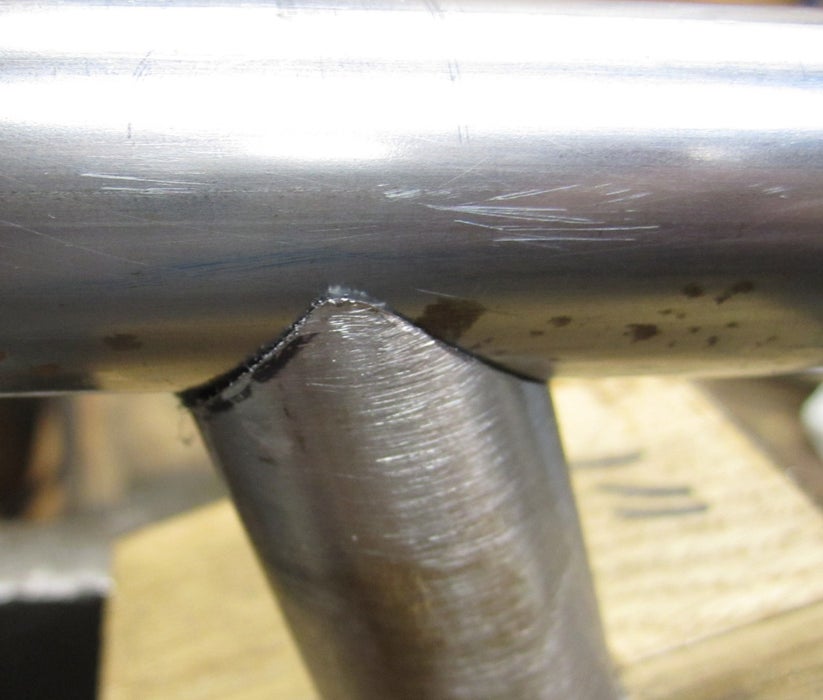
good pic of it done badly. you can see that really thin bit. looks good when its not welded, but it makes it hard to weld. basically grind that part so it has a 90 degree fillet joint around it.
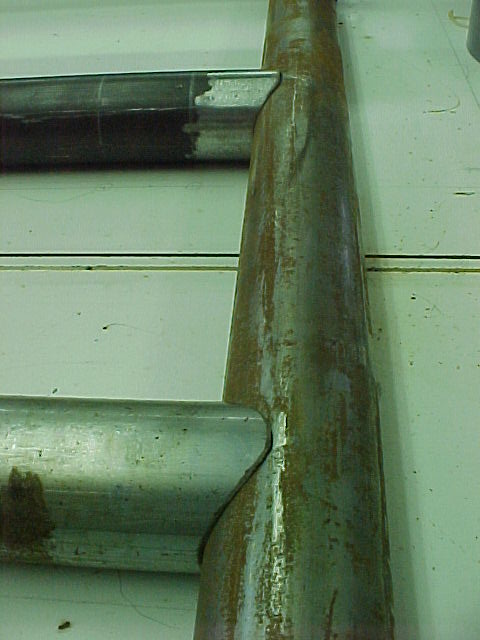

thats more like it.
tweak it until it breaks
Return to “Tig Welding - Tig Welding Aluminum - Tig Welding Techniques - Aluminum Tig Welding”
Jump to
- Introductions & How to Use the Forum
- ↳ Welcome!
- ↳ Member Introductions
- ↳ How to Use the Forum
- ↳ Moderator Applications
- Welding Discussion
- ↳ Metal Cutting
- ↳ Tig Welding - Tig Welding Aluminum - Tig Welding Techniques - Aluminum Tig Welding
- ↳ Mig and Flux Core - gas metal arc welding & flux cored arc welding
- ↳ Stick Welding/Arc Welding - Shielded Metal Arc Welding
- ↳ Welding Forum General Shop Talk
- ↳ Welding Certification - Stick/Arc Welding, Tig Welding, Mig Welding Certification tests - Welding Tests of all kinds
- ↳ Welding Projects - Welding project Ideas - Welding project plans
- ↳ Product Reviews
- ↳ Fuel Gas Heating
- Welding Tips & Tricks
- ↳ Video Discussion
- ↳ Wish List
- Announcements & Feedback
- ↳ Forum News
- ↳ Suggestions, Feedback and Support
- Welding Marketplace
- ↳ Welding Jobs - Industrial Welding Jobs - Pipe Welding Jobs - Tig Welding Jobs
- ↳ Classifieds - Buy, Sell, Trade Used Welding Equipment
- Welding Resources
- ↳ Tradeshows, Seminars and Events
- ↳ The Welding Library
- ↳ Education Opportunities