Tig welding tips, questions, equipment, applications, instructions, techniques, tig welding machines, troubleshooting tig welding process
highdezman
- highdezman
-
New Member

-
Posts:
-
Joined:Fri Jan 15, 2010 1:28 am
Im new to tig welding and im getting decent welds on thin aluminum but im struggling with 1/4 aluminum inside corner joint, My question is do i try to get as close as i possibly can to the crack and tack there and then back the tungsten out a little as i start my way along the seam? Im using a lincoln precision tig 225, 1/8 thoriated around 170 amps A/C , Set on auto cleaning thanks, Brian. oh yeah i seem to have the torch angle almost near 5deg and using 1/8 filler 4043 and using #7 cup around 15cfm

highdezman
- highdezman
-
New Member
-
Posts:
-
Joined:Fri Jan 15, 2010 1:28 am
Thanks I am using a pedal and ill give your suggestion a try and post some pics as well. Im riding tomorrow and after that im working on trying to video my welding so ill let you know. thanks again oh yeah do you think 1/8 in filler is too large?
@ 170 amps, 1/8 filler should be right. My notes show gas flow for 1/4 material at 10+ litres per minute and I thought I understood the conversion to cfm, but I'm not so sure now...??
Did a conversion on one of the sites....15cfm = 424litres per min!!?
Are you sure it's not cubic ft. an hour?
Jeff
Did a conversion on one of the sites....15cfm = 424litres per min!!?
Are you sure it's not cubic ft. an hour?
Jeff
highdezman
- highdezman
-
New Member
-
Posts:
-
Joined:Fri Jan 15, 2010 1:28 am
you maybe right the flow guage shows 15 and i thought that to be CFM but CFH sounds about right, im finding that it seems easier to start the bead with 3/32 filler though hum, im going to try and video tonight and will post a link later so you guys can see and possibly give some more pointers 
highdezman
- highdezman
-
New Member
-
Posts:
-
Joined:Fri Jan 15, 2010 1:28 am
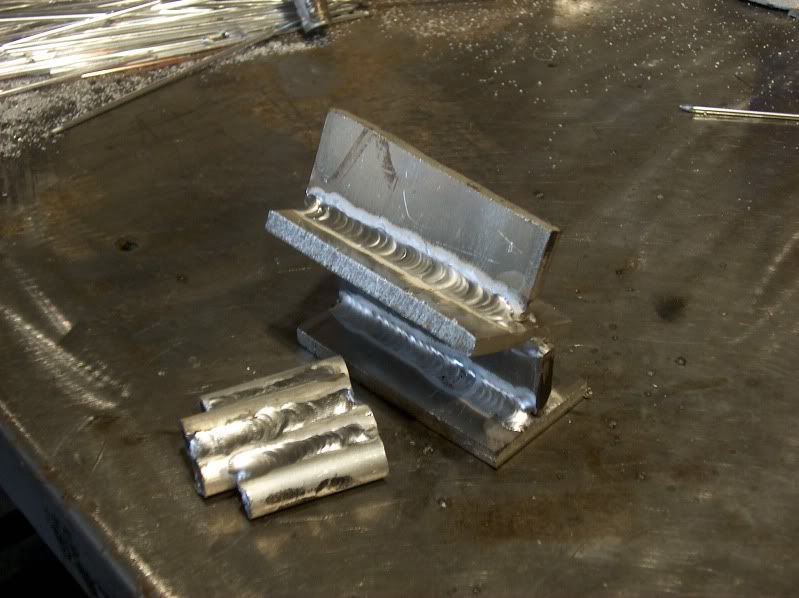
some are ok

some are not, im very new to tig welding and 1/4 inch Alum is my biggest problem so far
billsouzas
- billsouzas
-
New Member
-
Posts:
-
Joined:Wed Feb 24, 2010 8:41 am
i want to ask someone if the bottle with argon it have to be smaller or bigger to have good weld.
I am saying this because when i had small bottle of gas the weld was easier than to use the bigger, maybe i am wrong?
Please help me to have good weld.
I am saying this because when i had small bottle of gas the weld was easier than to use the bigger, maybe i am wrong?
Please help me to have good weld.
highdezman
- highdezman
-
New Member
-
Posts:
-
Joined:Fri Jan 15, 2010 1:28 am
I would not believe size in this casebillsouzas wrote:i want to ask someone if the bottle with argon it have to be smaller or bigger to have good weld.
I am saying this because when i had small bottle of gas the weld was easier than to use the bigger, maybe i am wrong?
Please help me to have good weld.
by the pic your weld starts off kinda rough and ends smother, other wise your material is too cold and by time time you reach the end you have reach the proper welding temperature, pre heat your material with your torch a little longer before you add any rod, GOOD LUCK !
Trackmaster welder
- Trackmaster welder
-
Active Member

-
Posts:
-
Joined:Wed Jul 07, 2010 10:26 pm
Uh your doing fine buddy, just takes practice my friend! On 1/4 material and up pre-heating will help you find a consistant pedal point right off the bat, but thanx to the thermal conductivity of aluminum you can start your arc, bring in a little heat and somewhat slowly move the torch along the seam area, preheating it a bit as well as cleaning some oxides off. Unless it's critical i'm often to lazy to pre-heat and this will work pretty well. Just remember as was said, that as you progress along an aluminum weld you have to kind of be aware of you overall footprint of the weld puddle. otherwise the bead wil get wider and wider. just takes practice on seeing when to just ever so slightly back off on the pedal as you move along the seam.
NO a bigger tank will make no difference, thats what the regulator is for ... to deliver constant pressure until it runs out of gas. With a conventional Tig machine (transformer based) you are stuck with 60 htz A/C frequency, that produces by it's nature a fairly broad arc cone. On a fillet weld you'll notice when you start the arc that it doesn't quite know which piece of the fillet it wants to arc to and kind of dances about causing some instability. The only thing to to is hit the "gas pedal" ie throw some heat to it and get going the arc will broaden out and stabilize. You then just kind of favor a spot or track and then it's just technique where and when you add rod, ie top of the puddle or bottom, and are you looking for a "stack of dimes" look or not. All of that is just perfecting your travel speed, increments, and rod feeds.
At 1/4 inch material personally i would still go with a 3/32 electrode, pure works fine for me on those type machines. It will give you a little more focus to the weld seam and a smaller bead width. Remember that while a 3/32 filler rod may be easier for you, it is essential to learn how to effectively feed, or push filler rod with that hand. It is a two finger and thumb kind of push me pull you affair, and the smaller the aluminum filler the better you need to be able to go from a dab, dab, technique to a constant feed, ...... still timing rod adds of course as desired. At the start of your weld get some wet in and then get some rod in there so you dont notch away the beggining of the fillet. At the end is a bit of "flair" or artwork as you back off the pedal add enough to end with a consistant build up, continue to back off the pedal slowly and swirl the torch staying within the foot print of the bead as you go to zero, arc out, to prevent cratering.
Guess that's all I got my friend, ...... your lookin good, just keep at it looking for "machine like" cosistancy! - Lou
Trackmaster welder
- Trackmaster welder
-
Active Member
-
Posts:
-
Joined:Wed Jul 07, 2010 10:26 pm
Oh yeah also meant to mention that it may help to go to manual balance and dial it to as much electrode negative you can get away with. A fillet weld by nature can be difficult to get consistant penetration, and more EN will help, as well as focusing the arc ..... less jumping from the vertical face to the horizontal and a tighter narrower heat affected zone which is always preferable
To go from Liters to CFM use about 50% ..... ie 7-8 lpm, to get about 15-17 cfm, and visa versa. Close enough for most anything. Also can't remember if your using one, but a gas lens produces superior shielding and allows greater tungsten stick out, which can help with fillet welds. I like to use nearly vertical torch on aluminum ( no tilt ) but can make for some serious head tilting, unless you use a bit more stick out.
To go from Liters to CFM use about 50% ..... ie 7-8 lpm, to get about 15-17 cfm, and visa versa. Close enough for most anything. Also can't remember if your using one, but a gas lens produces superior shielding and allows greater tungsten stick out, which can help with fillet welds. I like to use nearly vertical torch on aluminum ( no tilt ) but can make for some serious head tilting, unless you use a bit more stick out.
highdezman
- highdezman
-
New Member
-
Posts:
-
Joined:Fri Jan 15, 2010 1:28 am
wow great stuff there thank you so much that was exactly what i was looking for and i will fire the machine up this week and give it another try and post some pics, Ive been doing ok for the most part and have actually made some money on a few small aluminum jobs  Thansk again, Brian
On a weld like that what I usually do is put a small tack weld about 3/4" from the ends to hold into place , I know that is common knowledge but I do the first tack on the far end then do the tack on the end that I will be starting then after that tack just go right to welding , that way the heat is there in the metal (almost but up anyway) then you can get a clean start without blowing out the end of the metal. That has helped me. Also on .250 aluminum get real used to feeding quite a bit of filler rod at a time so you can get the weld puddle up to the .250 edge or bead height that is needed for the proper penetration and strength..
Hope that helps but practice is the main key and also get the heat up to start you puddle fast then back down fast to stop the edge from blowing off.
Gaary
Hope that helps but practice is the main key and also get the heat up to start you puddle fast then back down fast to stop the edge from blowing off.
Gaary
Everlast 250EX Tig
Everlast torch cooler
Everlast 50P Plasma Cutter
Home Built 2 x 4 CNC Router table
Shoptask Bridgemill with CNC added
Central Tools 7" Bandsaw
Everlast torch cooler
Everlast 50P Plasma Cutter
Home Built 2 x 4 CNC Router table
Shoptask Bridgemill with CNC added
Central Tools 7" Bandsaw
highdezman
- highdezman
-
New Member
-
Posts:
-
Joined:Fri Jan 15, 2010 1:28 am
Return to “Tig Welding - Tig Welding Aluminum - Tig Welding Techniques - Aluminum Tig Welding”
Jump to
- Introductions & How to Use the Forum
- ↳ Welcome!
- ↳ Member Introductions
- ↳ How to Use the Forum
- ↳ Moderator Applications
- Welding Discussion
- ↳ Metal Cutting
- ↳ Tig Welding - Tig Welding Aluminum - Tig Welding Techniques - Aluminum Tig Welding
- ↳ Mig and Flux Core - gas metal arc welding & flux cored arc welding
- ↳ Stick Welding/Arc Welding - Shielded Metal Arc Welding
- ↳ Welding Forum General Shop Talk
- ↳ Welding Certification - Stick/Arc Welding, Tig Welding, Mig Welding Certification tests - Welding Tests of all kinds
- ↳ Welding Projects - Welding project Ideas - Welding project plans
- ↳ Product Reviews
- ↳ Fuel Gas Heating
- Welding Tips & Tricks
- ↳ Video Discussion
- ↳ Wish List
- Announcements & Feedback
- ↳ Forum News
- ↳ Suggestions, Feedback and Support
- Welding Marketplace
- ↳ Welding Jobs - Industrial Welding Jobs - Pipe Welding Jobs - Tig Welding Jobs
- ↳ Classifieds - Buy, Sell, Trade Used Welding Equipment
- Welding Resources
- ↳ Tradeshows, Seminars and Events
- ↳ The Welding Library
- ↳ Education Opportunities