
I fortunately practiced this, and gave myself a C-. half good, half blow through. At least I didn't ruin the project.
For an engine stand, I've got a little table I welded up of 1" sqare steel tubing, 1/16" tube wall. I'm now ready to weld the bottom of the table legs to 1/8" angle iron pads that hang over the main engine frame.
The welds are fillet, square tube sitting on a flat side of the angle iron. I set my TIG EN at about 75 amps, 3/32 tungsten (maybe should use 1/16"). I've tried both 3/32" and 1/16" filler, have aimed about 45-60 degrees at intersection, concentrating on heavy plate, but then doesn't bond to 1/16" tube. If I'm not careful, easy burn through on 1/16" tube - have done it on practice welds. Weaving seems to help. Not sure if I should use less heat and go slower, or more heat and go faster.
I would appreciate any help I can get.
Thanks,
Jeff
Tig welding tips, questions, equipment, applications, instructions, techniques, tig welding machines, troubleshooting tig welding process

- AKweldshop
-
Weldmonger

-
Posts:
-
Joined:Wed Oct 23, 2013 3:30 pm
-
Location:Palmer AK
For your application, Jeff, Tig is a poor choice....
Mig would be a way better choice, for welding this kind of stuff.
But, since you don't have access to a Mig, I would, hold a tight arc and put the filler on the thin stuff.
But, before I steer you in the wrong direction, lets clarify.
You've got 1 inch 16ga wall tube coming straight down onto a piece of 1/8 plate?
A picture might help.
John
Just a couple welders and a couple of big hammers and torches.
Men in dirty jeans built this country, while men in clean suits have destroyed it.
Trump/Carson 2016-2024
Men in dirty jeans built this country, while men in clean suits have destroyed it.
Trump/Carson 2016-2024
The small table will hold the battery over the transmission on the engine stand. Each of the table's four legs will be welded to a short angle iron on the bottom. These angle irons will in turn rest on the longitudinal engine stand frame rails, with the other vertical side of the angle iron over the side of the engine frame rail to restrict movement.
Each leg is about 13" long of 1" square steel tubing, and have a wall thickness of 1/16". The angle iron bases are about 1.5 inches long and are 1.5 x 1.5 x 1/8".
Hope this helps. I can't figure out how to insert a picture; will work on.
Thanks for response.
Jeff
Each leg is about 13" long of 1" square steel tubing, and have a wall thickness of 1/16". The angle iron bases are about 1.5 inches long and are 1.5 x 1.5 x 1/8".
Hope this helps. I can't figure out how to insert a picture; will work on.
Thanks for response.
Jeff
- AKweldshop
-
Weldmonger
-
Posts:
-
Joined:Wed Oct 23, 2013 3:30 pm
-
Location:Palmer AK
for welding thin stuff, you should always keep that filler under the arc, put that filler right on the thinner stuff....
Just my humble opinion....
I haven't got a lot of tig experience on stuff like this.... Otto, I'm sure will have some good tips on this application.....
John
ps, is your metal nice and shiny?
Just my humble opinion....
I haven't got a lot of tig experience on stuff like this.... Otto, I'm sure will have some good tips on this application.....
John
ps, is your metal nice and shiny?
Just a couple welders and a couple of big hammers and torches.
Men in dirty jeans built this country, while men in clean suits have destroyed it.
Trump/Carson 2016-2024
Men in dirty jeans built this country, while men in clean suits have destroyed it.
Trump/Carson 2016-2024


Cool video... http://www.youtube.com/watch?v=gMlwyqUgJj0
Part of the fun of welding steel with gas, is you can see the color temperature of the metal as it heats up.
With TIG, the helmet eye shade is a bit too dark to see those nice color tones that cue you to what is going on.
I own a MultiPlaz welder that uses water as a fuel. I often use it instead of oxy/acetylene when welding mild steel.
Antorcha wrote:This is exactly where a torch, a #1 tip and some RG45 reigns king.Nice and slow.

This type of weld requires a little bit of puddle control and a steady hand on the torch. Direct the arc on to the 1/8" material and create your puddle there, then try to wash it into the thinner material. This may work without adding filler depending on how lucky you are. If filler is required, add it to the thicker material, then wash the puddle over. With a little practice you'll get it down and have a nice looking weld.
Also you may try changing the position of your materials. I bet you have the thin material vertical in the fillet position. Try to reposition it to horizontal. Now you are less likely to blast it with heat.
If need be and your machine has AC that you can adjust the frequency on, try a 120 to 200 hz arc. That will narrow the arc substantially. You don't allows have to use DC when welding steel.
If none of these methods work for you try getting some thicker material.
Everlast PowerTig 250EX, PowerTig 185 Micro, PowerArc 160STH, Miller Trailblazer 301G, Millermatic 140 Auto-Set

.05 angle to .25 flat bar. It's very doable. Not my best but I'm still trying to get used to the foot pedal. Was a bit rought at first but I just throttled up and everything started fusing together nicely. The filler wire is your best friend as you can use it to rob a bit of heat from the puddle as well as add metal. 3/32 2% lanth tungsten, 1/16 70s2 filler. Machine was set at 130. Most of the arc was focused toward the flat bar and I just weaved over to the angle, dabbed some filler and moved back to the bar.
Nick
First off, thanks for all the input - very helpful. I've done about 5 test runs, getting better. My first trials were a mistake. I just used a short (1" long) 1" square tube - too frugal, no where for heat to go, melted through easily, not a good practice. Now using foot long square tube, held in position by 2" square tube, 3/16" wall, clamped close to weld area. This heat sink really sucks heat out of the weld area on thin wall tube - big difference. I just cut off test section, do another.
I switched to 1/16" tungsten, sharper point, keep eyes closer. I sure agree about visibility re oxy work. With only 92 amps, I turned down auto dark to 9 to see better, and have jammed myself close to weld to see puddle very close - too close, burned tip of filler glove finger - ouch.
But, being close, got much steadier with these older hands. Set at 92 amps, lower lousy, but much better puddle at this setting. May try higher amps. I also make sure I stop if I feel I'm getting too hot rather than trying to push through to end - with bad results. I have been keeping filler closer to thin section, but working arc more toward thicker, and moving in circular motion to wash puddle onto thin part. Circular works better for me.
My TIG only has one frequency, but I may try AC to see how it works. I can see value of inserting a picture/image - will have to pursue, as it makes explanations much simpler.
I think I'm OK now, so thanks again.
Jeff
George is good. All of this reminds me of bong hits, coat hangers and a set of headers for a 289 going into a Ford pinto.WerkSpace wrote:Cool video... http://www.youtube.com/watch?v=gMlwyqUgJj0
Part of the fun of welding steel with gas, is you can see the color temperature of the metal as it heats up.
With TIG, the helmet eye shade is a bit too dark to see those nice color tones that cue you to what is going on.
I own a MultiPlaz welder that uses water as a fuel. I often use it instead of oxy/acetylene when welding mild steel.Antorcha wrote:This is exactly where a torch, a #1 tip and some RG45 reigns king.Nice and slow.
I have 5 lbs of 3/32 and 5 of 1/8 on the shelf right now. Beside my brazing and silver collection.
I'm off to resaerch MultiPlaz.
NOT This one : Although...it shows the superiority of the so-called Third World to the chaos to the north.
http://www.youtube.com/watch?v=s8dxCMg_WJI
CLOSURE: Well, I finished this job, looks alright. Sorry I can't show pictures, still don't know how. A couple added items made it much easier, for me. I did clamp a heavy piece just above the weld area to help soak up the heat on the thin square tubing. Second, my Lincoln TIG precision 235 has pulse control. I set it at 1 pulse per second. I'd start weld with three pulses, pedal-to-the-metal, no filler, to warm up area. Then I moved across piece, dipping filler into puddle at each hot point of pulse (also increased to 105 amps, so my welder stepped between 105 amps and half of that). Worked great on the 16 short welds. If I thought I was getting too hot, I just stopped for half a minute. Thanks again for all your help. Onward. Jeff
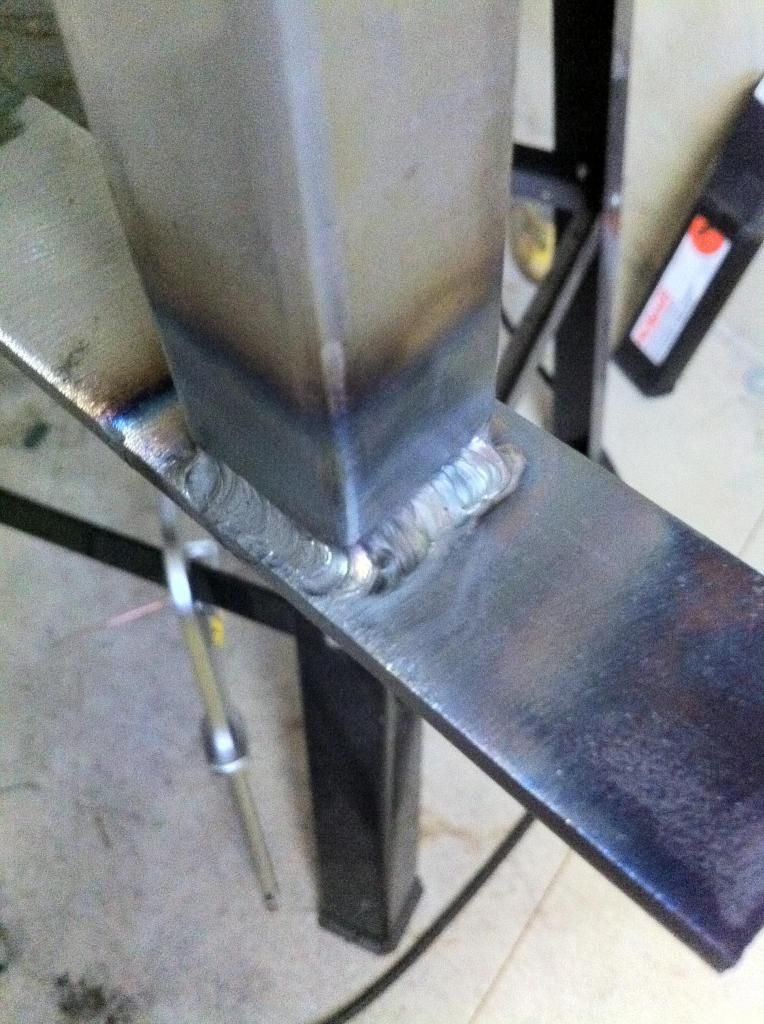
Hi. I wanted one last post, as I now can attach pictures. Here's one of the welds of the 1/16" inch wall square tube to the angle iron (1/8").
These angle irons are the base of the table and stand for the battery and control panel, shown here, almost done.
Finally, here's the engine with the stand I've built. The table above will go on top of the transmission, with legs resting on engine stand side rails. Thanks for all the help. Jeff
- Battery table and control panel stand A 001.jpg (33.65 KiB) Viewed 3492 times
- Battery table and control panel stand B 002.jpg (90.3 KiB) Viewed 3492 times
- BBC-w-Rad-and-Shift-Linkage.jpg (63.27 KiB) Viewed 3492 times
- AKweldshop
-
Weldmonger
-
Posts:
-
Joined:Wed Oct 23, 2013 3:30 pm
-
Location:Palmer AK
Hey Jeff,
I'm sure now you realize how pictures clear up so much misunderstanding and confusion
Those are some welds that will do the job....
I'm sure some of you guys will disagree with me, but, I would've use Mig
It would save time on jobs like these.
We live and learn, sometimes at our own expense
John
I'm sure now you realize how pictures clear up so much misunderstanding and confusion
Those are some welds that will do the job....
I'm sure some of you guys will disagree with me, but, I would've use Mig
It would save time on jobs like these.
We live and learn, sometimes at our own expense
John
Just a couple welders and a couple of big hammers and torches.
Men in dirty jeans built this country, while men in clean suits have destroyed it.
Trump/Carson 2016-2024
Men in dirty jeans built this country, while men in clean suits have destroyed it.
Trump/Carson 2016-2024
- AKweldshop
-
Weldmonger
-
Posts:
-
Joined:Wed Oct 23, 2013 3:30 pm
-
Location:Palmer AK
Jeff,
Are you sure that tubing is only 16 gauge/1/16th wall thickness???
John
Are you sure that tubing is only 16 gauge/1/16th wall thickness???
John
Just a couple welders and a couple of big hammers and torches.
Men in dirty jeans built this country, while men in clean suits have destroyed it.
Trump/Carson 2016-2024
Men in dirty jeans built this country, while men in clean suits have destroyed it.
Trump/Carson 2016-2024

- Otto Nobedder
-
Weldmonger
-
Posts:
-
Joined:Thu Jan 06, 2011 11:40 pm
-
Location:Near New Orleans
I, too, would have MIGged it, but sometimes a process is chosen just to get practice in that process, rather than to get it done quickly, and I suspect that's the case here.
As for the welds, they look solid, good pentration. They're about as strong as they can be, and stronger than the square tube at any rate. Further practice will improve the cosmetics, which becomes important when you sell your welds... The customer usually doesn't know anything about welding, and can't see "strong" vs. "weak", so they look for "pretty" and associate that with "good".
BTW, with the HAZ on the tube versus that on the angle, I can believe that's 16 ga.
Steve S
Thanks for the comments. I had some trepedation about showing my welds, but oh well. I'd someday like to try MIG, but as a retired guy, it won't be mine. It may have been better, but from my Oxyacetylene welding when I first started years ago, I came to really enjoy that method of melt, dip, move forward, dip, and that's why I picked a TIG machine as one of my retirement rewards. I really enjoy it. As a retired engineer I spend more than enough time on technical issues, but truly consider welding an art, true artisans. Came to appreciate that as an engineer in the refinery industry. I remember watching welders on a deck 150' up, laying mulit-layered beads on the top cap of a pressure vessel, 100 % X-Ray'd. Beautiful beads, very critical, wish the world at large could appreciate it. Those guys were exceptional, and I knew it.
Back to the science. I appreciate one of you saying politely that the welds were stronger than the square tube, which is truly 1/16" wall. I think what you were saying was the bead's bigger than needed. Agree, but I'd need hours to get it better and get good penetration, not undercut - at least for me. I just shoved in the filler on the pulse, kept from burning through the thin stuff, but with bigger beads. About cosmetics, that 1 pulse per second I used worked for these hands, but tends to make big puddles. I will try quicker/no pulsing in future.
About the stacked-dime ripples. I try to do that, but truth is it seems to me better to have a smooth, no ripple weld. Penetration is of course key, and maybe you folks could tell me why the stacked dime ripples are better structurally. As an engineer, sharp edges and very small radiuses that dime stacking can create if too exaggerated are stress raisers, by factors of 2-5 and upwards, depending on sharpness of edge. I saw a guy demonstrate that at a hot rod show. Edges were much worse, very pronounced. I'm guessing, but believe his dime stacking would have been smoother, curved if he'd used more heat. I think he had `cold' welds. I kept my mouth shut. They were beautious though. On vibrating parts under dynamic loads that is important. If my memory serves, MIG doesn't create ripples, but is a smooth weld, as wire feed is constant. I think that is a plus.
Thanks for feed back. Onward. Jeff
- Otto Nobedder
-
Weldmonger
-
Posts:
-
Joined:Thu Jan 06, 2011 11:40 pm
-
Location:Near New Orleans
Jeff,
When I commented on the welds being stronger than the square tube, I didn't mean to imply they were "too big". From an engineering standpoint, sure, they were larger than needed, but from a practical standpoint, they're just fine. Putting down "just enough" can actually be more time consuming, and erring on the wrong side can induce weak spots.
I wasn't trying to "down" the appearance, either, though it may have sounded that way. I meant to say I felt them to be sound, quality welds, which a "customer" with no knowledge of welding might misjudge for purely cosmetic reasons.
As to "stacked dimes", that's merely an indicator/side effect of a consistent technique, and done properly, each ripple is rounded with no sharp points, or peaks and valleys into the parent metal creating stress risers. The step-size between the ripples should be small enough to be difficult to gauge without specialized tools. I cringe when I see stacked dimes in MIG welding, though... It may be attractive, but I'm unconvinced the technique that produces it makes a weld of equal strength to a "proper" nearly smooth bead.
Steve S
Return to “Tig Welding - Tig Welding Aluminum - Tig Welding Techniques - Aluminum Tig Welding”
Jump to
- Introductions & How to Use the Forum
- ↳ Welcome!
- ↳ Member Introductions
- ↳ How to Use the Forum
- ↳ Moderator Applications
- Welding Discussion
- ↳ Metal Cutting
- ↳ Tig Welding - Tig Welding Aluminum - Tig Welding Techniques - Aluminum Tig Welding
- ↳ Mig and Flux Core - gas metal arc welding & flux cored arc welding
- ↳ Stick Welding/Arc Welding - Shielded Metal Arc Welding
- ↳ Welding Forum General Shop Talk
- ↳ Welding Certification - Stick/Arc Welding, Tig Welding, Mig Welding Certification tests - Welding Tests of all kinds
- ↳ Welding Projects - Welding project Ideas - Welding project plans
- ↳ Product Reviews
- ↳ Fuel Gas Heating
- Welding Tips & Tricks
- ↳ Video Discussion
- ↳ Wish List
- Announcements & Feedback
- ↳ Forum News
- ↳ Suggestions, Feedback and Support
- Welding Marketplace
- ↳ Welding Jobs - Industrial Welding Jobs - Pipe Welding Jobs - Tig Welding Jobs
- ↳ Classifieds - Buy, Sell, Trade Used Welding Equipment
- Welding Resources
- ↳ Tradeshows, Seminars and Events
- ↳ The Welding Library
- ↳ Education Opportunities