Tig welding tips, questions, equipment, applications, instructions, techniques, tig welding machines, troubleshooting tig welding process
danielbuck
  • Posts:
  • Joined:
    Tue Jan 21, 2014 7:56 pm
  • Location:
    Gilroy, CA

I'm a total newbie to TIG welding, just did my first set of practice runs today. I think I'm going to enjoy the slower pace of welding, compared to MIG. I'm just a hobbyist at home, making future and general fabrication for my jeeps.

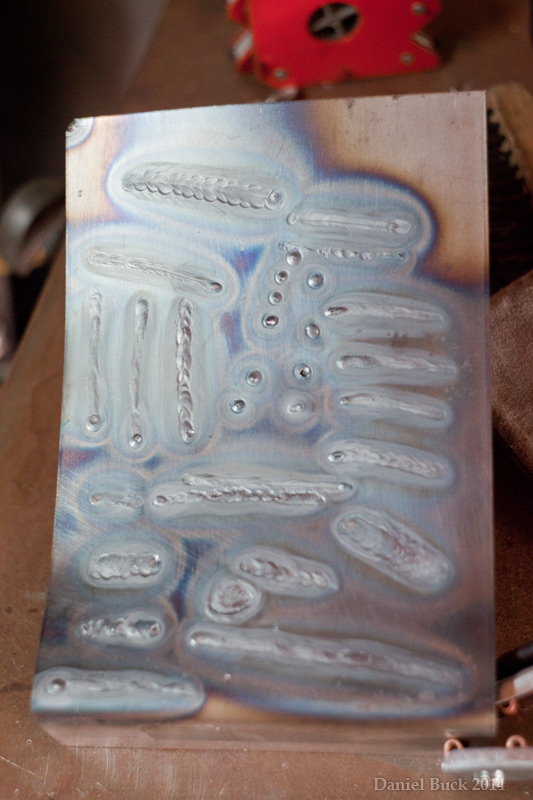
My practice scrap steel here is 1/16th" thick (I think), I had the amps set to a maximum of about 85 or so (keeping the pedal 3/4-full most of the time), 1/16" tungsten 2% lanthanated, and argon at almost 15cfh.

I'm still getting used to moving the torch, holding it differently, trying different movements with the gun, distance from the metal and so on. Also trying things that I know probably won't work well, to see what they look and feel like. I'll do this a good bit more, then next I'd like to try and work on making lots of runs and keeping them consistent.

Does the under cut here suggest I should be doing something different? Or is this normal when not using any filler rod? I've proped the sheet meal up off of my welding table, so that the heat stays on the sheet metal. I figure this is probably a more accurate test method than laying it flat down on the welding table? I'm not going to start using filler rod until I'm more comfortable with the torch.


Image


Thanks for any input! 8-)
User avatar
  • Posts:
  • Joined:
    Thu Jan 06, 2011 11:40 pm
  • Location:
    Near New Orleans

The undercut is completely normal welding on plate with no filler...

In any position, just "running a bead" with no filler on flat plate will do this.

Welcome to the show...

Steve S
danielbuck
  • Posts:
  • Joined:
    Tue Jan 21, 2014 7:56 pm
  • Location:
    Gilroy, CA

Otto Nobedder wrote:The undercut is completely normal welding on plate with no filler...

In any position, just "running a bead" with no filler on flat plate will do this.

Welcome to the show...

Steve S

Ah, thanks Steve! Glad to hear this.

I'll concentrate on making consistent lines, and keeping the tungsten real close to the metal. I have a feeling I'm going to need a larger bottle of argon :lol:
danielbuck
  • Posts:
  • Joined:
    Tue Jan 21, 2014 7:56 pm
  • Location:
    Gilroy, CA

So assuming you don't dip the tungsten into the puddle, how often do yall sharpen the tungsten? mine isn't as sharp as it was when I started welding today, but I don't notice any difference in the arc (or at least, I'm not familiar enough to notice a subtle change anyway :lol: )

How rounded to you let the tungsten get before you re-sharpen it?
User avatar
  • Posts:
  • Joined:
    Thu Jan 06, 2011 11:40 pm
  • Location:
    Near New Orleans

If you have HF start, your tungsten should stay needle-sharp through many starts.

If you're doing lift-arc or scratch-start, the tip will degrade much quicker. How often you'd sharpen in each case depends on the welds you're doing. If you were doing 1/16" beads on 18 ga., you'd sharpen far more often than 1/4" beads on 1/2" plate, as an example. It's about the "fine control" on thinner material vs. "blazing it in" on heavy stuff... The higher the current you're running, the less effect a degraded point has on your arc control.

One other thing I'll point out... While you're practicing keeping the tungsten close on your "no filler" beads, you may find you're teaching yourself a bad habit... When you add filler, the puddle will swell with the new material, and you may find yourself "dipping the tungsten" when you first try it.

Edit...
By way of explanation for why you see undercut on your "no filler" beads, when you heat the metal that much, and it cools rapidly (as the heat is drawn away by the surrounding metal), it shrinks. You now have more dense metal in the weld zone than before, so it takes less space, and leaves the undercut.

Steve S
danielbuck
  • Posts:
  • Joined:
    Tue Jan 21, 2014 7:56 pm
  • Location:
    Gilroy, CA

Yes, I have HF start.

I've been testing on 1/16" and 1/8" metal. 1/8" seems to undercut less, (but still penetrates nicely on the back side) I guess maybe that means for the 1/16" metal I was putting to much heat on it. The 1/8" metal still undercuts slightly, but not as much as what I saw on 1/16".

I'll keep that in mind when I start putting filler rod in there! The puddle will actually be proud of the surface of the metal.

Another question on sharpening the tungsten. One of the informational pamphlets I found in the box of tig stuff that I ordered showed a graphic of how tapered the point was versus how wide the puddle would be and how deep it would penetrate. It showed a flat (not sharp) tungsten as having the most penetration, but the narrowest puddle. And showed a graphic of a tungsten that is sharpend to about the angle of a pencil having the widest puddle and the least penetration. And then a few in-between angles that gradually had less penetration and larger puddle.

Is this common practice, to not sharpen the tungsten when you need maximum penetration? Or was this pamphlet junk? (or was it perhaps referring to welding something other than steel?)
User avatar
  • Posts:
  • Joined:
    Thu Jan 06, 2011 11:40 pm
  • Location:
    Near New Orleans

The pamphlet is junk... I'd assume a bad translation.

The sharper the tungsten, the tighter the arc. A broad arc will make a broad, shallow bead. A tight arc focuses the heat in a narrow band and it goes deeper. The angle of taper is less critical an heavy stuff, but you still want a point. On thin stuff, I've actually done 16ga. with a 1/8" tungsten, sharpened to a needle point like the pencil you described (though a smaller tungsten would have been easier and more practical).

Bear in mind, aluminum is a different animal, but I presume you're not to that point yet.

Steve S
danielbuck
  • Posts:
  • Joined:
    Tue Jan 21, 2014 7:56 pm
  • Location:
    Gilroy, CA

Otto Nobedder wrote:The pamphlet is junk... I'd assume a bad translation.

The sharper the tungsten, the tighter the arc. A broad arc will make a broad, shallow bead. A tight arc focuses the heat in a narrow band and it goes deeper. The angle of taper is less critical an heavy stuff, but you still want a point. On thin stuff, I've actually done 16ga. with a 1/8" tungsten, sharpened to a needle point like the pencil you described (though a smaller tungsten would have been easier and more practical).

Bear in mind, aluminum is a different animal, but I presume you're not to that point yet.

Steve S

Thanks :)

Correct, I'm not gonna try aluminum for a while.
Camerondoherty
  • Posts:
  • Joined:
    Sun Jan 19, 2014 11:54 am

danielbuck wrote:
Otto Nobedder wrote:The pamphlet is junk... I'd assume a bad translation.

The sharper the tungsten, the tighter the arc. A broad arc will make a broad, shallow bead. A tight arc focuses the heat in a narrow band and it goes deeper. The angle of taper is less critical an heavy stuff, but you still want a point. On thin stuff, I've actually done 16ga. with a 1/8" tungsten, sharpened to a needle point like the pencil you described (though a smaller tungsten would have been easier and more practical).

Bear in mind, aluminum is a different animal, but I presume you're not to that point yet.

Steve S

Thanks :)

Correct, I'm not gonna try aluminum for a while.
Just passed my tig test today ,on plates.just be patient.good luck bro!practice with tungsten grinder differently to see what suits you and to understand how your arc works!!!good luck
GreinTime
  • Posts:
  • Joined:
    Fri Nov 01, 2013 11:20 am
  • Location:
    Pittsburgh, PA

Most people don't have cash laying around to buy a dedicated tungsten grinder my friend. Congrats on passing your test though!

Sent from my DROID RAZR using Tapatalk
#oneleggedproblems
-=Sam=-
danielbuck
  • Posts:
  • Joined:
    Tue Jan 21, 2014 7:56 pm
  • Location:
    Gilroy, CA

Ran a few more lines without filler rod, then decided to try a butt weld while adding filler. I think I probably could have used a bit more filler but I'm completely stoked at the results, much nicer than I anticipated! I think since the rings/ripples in the weld aren't arrow shaped, that indicates that my travel speed is about right?

1/8" steel, I had the power set at 120 amps, but I didn't push the pedal down all the way, so I don't know maybe it was somewhere around 80-90 amps or so.

I don't really have a comfortable place to sit, so I'm kinda leaning on a step ladder. I never realized it before, but I don't really ever sit down when I'm in the garage, I don't have a stool or anything. And my 5 gallon buckets are to short to sit on. I think I'll pick up a cheap stool so I can sit at a better height.

I really do like how slow the process is, I feel that I actually have time to think about what I'm doing. I can't wait to get more seat time :D

Image
User avatar
  • Posts:
  • Joined:
    Thu Jan 06, 2011 11:40 pm
  • Location:
    Near New Orleans

I think that looks great! And I'd agree, you had a good travel speed.

You'll get a better analysis if you take a pic before you wire-brush the weld... The colors and bands of color say a lot about heat input.

One tip: Make a habit of filling that crater where you finish. It's the weak point in the weld, and a common place for cracks to start. I realize for simply practicing running beads, it doesn't matter, but if it becomes automatic to you, you won't have to think about it when it does count.

Steve S
danielbuck
  • Posts:
  • Joined:
    Tue Jan 21, 2014 7:56 pm
  • Location:
    Gilroy, CA

Otto Nobedder wrote:I think that looks great! And I'd agree, you had a good travel speed.

You'll get a better analysis if you take a pic before you wire-brush the weld... The colors and bands of color say a lot about heat input.

One tip: Make a habit of filling that crater where you finish. It's the weak point in the weld, and a common place for cracks to start. I realize for simply practicing running beads, it doesn't matter, but if it becomes automatic to you, you won't have to think about it when it does count.

Steve S

Thanks for the tips! Yea, I wasn't quite sure what to do when I stopped the weld, I just slowly backed off the pedal and swirled the torch once or twice. Do you usually put the last dab of filler as you are tapering off? or just before?

I'll look at the heat coloration next time, I didn't even think about that.
User avatar
  • Posts:
  • Joined:
    Thu Jan 06, 2011 11:40 pm
  • Location:
    Near New Orleans

I *usually* put the last bit in "just" before I begin taperin off.

Here, though, you're at the edge of the metal, and the heat has no more "ahead" to go, so you'd likely need to back off some "as" you're adding the last bit, then taper off.

Steve S
danielbuck
  • Posts:
  • Joined:
    Tue Jan 21, 2014 7:56 pm
  • Location:
    Gilroy, CA

Otto Nobedder wrote:I *usually* put the last bit in "just" before I begin taperin off.

Here, though, you're at the edge of the metal, and the heat has no more "ahead" to go, so you'd likely need to back off some "as" you're adding the last bit, then taper off.

Steve S
Do you normally leave the torch stopped as you taper off? or swirl it, or back travel a bit? I have seen several different ways to do this, I guess it's more of a preference for what you want the end of the weld to look like?
User avatar
  • Posts:
  • Joined:
    Thu Jan 06, 2011 11:40 pm
  • Location:
    Near New Orleans

I do move the torch as I taper off, usually a small circle. It helps prevent a small crater, and I usually end up with a little "teat", like you see in the middle of the crater at the end of your weld. If it's cosmetically important, that can be easily taken off with a file, otherwise it can stay.

Steve S
danielbuck
  • Posts:
  • Joined:
    Tue Jan 21, 2014 7:56 pm
  • Location:
    Gilroy, CA

so while practicing feeding the filler rod, It's pretty easy without gloves on, but with gloves it's alot more challenging, haha! I'll be working on that!

So until I'm good at feeding the rod, if I need to pause for a second to get the rod into position again, would it be best to completely stop the torch and re-start the weld? Or would it be just fine to back off on the pedal and still keep the puddle alive? Just curious, I could see on a long run I might need to pause a few times to let my left hand keep up with the feeding.
User avatar
  • Posts:
  • Joined:
    Thu Jan 06, 2011 11:40 pm
  • Location:
    Near New Orleans

I prefer to just back off, and keep the puddle live if I need to reposition the rod or adjust how I feed. This "keeps the light on" so I can see the rod and make sure I keep it in the shielding gas. (I don't use an auto-dark hood.)

That's another "good practice" thing, keeping the rod in the shielding gas. Less critical with carbon steel, but very important on stainless and aluminum. Pulling a red-hot rod tip outside the shielding allows it to immediately oxidize, then you introduce that crap to the puddle on the next dip.

Steve S
danielbuck
  • Posts:
  • Joined:
    Tue Jan 21, 2014 7:56 pm
  • Location:
    Gilroy, CA

So I'm probably getting ahead of myself here, but I just had to. So I grabbed some scrap aluminum and switched the machine over to AC, and ran a few lines with no filler. I think I actually like how aluminum feels better. It seems to take longer to melt, and solidifies quicker than steel. or maybe that's just because I can't see it turn color or glow. But it seems to hold it's shape better when I move forward on a run.

However, I seemed to get quite a crater at the end of each run, alot more than I get with steel. I assume that when I'm using filler rods, I can counter this with a quick dab before I kill the power?

I don't have much aluminum scrap to do more, and I don't have any aluminum filler rods yet, but I'm quite interested to try this farther! Aluminum is ultimately one of my TIG goals.
User avatar
  • Posts:
  • Joined:
    Thu Jan 06, 2011 11:40 pm
  • Location:
    Near New Orleans

Daniel.

You're not getting ahead of yourself at all... Practicing both metals at the same time will keep you from getting "set" in a way of doing things that doesn't work with the other metal.

Aluminum does shrink a lot more than steel; When you're adding filler you'll be feeding a lot more rod for the same weld in steel. Even your tack welds must be much bigger/fuller on aluminum, as the shrinkage will crack them readily.

Aluminum does take longer to melt, as it carries your heat away much faster than steel; That's why you'll hear "pre-heat" mentioned a lot with aluminum welds, especially on heavier sections. This heat property is only half the reason aluminum takes about twice the amps of a similar thickness of steel. The other half is the AC current; The heat at the torch is the RMS value of the set (peak) current, or 70.7%, and part of that heat goes into the tungsten.

Steve S
User avatar
  • Posts:
  • Joined:
    Thu Jan 24, 2013 10:13 pm
  • Location:
    Eddy, TX

Daniel
Welcome to the TIG welding world! From what I see you have it down better than some newbies I have seen. Practice will make your welds perfect ( although I don't think we ever think they are perfect) As far as Alum welding coupons PM me your location, if you live near me I will give you a bunch and some filler wire and you can go to town.
User avatar
  • Posts:
  • Joined:
    Thu Jan 06, 2011 11:40 pm
  • Location:
    Near New Orleans

Hey, Superiorwelding,

Welcome back! I've not seen you post since those cracked welds on pad-eyes!

I'd love to hear how that worked out (in the General Shop Talk, perhaps?)

I'm glad to see you active again!

Steve S
User avatar
  • Posts:
  • Joined:
    Thu Jan 24, 2013 10:13 pm
  • Location:
    Eddy, TX

Steve
Yes it has been a while. I seem to look everyday but never reply to anything. Guess my passion for TIG welding won me over lol. I will post a update on the other post. Hope your job gets worked out as well!
User avatar
  • Posts:
  • Joined:
    Thu Jan 06, 2011 11:40 pm
  • Location:
    Near New Orleans

Thank you for that!

I got good news on that today.

I'm "on hold" ontil the paperwork comes through, but I'm not screwed on my benefits, etc.!

Steve S
danielbuck
  • Posts:
  • Joined:
    Tue Jan 21, 2014 7:56 pm
  • Location:
    Gilroy, CA

Well, instead of starting a new thread, I'll just continue on this one.

Starting my first useful project with TIG. A set of adjustable rear bumpstops for my old willys jeep from some 3/4" nuts and bolts and washers. Welded two washers flat to each other (thicker, stronger), and welded a nut to that. Tonight I'll weld that piece to the end of a short section of pipe to allow a bolt to be threaded into the pipe, to shorten or lengthen the bumpstop. A flange will be welded on the opposite end of the pipe to be bolted to the frame of the jeep.

I found it quite tricky to weld around 360 degrees, both for the washers, and the nut. Lots of starting and stopping. Overall I'm pleased, but have a long way to go to get where I'd like to be :shock:

I think I'm getting some good practice in, it's not a critical component of the jeep, so I don't mind using it as a learning experience. And I have plenty of nuts and bolts and pipe to re-do them if I need to :lol:

Image

Image

Image
Post Reply