Nice, Daniel!
A project you'll actually use will teach you much, as you see how, in fact, it works, and how you could improve it.
Or, you may have nailed it, and the sense of pride is equally valuable.
Steve S
Tig welding tips, questions, equipment, applications, instructions, techniques, tig welding machines, troubleshooting tig welding process

- Otto Nobedder
-
Weldmonger

-
Posts:
-
Joined:Thu Jan 06, 2011 11:40 pm
-
Location:Near New Orleans
danielbuck
- danielbuck
-
Guide

-
Posts:
-
Joined:Tue Jan 21, 2014 7:56 pm
-
Location:Gilroy, CA
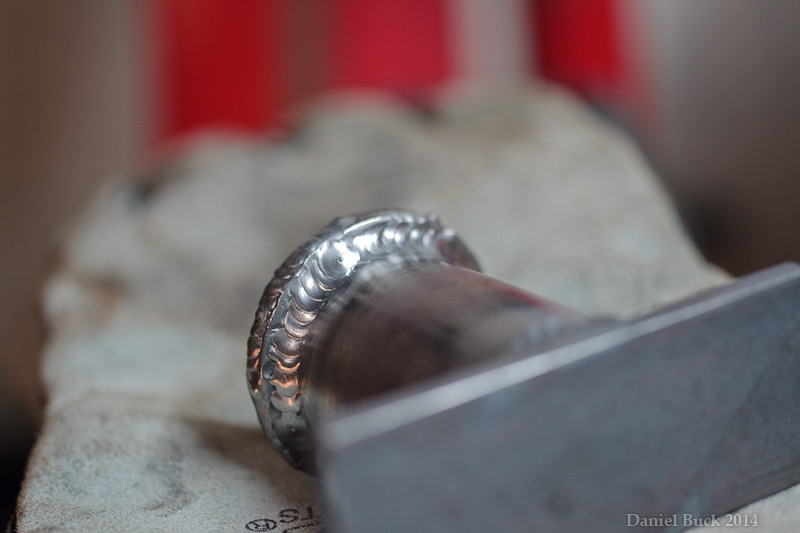
I finished the first one tonight (accept for drilling the mounting holes), I did better tonight I think!
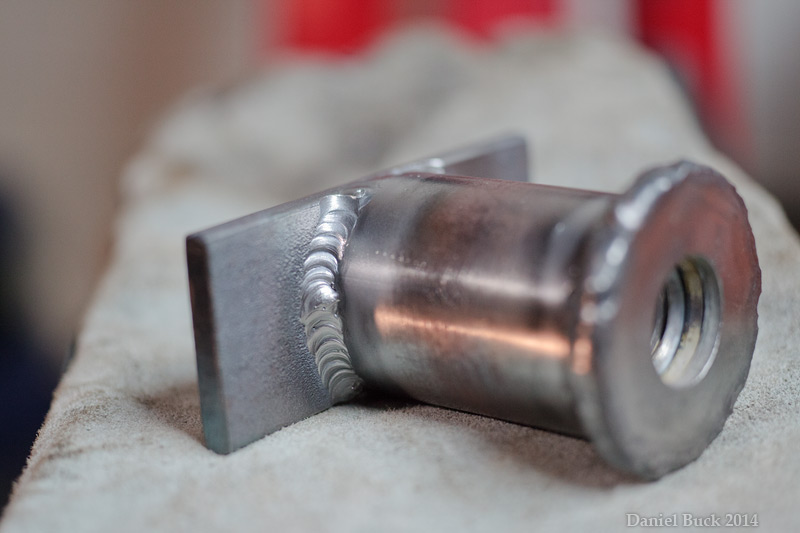
My individual welds turn out looking not 1/2 bad. I'm pleased with them. But I'm having trouble when I start at the end of an existing weld, or finish at an existing weld. And since I can't seem to get my possition well enough to go 1/2 way around the tube in one run, I split it up in to 8 1/8 runs, lots of stops and starts. Maybe I should go back to the plate and start running a bunch of connecting lines, both forwards and backwards, to practice continuing a line, as well as ending up and joining with a line. I'm sure with practice it will come! As well as practice running around tubing.
As soon as the part cools off (running out for some pizza and beer right now!) I'll throw it under a wire brush and take a photo

- Superiorwelding
-
Weldmonger
-
Posts:
-
Joined:Thu Jan 24, 2013 10:13 pm
-
Location:Eddy, TX
Daniel,
I think it is looking good. Cant wait to see more pics. As far as starting on the end of a weld try lighting up on your last ripple and when it melts add your filler and go. When you end on the beginning of a weld, melt the weld at the beginning and add one more dip, presto you won't know where you started or stopped.
Making it around a small pipe is not the easiest task to do, but don't worry about it, with practice it will come.
Come to think of it welding around a small object like that will teach you a lot of positioning, control and starts and stops.
Instagram- @superiorwelding/@learntotig
Twitter- @_JonathanLewis
https://www.learntotig.com
https://www.superiorweldandfab.com
https://www.youtube.com/+SuperiorWeldin ... ATHANLEWIS
Twitter- @_JonathanLewis
https://www.learntotig.com
https://www.superiorweldandfab.com
https://www.youtube.com/+SuperiorWeldin ... ATHANLEWIS
danielbuck
- danielbuck
-
Guide
-
Posts:
-
Joined:Tue Jan 21, 2014 7:56 pm
-
Location:Gilroy, CA
I tell you what, I'm glad I went with the flex lock torch, I find my self adjusting it several times on just one piece like this, either to kind of "back hand" (as in tennis) the left hand side of the part, while staying out of the way of the filler rod that's actually in my left hand.Superiorwelding wrote:Daniel,
I think it is looking good. Cant wait to see more pics. As far as starting on the end of a weld try lighting up on your last ripple and when it melts add your filler and go. When you end on the beginning of a weld, melt the weld at the beginning and add one more dip, presto you won't know where you started or stopped.
Making it around a small pipe is not the easiest task to do, but don't worry about it, with practice it will come.
Come to think of it welding around a small object like that will teach you a lot of positioning, control and starts and stops.
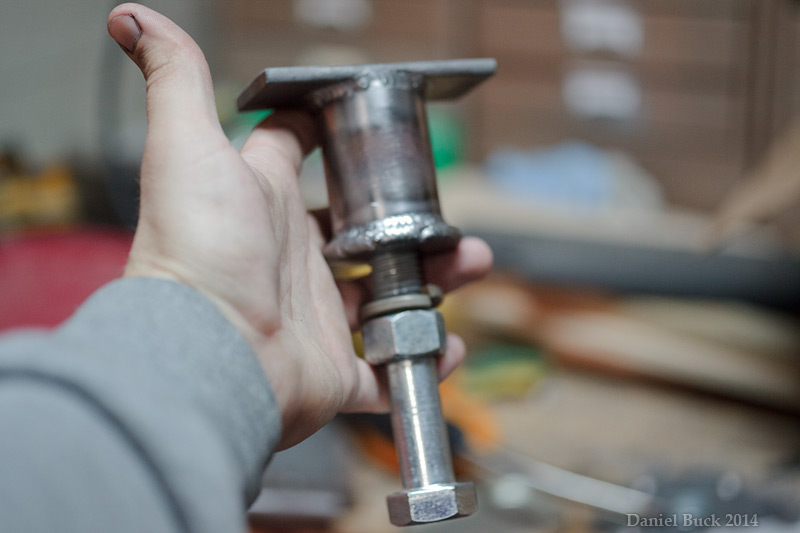
A thick rubber funiture coaster will wrap around the end of the bolt, and that will be the contact point with the axle.
In retrospect, it probably wasn't necessary to weld two washers together, but I guess I was just to excited to weld something other than practice scrap
a hole will go on either side of the tube on the flat bar, and that's how it will bolt to the frame.

- Superiorwelding
-
Weldmonger
-
Posts:
-
Joined:Thu Jan 24, 2013 10:13 pm
-
Location:Eddy, TX
Not bad at all! I need to get me a FlexLoc one day. Keep up the good work.
Instagram- @superiorwelding/@learntotig
Twitter- @_JonathanLewis
https://www.learntotig.com
https://www.superiorweldandfab.com
https://www.youtube.com/+SuperiorWeldin ... ATHANLEWIS
Twitter- @_JonathanLewis
https://www.learntotig.com
https://www.superiorweldandfab.com
https://www.youtube.com/+SuperiorWeldin ... ATHANLEWIS
danielbuck
- danielbuck
-
Guide
-
Posts:
-
Joined:Tue Jan 21, 2014 7:56 pm
-
Location:Gilroy, CA
That's kind of how I work I guess. I don't like practicing just for the sake of practicing, I don't have a whole lot of free time from work, if I'm not working on something practical I feel like I'm wasting time!Otto Nobedder wrote:A project you'll actually use will teach you much, as you see how, in fact, it works, and how you could improve it.
This thicker steel seems to be alot easier than thinner steel.
I tried doing a butt weld with 1x1 1/16" square steel tubing with 45 degree miter cuts, and man did I have trouble. Kept on burning through, and kept on getting my filler rod stuck to the metal. I was using 1/16" filler rod, maybe I should just grab some .035 or .045 MIG wire for filler? It seemed when ever I got the power and puddle enough so that the filler rod wouldn't stick, I would burn right through. But when I backed off the power and had a smaller puddle, the rod would stick. This 1x1 1/16" square tubing is what I'd like to get real good at, I like making furniture out of this material. I'll need to do alot of practicing on that, it doesn't seem to be near as forgiving as thicker metal since I have to constantly worry about burning through.
Thanks for the encouragementSuperiorwelding wrote:Not bad at all! I need to get me a FlexLoc one day. Keep up the good work.
After reading about the torch that came with my Everlast machine, and after holding it in my hand, I knew there was no way I could work with it. The cable alone was so stiff, it felt like a car battery cable! I really like the very flexible cable on the CK. I'm a little worried about damaging the cable though.
Return to “Tig Welding - Tig Welding Aluminum - Tig Welding Techniques - Aluminum Tig Welding”
Jump to
- Introductions & How to Use the Forum
- ↳ Welcome!
- ↳ Member Introductions
- ↳ How to Use the Forum
- ↳ Moderator Applications
- Welding Discussion
- ↳ Metal Cutting
- ↳ Tig Welding - Tig Welding Aluminum - Tig Welding Techniques - Aluminum Tig Welding
- ↳ Mig and Flux Core - gas metal arc welding & flux cored arc welding
- ↳ Stick Welding/Arc Welding - Shielded Metal Arc Welding
- ↳ Welding Forum General Shop Talk
- ↳ Welding Certification - Stick/Arc Welding, Tig Welding, Mig Welding Certification tests - Welding Tests of all kinds
- ↳ Welding Projects - Welding project Ideas - Welding project plans
- ↳ Product Reviews
- ↳ Fuel Gas Heating
- Welding Tips & Tricks
- ↳ Video Discussion
- ↳ Wish List
- Announcements & Feedback
- ↳ Forum News
- ↳ Suggestions, Feedback and Support
- Welding Marketplace
- ↳ Welding Jobs - Industrial Welding Jobs - Pipe Welding Jobs - Tig Welding Jobs
- ↳ Classifieds - Buy, Sell, Trade Used Welding Equipment
- Welding Resources
- ↳ Tradeshows, Seminars and Events
- ↳ The Welding Library
- ↳ Education Opportunities