- GEDC1348.JPG (160.01 KiB) Viewed 2163 times
Tig welding tips, questions, equipment, applications, instructions, techniques, tig welding machines, troubleshooting tig welding process

- Otto Nobedder
-
Weldmonger

-
Posts:
-
Joined:Thu Jan 06, 2011 11:40 pm
-
Location:Near New Orleans
Well, it ain't Monday, but here's the view of the ell. The taper to pipe ID is obvious (so, yes, smaller ID in the ell), as is the odd "horseshoe" profile, that matches the variation in HAZ in the previous picture.
Steve S

- Superiorwelding
-
Weldmonger
-
Posts:
-
Joined:Thu Jan 24, 2013 10:13 pm
-
Location:Eddy, TX
Steve,
Interesting, I personally have never seen a one like that. Anyone care to explain why it is made like that? I could look it up but I will let someone else answer a question for me, change things up
-Jonathan
Interesting, I personally have never seen a one like that. Anyone care to explain why it is made like that? I could look it up but I will let someone else answer a question for me, change things up
-Jonathan
Instagram- @superiorwelding/@learntotig
Twitter- @_JonathanLewis
https://www.learntotig.com
https://www.superiorweldandfab.com
https://www.youtube.com/+SuperiorWeldin ... ATHANLEWIS
Twitter- @_JonathanLewis
https://www.learntotig.com
https://www.superiorweldandfab.com
https://www.youtube.com/+SuperiorWeldin ... ATHANLEWIS
- Otto Nobedder
-
Weldmonger
-
Posts:
-
Joined:Thu Jan 06, 2011 11:40 pm
-
Location:Near New Orleans
I'm sure it's simply an efficient mandrel fo bend something this heavy on (and for all I know improves teh flow around the ell).
In other words, I have no idea...
Steve S
In other words, I have no idea...
Steve S
- Superiorwelding
-
Weldmonger
-
Posts:
-
Joined:Thu Jan 24, 2013 10:13 pm
-
Location:Eddy, TX
Gave me a good laugh though!Otto Nobedder wrote:I'm sure it's simply an efficient mandrel fo bend something this heavy on (and for all I know improves teh flow around the ell).
In other words, I have no idea...
Steve S
-Jonathan
Instagram- @superiorwelding/@learntotig
Twitter- @_JonathanLewis
https://www.learntotig.com
https://www.superiorweldandfab.com
https://www.youtube.com/+SuperiorWeldin ... ATHANLEWIS
Twitter- @_JonathanLewis
https://www.learntotig.com
https://www.superiorweldandfab.com
https://www.youtube.com/+SuperiorWeldin ... ATHANLEWIS
bass.warrior
- bass.warrior
-
New Member

-
Posts:
-
Joined:Tue Feb 11, 2014 10:26 am
-
Location:Sand Spring, Ok
Superiorwelding wrote:Steve,
Interesting, I personally have never seen a one like that. Anyone care to explain why it is made like that? I could look it up but I will let someone else answer a question for me, change things up
-Jonathan
Maybe something to do with the contraction of the metal when it gets hit with rapid temperature changes.
Based on where it is being used I would expect there to be a lot of that.
bass.warrior
- bass.warrior
-
New Member
-
Posts:
-
Joined:Tue Feb 11, 2014 10:26 am
-
Location:Sand Spring, Ok
Nothing as exciting as otto, just some practice on aluminum corner joint.
- IMAG0049.jpg (23.75 KiB) Viewed 2124 times
- Otto Nobedder
-
Weldmonger
-
Posts:
-
Joined:Thu Jan 06, 2011 11:40 pm
-
Location:Near New Orleans
Boss ever send you on that fool's errand, for a "bucket of steam"?

Had to chase a "cold-leak" today, so here's a bucket of liquid nitrogen, to chill some vacuum-jacket inner piping...

This is a bit of redneck engineering, to pour into the piping. I've narrowed the leak to 15" of piping, and I have a strong suspect for it's actual location.
Steve S
Had to chase a "cold-leak" today, so here's a bucket of liquid nitrogen, to chill some vacuum-jacket inner piping...
This is a bit of redneck engineering, to pour into the piping. I've narrowed the leak to 15" of piping, and I have a strong suspect for it's actual location.
Steve S

- Braehill
-
Weldmonger
-
Posts:
-
Joined:Sat Jul 06, 2013 11:16 am
-
Location:Near Pittsburgh,Pennsylvania. Steel Buckle of the Rust Belt
Steve,
I was checking out all the S/S fittings in the rack and I didn't find any with that D shape. I only have up to sched. 80 here but I've been working in another plant that's a liquid plant a couple days a week. Monday when I'm down ther I'll check out some of the fittings in the old high pressure pump shop and see if there are any sched. 160 and if in fact they are also D shaped like yours. Those are a first for me, and we do weld quite a bit of butt welded fittings in the small process piping.
If I get a chance next week I'll ask our piping guy (one of the sharpest guys I know) why they're made that way.
Len
Now go melt something.
Instagram @lenny_gforce
Len
Instagram @lenny_gforce
Len
- Otto Nobedder
-
Weldmonger
-
Posts:
-
Joined:Thu Jan 06, 2011 11:40 pm
-
Location:Near New Orleans
- Otto Nobedder
-
Weldmonger
-
Posts:
-
Joined:Thu Jan 06, 2011 11:40 pm
-
Location:Near New Orleans
Nice work! Outside corners are difficult to control, much less keep even.bass.warrior wrote:Nothing as exciting as otto, just some practice on aluminum corner joint.IMAG0049.jpg
Steve S
Not today exactly. It's further along than this by now but I built the shade portion in 7 hours completely welded. It would have been 6, but the extrusion I usually use was handled/delivered by apes who don't know how to handle their product so, it's on the "send back to idiots" rack. Anyway, I had to make a substitute out of 1/4" x 4" flat bar with some tube stiffeners for the leg mounts so it took extra time, with each of those mounts having nearly 6 feet of weld each!
The legs took awhile, being as I used level, elbow rungs for the trusses. Angles in all different directions etc. It doesn't seem that odd, but each cut shrinks the part in two directions so you always have to be thinking about that if you want both sides to be an exact mirror.
Had to redo the wire for the torch switch in the middle of it. Had broken down in the insulation up by the torch from all the flexing lately.
Was told today that they are handing the keys to the company over to me. I said I would, if they agree to clear up the junk first for a fresh start. Wish this could have been about 10 years ago, when I was still a fabricating monster.
Miller ABP 330, Syncrowave 250, Dynasty 300 DX.
Honorary member of the Fraternity of Faded Tee Shirts.
Honorary member of the Fraternity of Faded Tee Shirts.
- Otto Nobedder
-
Weldmonger
-
Posts:
-
Joined:Thu Jan 06, 2011 11:40 pm
-
Location:Near New Orleans
That usually happens just before the checkpoint or train wreck, so I'm torn between "Congratulations!" and "My Sympathies."TamJeff wrote:...Was told today that they are handing the keys to the company over to me...
Seriously, from the work I've seen, and the work habits you keep, it's a good decision for all involved. (Especially if you get that "shop cleanup/fresh start" thrown in the mix.)
Steve S
Actually already survived a few train wrecks if you think about it. First, the fuel crisis, when "speculators" determined that fuel prices were too low and every supplier in the land tacked on a hefty surcharge on all materials and delivery, never to return. 2nd. . .the economy in the crapper and with the recreation industry being the first to go in such times, and then further compounded by the Gulf Oil Spill, which all but shut down a huge portion of our offshore fishing industry.
Think about where we've been, Steve. Our stories somewhat parallel on how we got to where we are. One thing I do know how to do is budget/finances and I am personally and financially. . .low maintenance. Which amounts to next to no personal debt. One thing I have in my favor is, 25 years of reputation in this particular industry. I've outlasted just about everyone thru it all.
Think about where we've been, Steve. Our stories somewhat parallel on how we got to where we are. One thing I do know how to do is budget/finances and I am personally and financially. . .low maintenance. Which amounts to next to no personal debt. One thing I have in my favor is, 25 years of reputation in this particular industry. I've outlasted just about everyone thru it all.
Miller ABP 330, Syncrowave 250, Dynasty 300 DX.
Honorary member of the Fraternity of Faded Tee Shirts.
Honorary member of the Fraternity of Faded Tee Shirts.
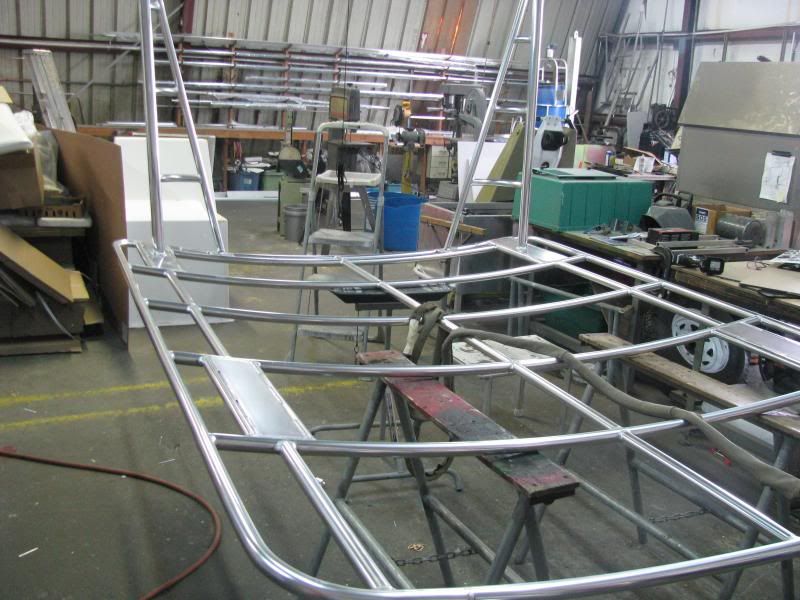
Here's where I was headed in the previous photos. It's a canopy for a commercial boat so it doesn't have to be stylish. The boat is "commercial" in every sense of the word, right down to it's work boat finish and minimal accommodations and it's been rode hard.
At any rate, lots of trusses. There is nothing in the boat to brace it to so it essentially has to stand on it's own.
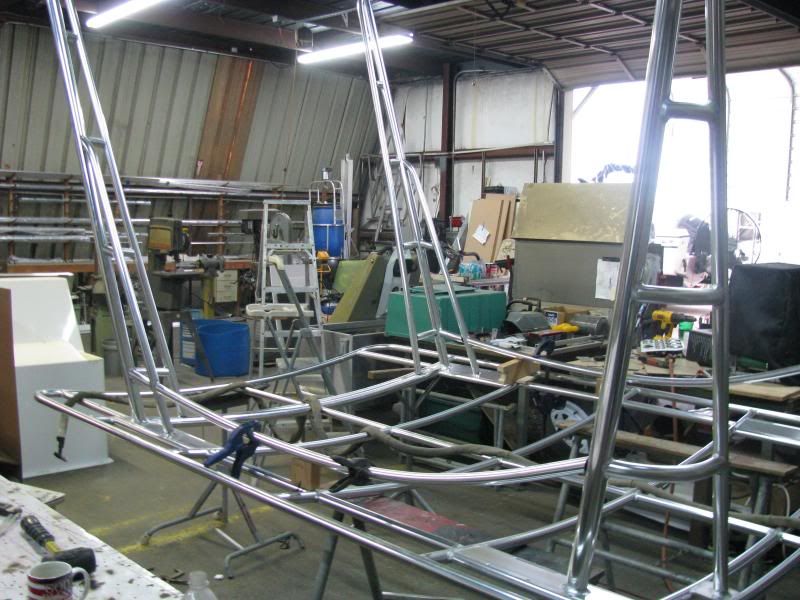
In the above photo, you can see where the trusses intersect. I don't like to double up heat zones on vehicle structures on aluminum. A bend pipe in it's place would have needed subduction gusseting at the bend, or the bend just becomes a spring of sorts and aluminum only springs, so few times before it fails. Typically, I would use a sleeve where the pipes intersect like this but I did not have time to order them in. So. . . .I stuck a tube inside to create a double wall section where these occur and nobody's the wiser.
I cut the truss and only mitre it partially. This way, the weld will also grab the inner pipe. The distortion at the double weld joint will usually deform enough to lock the pipe in from sliding down the truss later, but this is just cheap insurance. The tack is just there to grab it initially. I will start the actual weld opposite to it, and by the time I get around to where this tack is, it will be plenty hot in which to sink a good weld to both. As the arc comes around, it will draw half the metal from that tack leaving a good void for burn in.
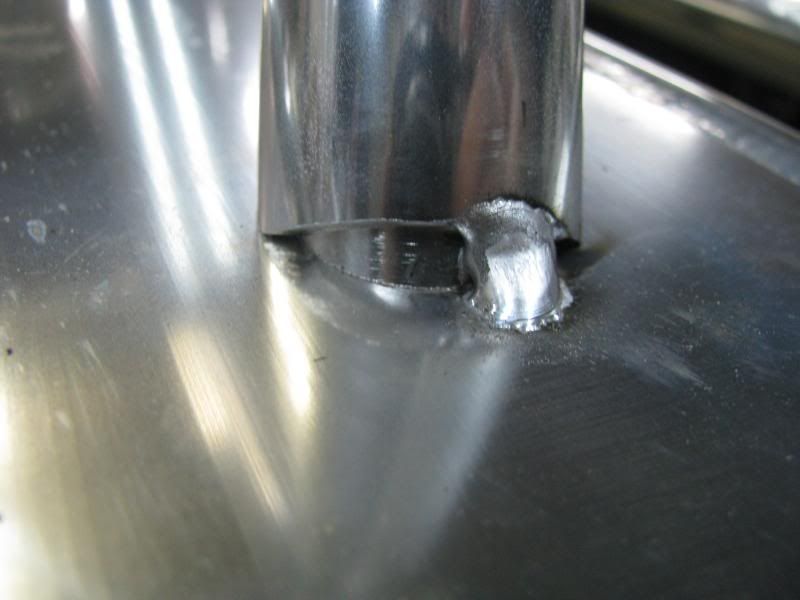
By now, all the truss nipples are tacked in down the sides as well and I can easily cruise Monday, finishing welding this all nicely, being all I have to worry about is welding.
At any rate, lots of trusses. There is nothing in the boat to brace it to so it essentially has to stand on it's own.
In the above photo, you can see where the trusses intersect. I don't like to double up heat zones on vehicle structures on aluminum. A bend pipe in it's place would have needed subduction gusseting at the bend, or the bend just becomes a spring of sorts and aluminum only springs, so few times before it fails. Typically, I would use a sleeve where the pipes intersect like this but I did not have time to order them in. So. . . .I stuck a tube inside to create a double wall section where these occur and nobody's the wiser.
I cut the truss and only mitre it partially. This way, the weld will also grab the inner pipe. The distortion at the double weld joint will usually deform enough to lock the pipe in from sliding down the truss later, but this is just cheap insurance. The tack is just there to grab it initially. I will start the actual weld opposite to it, and by the time I get around to where this tack is, it will be plenty hot in which to sink a good weld to both. As the arc comes around, it will draw half the metal from that tack leaving a good void for burn in.
By now, all the truss nipples are tacked in down the sides as well and I can easily cruise Monday, finishing welding this all nicely, being all I have to worry about is welding.
Miller ABP 330, Syncrowave 250, Dynasty 300 DX.
Honorary member of the Fraternity of Faded Tee Shirts.
Honorary member of the Fraternity of Faded Tee Shirts.

So nice
So matter a factually
"EXCELLANT WORK"
Craftsmanship Pride
So matter a factually
"EXCELLANT WORK"
Craftsmanship Pride
Everlast 250EX
Miller 250 syncrowave
Sharp LMV Vertical Mill
Takisawa TSL-800-D Lathe
Coupla Bandsaws,Grinders,surface grinder,tool/cutter grinder
and more stuff than I deserve(Thanks Significant Other)
Miller 250 syncrowave
Sharp LMV Vertical Mill
Takisawa TSL-800-D Lathe
Coupla Bandsaws,Grinders,surface grinder,tool/cutter grinder
and more stuff than I deserve(Thanks Significant Other)
- Otto Nobedder
-
Weldmonger
-
Posts:
-
Joined:Thu Jan 06, 2011 11:40 pm
-
Location:Near New Orleans
Well, I found my "cold leak", and it was remarkably complicated. There was a surface crack in the inner pipe...

That doesn't leak through here, where it's obvious. It extends under the weld. The reason it's a cold-leak is here:

A socket weld with the pipe butted tight, no gap left. When it gets cold, the stresses induced from a no-gap socket weld are multiplied. Here it is in context:

I stripped the entire fitting of all the bullshit, and will rebuild it the way it should be done. Here's the stripped fitting, where I'll begin tomorrow:

This was a good Monday...
Steve S
That doesn't leak through here, where it's obvious. It extends under the weld. The reason it's a cold-leak is here:
A socket weld with the pipe butted tight, no gap left. When it gets cold, the stresses induced from a no-gap socket weld are multiplied. Here it is in context:
I stripped the entire fitting of all the bullshit, and will rebuild it the way it should be done. Here's the stripped fitting, where I'll begin tomorrow:
This was a good Monday...
Steve S
- Otto Nobedder
-
Weldmonger
-
Posts:
-
Joined:Thu Jan 06, 2011 11:40 pm
-
Location:Near New Orleans
I almost forgot... Here's another example of the very crappy fit-up in the piping I'm repairing... These fittings are the same radius, so there should be plenty of room between them. However, for some reason, the inner pipe is mashing the insulation against the outer pipe. Master craftsmen were not involved...

As long as people keep 3^CKing up like this, I'll always have work...
Steve S
As long as people keep 3^CKing up like this, I'll always have work...
Steve S
- Braehill
-
Weldmonger
-
Posts:
-
Joined:Sat Jul 06, 2013 11:16 am
-
Location:Near Pittsburgh,Pennsylvania. Steel Buckle of the Rust Belt
Steve,
Your one inverted picture had me wondering what was holding that aerosol can up there, then I read the tag marker for the Helium and realized it was inverted.
I had one of our welders tell me that he always just butts his socket weld fittings tight. I promptly ask the lead guy to tack up for him or remove him from our plant. He said that he has worked with this guy for seven years and had never watched him tack fittings and didn't know he did this. Needless to say he now knows the proper way to fit socket weld joints, he learned it in a very loud and not so politically correct short course. He'll be a better welder for it though.
Len
Now go melt something.
Instagram @lenny_gforce
Len
Instagram @lenny_gforce
Len
- Otto Nobedder
-
Weldmonger
-
Posts:
-
Joined:Thu Jan 06, 2011 11:40 pm
-
Location:Near New Orleans
Len,
I've explained socket-weld fit-up to at least four people here. I'm stunned each time, as it's never a green hand... It's someone who should damn well know better.
Fortunately, on the trailers, we've eliminated most socket welds, and the ones that remain are mostly in the helium system between the bottles and the regulator, where little real harm can be done. There are occasionlly one or two at the liquid sample circuit, but at least these can be isolated should they fail.
Steve S
newschoppafowah
- newschoppafowah
-
Workhorse

-
Posts:
-
Joined:Wed Feb 19, 2014 11:54 pm
Well Steve, as someone who has no real idea what's going on in these pics I'll venture that there should be a bit of a gap to allow for thermal expansion and contraction?
Sorry, feeling spry.
Just for kicks, what are you fixing anyway?
Sorry, feeling spry.
Just for kicks, what are you fixing anyway?
Sent from an earthen ditch outside Needles, CA using an awful lot of low voltage single strand wire.
It's a matter of flour and water and then there's the seasonings, which is a matter of salt and so forth and then you h-we interrupt this for the announc
It's a matter of flour and water and then there's the seasonings, which is a matter of salt and so forth and then you h-we interrupt this for the announc

Scientific guess here... I suspect it's because sockets are actually welded a distance back from the end of the pipe, so that "loose end" is free to expand and contract inside the fitting.
I think this is usually described as a problem during the welding process because you add so much heat, expanding it after it's been partially welded, building stress against the bottom of the socket. Perhaps also with extreme cold having the opposite effect on the socket?
I'm curious to see how close to the mark this is.
Cheers,
Richard
Grinding discs... still my #1 consumable!
- Otto Nobedder
-
Weldmonger
-
Posts:
-
Joined:Thu Jan 06, 2011 11:40 pm
-
Location:Near New Orleans
@ Newschoppahfowah...
This is the pump discharge for a liquid hydrogen vessel, where the transfer hose attaches. In practice, it sees 160-200psi at -423F.
Richard, you've pretty much got it. If a socket weld is butted tight, then welded, the fitting shrinks as the weld cools... Most of the pipe is above the fitting, so the pipe shrinkage is immaterial there, but the shrinkage of the fitting presses the part of the pipe inside the fitting to the collar it's butted against with great force, in some cases thousands of pounds.Then add temperature cycles of 500* or more (ambient of 77* to -423*), and you see the stresses imposed.
Steve S
- Otto Nobedder
-
Weldmonger
-
Posts:
-
Joined:Thu Jan 06, 2011 11:40 pm
-
Location:Near New Orleans
Here's a mess of stuff I did today, only to undo it at the end... 
Here's the socket weld, where the original problem was...

and here it is wrapped... 50 alternating layers of mylar and tissue, overwrapped with fiberglass tape, and safety-wired tight:

And with the vacuum-jacket added:

And the ell back in place... Note I did not even scorch the mylar/tissue an inch and quarter from the weld...

And here it is back where it belongs, for a preliminary test:

It FAILED the preliminary test, and I had to cut it back out and partially apart, for THIS little bullshit that opened up when I welded the socket... GRRR!

I'll be on this in the morning, and back to reassembly. I thought Monday went a little too well, and today, I paid for it.
At least this time I actually posted some welds on the "what I welded" topic...
Steve S
Here's the socket weld, where the original problem was...
and here it is wrapped... 50 alternating layers of mylar and tissue, overwrapped with fiberglass tape, and safety-wired tight:
And with the vacuum-jacket added:
And the ell back in place... Note I did not even scorch the mylar/tissue an inch and quarter from the weld...
And here it is back where it belongs, for a preliminary test:
It FAILED the preliminary test, and I had to cut it back out and partially apart, for THIS little bullshit that opened up when I welded the socket... GRRR!
I'll be on this in the morning, and back to reassembly. I thought Monday went a little too well, and today, I paid for it.
At least this time I actually posted some welds on the "what I welded" topic...
Steve S

So the bottom fell out of my smoker and I had some flat bar laying around with a 90s bent in them just begging to be tweaked to fit the smoker. I put three brackets on the bottom section, and attached the best looking of all the welds. I am a pipefitter by trade, and by no means a welder. I just got the Everlast for hobby time at the house because I just like welding. The flat bar is close to 1/8th thick and the material on the smoker is like a 16th i think. Anywho, the smoker is fixed and ready for some cooking.
Everlast 160sth, er70s2, about 40-45 amps


Everlast 160sth, er70s2, about 40-45 amps
AHP 200x
Frustration
Grinder, not a welder.
Frustration
Grinder, not a welder.
- Otto Nobedder
-
Weldmonger
-
Posts:
-
Joined:Thu Jan 06, 2011 11:40 pm
-
Location:Near New Orleans
FitNPipe,
This is one of those moments I wish this forum had a "like" button like facebook...
Li'l redneck engineering, li'l new welding skill, li'l new machine, and problem solved... Keep practicing, keep following Jody's videos, and keep up with us, and you'll be teaching your welder in no time...
Steve S
This is one of those moments I wish this forum had a "like" button like facebook...
Li'l redneck engineering, li'l new welding skill, li'l new machine, and problem solved... Keep practicing, keep following Jody's videos, and keep up with us, and you'll be teaching your welder in no time...
Steve S
Return to “Tig Welding - Tig Welding Aluminum - Tig Welding Techniques - Aluminum Tig Welding”
Jump to
- Introductions & How to Use the Forum
- ↳ Welcome!
- ↳ Member Introductions
- ↳ How to Use the Forum
- ↳ Moderator Applications
- Welding Discussion
- ↳ Metal Cutting
- ↳ Tig Welding - Tig Welding Aluminum - Tig Welding Techniques - Aluminum Tig Welding
- ↳ Mig and Flux Core - gas metal arc welding & flux cored arc welding
- ↳ Stick Welding/Arc Welding - Shielded Metal Arc Welding
- ↳ Welding Forum General Shop Talk
- ↳ Welding Certification - Stick/Arc Welding, Tig Welding, Mig Welding Certification tests - Welding Tests of all kinds
- ↳ Welding Projects - Welding project Ideas - Welding project plans
- ↳ Product Reviews
- ↳ Fuel Gas Heating
- Welding Tips & Tricks
- ↳ Video Discussion
- ↳ Wish List
- Announcements & Feedback
- ↳ Forum News
- ↳ Suggestions, Feedback and Support
- Welding Marketplace
- ↳ Welding Jobs - Industrial Welding Jobs - Pipe Welding Jobs - Tig Welding Jobs
- ↳ Classifieds - Buy, Sell, Trade Used Welding Equipment
- Welding Resources
- ↳ Tradeshows, Seminars and Events
- ↳ The Welding Library
- ↳ Education Opportunities