I'm going to be building a roll cage for my jeep, I'm confident with my MIG welding, but I would really like to TIG weld the cage if I can get confident enough to do so. So, I'm going to chop up some tube (DOM 1.75" .120 wall mild steel) and do a bunch of test joints to see if I can get confident enough with the TIG. If I'm not confident, then I'll MIG it.
I'd like to make alot of test joints, but not use up to much steel, so I'm going to use short sections.
My question is: Will I get significant heat difference if I'm using short pieces (say, 4" long sections) versus longer pieces? The actual cage itself will obviously be alot more metal, and will draw the heat away more. So I wonder if the puddle will flow significantly differently on my shorter test pieces that retain their heat? I'm particularly interested in practicing the upside-down welding, I've not really tigged upside down very much, so I definitely want to practice the lower 1/2 of the joints alot.
Tig welding tips, questions, equipment, applications, instructions, techniques, tig welding machines, troubleshooting tig welding process
danielbuck
- danielbuck
-
Guide

-
Posts:
-
Joined:Tue Jan 21, 2014 7:56 pm
-
Location:Gilroy, CA

Yea a 4" long piece will get heat soaked fast while welding it at ~120A.
What I would personally do is this: get a long piece of steel, to simulate the heat sinking of the much larger frame. Try 6ft or so. Slice right down the middle, so two 3ft sections. Weld them together to make it back into a single 6ft piece. Once you finish that weld, cut out that weld from the middle about 1" on both sides of the weld so you can inspect it and check the fusion. That way you're only missing about 2" from the whole piece, and the remaining two 2'11" piece can be welded together again in the same fashion. Weld them together, cut out the weld to inspect. Lather, rinse repeat. Eventually you'll have so little tube left that you'd have to start over but for the most part, you'd still be welding together large/long lengths of tube, and to me this would be better than cutting up a long piece of tube steel to weld tiny 4" sections together. That's just my take on it of course.
What I would personally do is this: get a long piece of steel, to simulate the heat sinking of the much larger frame. Try 6ft or so. Slice right down the middle, so two 3ft sections. Weld them together to make it back into a single 6ft piece. Once you finish that weld, cut out that weld from the middle about 1" on both sides of the weld so you can inspect it and check the fusion. That way you're only missing about 2" from the whole piece, and the remaining two 2'11" piece can be welded together again in the same fashion. Weld them together, cut out the weld to inspect. Lather, rinse repeat. Eventually you'll have so little tube left that you'd have to start over but for the most part, you'd still be welding together large/long lengths of tube, and to me this would be better than cutting up a long piece of tube steel to weld tiny 4" sections together. That's just my take on it of course.
danielbuck
- danielbuck
-
Guide
-
Posts:
-
Joined:Tue Jan 21, 2014 7:56 pm
-
Location:Gilroy, CA
I'm more wanting to practice going around the tube, up and over and on the underside, 360 degrees all the way around. Instead of welding a flat surface. Although I guess I could do the same thing with tubing, although that would be butt joints instead of notched angles like all of the joints on the cage will be.

Then Daniel all you do is cut your stick in half, notch one end and slap it against the other and start welding up and around the joint. You just loose a little more when you cut it apart for the next go at it.
If you don't have it you might want this. http://www.ozhpv.org.au/shed/tubemiter.htm It goes a long way to making your fit-ups better.
If you don't have it you might want this. http://www.ozhpv.org.au/shed/tubemiter.htm It goes a long way to making your fit-ups better.
Go break something, then you can weld it back the right way.

danielbuck
- danielbuck
-
Guide
-
Posts:
-
Joined:Tue Jan 21, 2014 7:56 pm
-
Location:Gilroy, CA
Fat Bob wrote:Then Daniel all you do is cut your stick in half, notch one end and slap it against the other and start welding up and around the joint. You just loose a little more when you cut it apart for the next go at it.
Yea, I suppose that would be the best way, do a bunch of 90 degree T joints (and I could do some 30 and 60 degree joints as well) but only cut them one at a time, so I start out with two longer pieces, instead of a bunch of already cut up short pieces. I think that sounds like a plan, thanks
danielbuck
- danielbuck
-
Guide
-
Posts:
-
Joined:Tue Jan 21, 2014 7:56 pm
-
Location:Gilroy, CA
Thanks! Yea, that's another thing I'm going to be practicing, tube notching. I do have a tubing notcher (from JD2) but I'm sure it will take some practice to get the joints tight.
danielbuck
- danielbuck
-
Guide
-
Posts:
-
Joined:Tue Jan 21, 2014 7:56 pm
-
Location:Gilroy, CA
Sounds like good advice, I'll do some butt joints on the tubing first, can't hurtOscar wrote:If you haven't tig'd before, your best bet would be to do butt joints for practice, instead of just going right at it into coped/notched joints. But its your project
danielbuck
- danielbuck
-
Guide
-
Posts:
-
Joined:Tue Jan 21, 2014 7:56 pm
-
Location:Gilroy, CA
HAH, yea, I'm used to that by now, learning everything myself as I goOscar wrote:The only thing it will hurt is one's ego; tubing is VERY difficult and it will humble you very quickly.

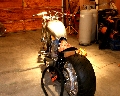
When I started practicing on tubing, I got a bunch of 1 3/8" OD x 0.062 wall tubing and cut it into 3" pieces. I coped one end and made Ts. When you first start, you'll be stopping and starting so much that the heat build up won't be too much of an issue. As you get better, you'll make longer runs. But by then your heat control will be better. I made boxes full of these joints and I still do them often. I did some just last week on some titanium. It really allows you to focus on fundamentals on te bench before you have to start maneuvering around a full frame or roll cage.
Titanium by Zanconato Custom Cycles, on Flickr
Titanium by Zanconato Custom Cycles, on Flickr
dirtmidget33
- dirtmidget33
-
Heavy Hitter

-
Posts:
-
Joined:Tue May 13, 2014 5:22 pm
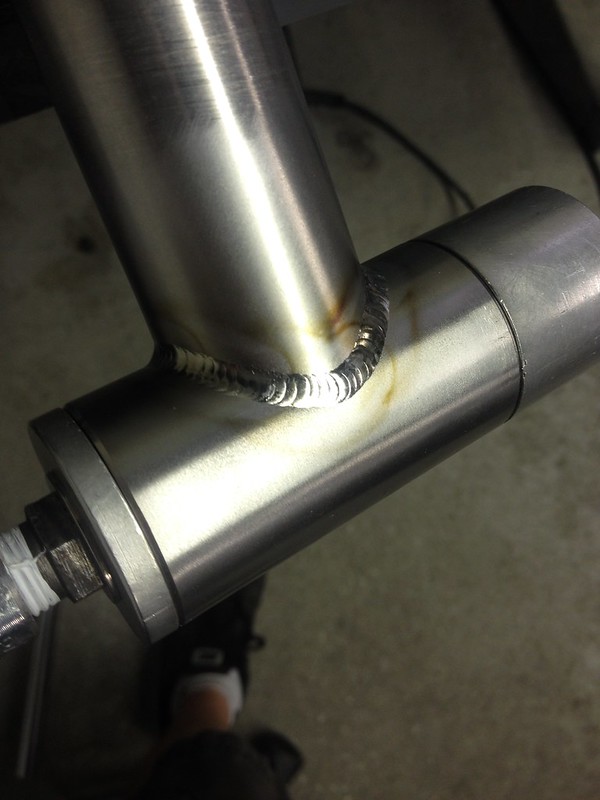
Want to add a few things for you to think about. Lately I have seen a bad thing happening with chassis and that is the frames braking when they shouldn't have and could have been avoided by this. On your welds try to make convex beads avoid the small concave welds. They may look real pretty but when your flipping several times unconscious you will be glad to have that weld with a little more meat to it, been seeing a lot of concave welds lately on newer frames coming out. Give your welds some filler that little weight can be taken off somewhere else, but don't over heat and burn it up also.
following pic is a weld on a cage with a convex weld for an example. I did not weld this frame. this is a TIG welded 4130 backed purged frame ER70s-2 filler
drill small holes in the middle of joint where tubing meets so you don't have a closed space which will cause blowouts and it allows the frame to be back purged also.
during a wreck tubes should distort, bend, collapse but not break. no good way of showing how badly bent parts of this frame are. On another note NOTHING BROKE on this car frame. It is bent in several directions and nothing is square anymore. just snapped a couple of pics been out in pole barn for awile now so pretty dirty
following pic is a weld on a cage with a convex weld for an example. I did not weld this frame. this is a TIG welded 4130 backed purged frame ER70s-2 filler
- 0707141856[1].jpg (21.55 KiB) Viewed 2778 times
during a wreck tubes should distort, bend, collapse but not break. no good way of showing how badly bent parts of this frame are. On another note NOTHING BROKE on this car frame. It is bent in several directions and nothing is square anymore. just snapped a couple of pics been out in pole barn for awile now so pretty dirty
- 0707141959.jpg (75.85 KiB) Viewed 2778 times
- 0707141858[1].jpg (24.82 KiB) Viewed 2778 times
- 0707141855a[1].jpg (43.43 KiB) Viewed 2778 times
Last edited by dirtmidget33 on Tue Jan 12, 2016 2:52 am, edited 2 times in total.
why use standard nozzles after gas lens where invented. Kinda of like starting fires by rubbing sticks together.
dirtmidget33
- dirtmidget33
-
Heavy Hitter
-
Posts:
-
Joined:Tue May 13, 2014 5:22 pm
Oscar if you wouldnt mind I would like to read it. Always looking for more info.
why use standard nozzles after gas lens where invented. Kinda of like starting fires by rubbing sticks together.

- AKweldshop
-
Weldmonger

-
Posts:
-
Joined:Wed Oct 23, 2013 3:30 pm
-
Location:Palmer AK
Daniel.
Have you got a tig finger??
Makes small tubing a pipe way easier to learn to weld.
~John
Have you got a tig finger??
Makes small tubing a pipe way easier to learn to weld.
~John
Just a couple welders and a couple of big hammers and torches.
Men in dirty jeans built this country, while men in clean suits have destroyed it.
Trump/Carson 2016-2024
Men in dirty jeans built this country, while men in clean suits have destroyed it.
Trump/Carson 2016-2024
http://www.mediafire.com/download/7zuj3 ... p/GTAW.zipdirtmidget33 wrote:Oscar if you wouldnt mind I would like to read it. Always looking for more info.
Return to “Tig Welding - Tig Welding Aluminum - Tig Welding Techniques - Aluminum Tig Welding”
Jump to
- Introductions & How to Use the Forum
- ↳ Welcome!
- ↳ Member Introductions
- ↳ How to Use the Forum
- ↳ Moderator Applications
- Welding Discussion
- ↳ Metal Cutting
- ↳ Tig Welding - Tig Welding Aluminum - Tig Welding Techniques - Aluminum Tig Welding
- ↳ Mig and Flux Core - gas metal arc welding & flux cored arc welding
- ↳ Stick Welding/Arc Welding - Shielded Metal Arc Welding
- ↳ Welding Forum General Shop Talk
- ↳ Welding Certification - Stick/Arc Welding, Tig Welding, Mig Welding Certification tests - Welding Tests of all kinds
- ↳ Welding Projects - Welding project Ideas - Welding project plans
- ↳ Product Reviews
- ↳ Fuel Gas Heating
- Welding Tips & Tricks
- ↳ Video Discussion
- ↳ Wish List
- Announcements & Feedback
- ↳ Forum News
- ↳ Suggestions, Feedback and Support
- Welding Marketplace
- ↳ Welding Jobs - Industrial Welding Jobs - Pipe Welding Jobs - Tig Welding Jobs
- ↳ Classifieds - Buy, Sell, Trade Used Welding Equipment
- Welding Resources
- ↳ Tradeshows, Seminars and Events
- ↳ The Welding Library
- ↳ Education Opportunities