
Hi Guys,
Totally new to tube welding and gave it a shot a week ago.. and it didn't turn out too good, lol.
I am using 35 amps and a 3/32 tip and I am totally lost.. so any advise would be welcome.
Tig welding tips, questions, equipment, applications, instructions, techniques, tig welding machines, troubleshooting tig welding process

- TRACKRANGER
-
Weldmonger

-
Posts:
-
Joined:Wed Aug 06, 2014 12:48 am
-
Location:Melbourne, Australia
Hi rkirk77
You are probably holding too long an arc length, and going way too slow.
Reduce your amperage slightly, hold a much tighter arc and see if that heads you in a better direction.
I would find time to practice on something a little less challenging than thin-wall tube. Try some 16 or 20 gauge sheet and practice some fillet or butt joints on that first, Try some different settings on the machine until you are comfortable with that, then take the next steps.
Trev
EWM Phonenix 355 Pulse MIG set mainly for Aluminum, CIGWeld 300Amp AC/DC TIG, TRANSMIG S3C 300 Amp MIG, etc, etc

what else have you practiced on? (tubing is the #1 worst thing to start tig welding on, even for practice!) My advice is hidden in my question, BTW. 
Please list what machine you are using, and the settings you have tried with it. From here on out, you will get bombarded with questions, so just disclose EVERYTHING up front and save everyone sometime if you would like to get good, concise advise.
Please list what machine you are using, and the settings you have tried with it. From here on out, you will get bombarded with questions, so just disclose EVERYTHING up front and save everyone sometime if you would like to get good, concise advise.

Yes, lower your amps and shorten the arc length.
I learned to weld by filling in holes on sheet metal.
If you have some scrap tube, try adding weld to the ends.
See if you can build up the end of the tube and close it off.
If you mess up, just cut the end of the tube off and try again.
It's all about learning heat control.
I learned to weld by filling in holes on sheet metal.
If you have some scrap tube, try adding weld to the ends.
See if you can build up the end of the tube and close it off.
If you mess up, just cut the end of the tube off and try again.
It's all about learning heat control.

- Otto Nobedder
-
Weldmonger
-
Posts:
-
Joined:Thu Jan 06, 2011 11:40 pm
-
Location:Near New Orleans
That looks like 4130 tube,
say, 1/2" X .035 wall, or maybe .049.
The heat-affected zone makes me agree with Trev, you're putting in too much heat. The blow-outs confirm this.
What filler are you using? Do you have a foot pedal or other remote control? Thin tube is much easier to TIG weld when you have complete control over the welding current.
Questions, questions...
Steve S
- Otto Nobedder
-
Weldmonger
-
Posts:
-
Joined:Thu Jan 06, 2011 11:40 pm
-
Location:Near New Orleans
That's a big plank with big-arse nail holes, then, if that's 1"... That's why I thought it 1/2".rkirk77 wrote:Oh crap.. sorry guys.. lol
I am practising on 4130 tube that is 1" OD / 0.035 wall thickness
Everlast PowerARC 160 STH (I took the 2T switch off and am learning to use the pedal).
I'm tickled I got the thickness from the picture.
Steve S
Check out this video, it has some decent pointers.
https://www.youtube.com/watch?v=1nLsrcscoOA
https://www.youtube.com/watch?v=1nLsrcscoOA
Oh and ditch the 3/32" tungsten until you really get good. Pro's can work with it much easier, but I'd bet you will be able to do much better with a 0.040" or 1/16" tungsten sharpened to a point with a long taper.
Something like this would work much better (after you practice on normal flat plate that is----you can forget doing aircraft/airframe welding anytime soon ) That is a 1/16" tungsten, and a 0.5mm "arc length", for reference.
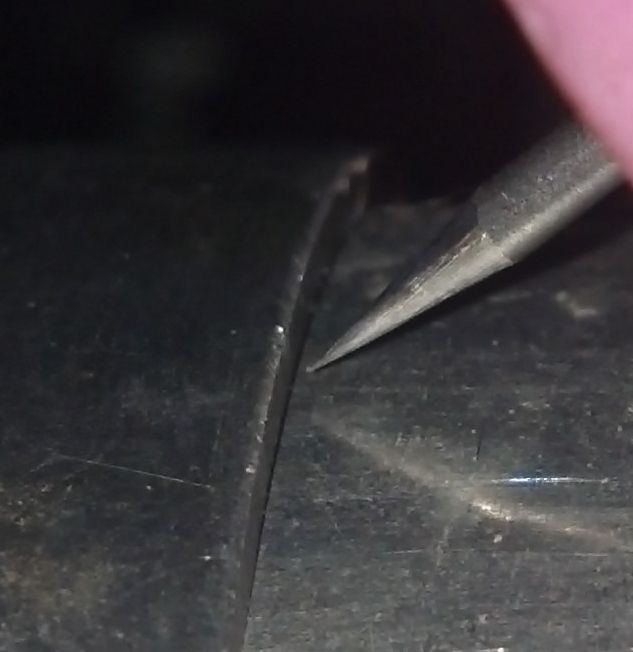
Something like this would work much better (after you practice on normal flat plate that is----you can forget doing aircraft/airframe welding anytime soon
I use 1.5%La/2%La/Quad-Mix interchangeably for everything (not that I do much other than plain ol' steel, but all of those work great for the few times I decide to make something out of aluminum). Yes, you are supposed to use DC Electrode Negative for all steel tig welding, lol.rkirk77 wrote:Ok.. thanks oscar!
What type of tungsten are you using and how long is that taper?
PS, i am using electrode negative..
For the taper, glance at the un-sharpened portion of the tungsten itself. It is 1/16" in diameter (1.6mm). Then glance over at the tapered point. Then glance back at the rod. Then back. You'll get it.
The E3 would work just fine, it's just operator-error at this point. TIG welding small round tubing for aircraft frames is not something that you pick up over a couple weekends. More like 5-10 years of day-in/day-out tig welding. You must crawl before you can walk. Start practicing on 1/16" - 1/8" flat steel, just running beads without using filler or anything. Then you move on to adding filler. Then you move on to doing butt-joints. Etc, Etc, Etc. If you can' do basic joints in flat-steel practice parts, you won't get anywhere fast doing thin-wall small-diameter tubing.
rkirk77
take what Oscar to heart
start with simple welds on a flat surface
till you can do it without thinking.
then try laps, butts and then up hill.
same thing till you can do it without
thinking. by then you will know how to
grind your tungsten, set your machine
and even weld.
it takes time and practice just be ok
stay at it.
craig
htp invertig 221
syncrowave 250
miller 140 mig
hypertherm plasma
morse 14 metal devil
syncrowave 250
miller 140 mig
hypertherm plasma
morse 14 metal devil
jwright650
- jwright650
-
Ace

-
Posts:
-
Joined:Wed Dec 03, 2014 3:27 pm
If you don't have any flats handy, you can still practice running stringers longways on the tube....just practice forming a puddle and moving the puddle along longitudinally along the pipe.... get that down and then start adding fillerrkirk77 wrote:I took no offence to any of it.. I am going to the scrap yard tomorrow and i an going to burn, burn, burn!
Thank you all for your help!
John Wright
AWS Certified Welding Inspector
NDT Level II UT, VT, MT and PT
NACE CIP Level I Coating Inspector
AWS Certified Welding Inspector
NDT Level II UT, VT, MT and PT
NACE CIP Level I Coating Inspector
jwright650
- jwright650
-
Ace
-
Posts:
-
Joined:Wed Dec 03, 2014 3:27 pm
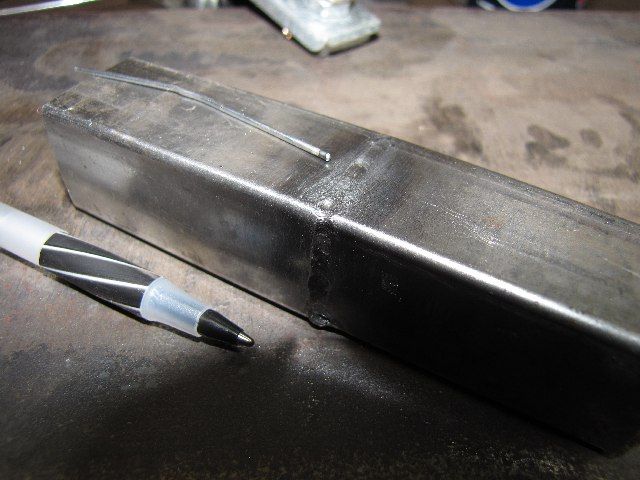
(don't laugh) Here is a pic of my first ever Tig weld...I'm not sure of the wall thickness of this tubing, but it was thinner than the paperclip I used as filler. Been awhile so I don't remember the machine settings. I opened the box when the welder was delivered that day and this was the first time ever using this machine. I didn't have any filler, so I straightened a paperclip and used that.
John Wright
AWS Certified Welding Inspector
NDT Level II UT, VT, MT and PT
NACE CIP Level I Coating Inspector
AWS Certified Welding Inspector
NDT Level II UT, VT, MT and PT
NACE CIP Level I Coating Inspector

- Superiorwelding
-
Weldmonger
-
Posts:
-
Joined:Thu Jan 24, 2013 10:13 pm
-
Location:Eddy, TX
John,
What I want to know is, what wire classification does a paper clip fall under?
-Jonathan
What I want to know is, what wire classification does a paper clip fall under?
-Jonathan
Instagram- @superiorwelding/@learntotig
Twitter- @_JonathanLewis
https://www.learntotig.com
https://www.superiorweldandfab.com
https://www.youtube.com/+SuperiorWeldin ... ATHANLEWIS
Twitter- @_JonathanLewis
https://www.learntotig.com
https://www.superiorweldandfab.com
https://www.youtube.com/+SuperiorWeldin ... ATHANLEWIS
jwright650
- jwright650
-
Ace
-
Posts:
-
Joined:Wed Dec 03, 2014 3:27 pm
I'm not sure.....The paperwork on it flew away in the wind when I took the paperclip offSuperiorwelding wrote:John,
What I want to know is, what wire classification does a paper clip fall under?
-Jonathan
John Wright
AWS Certified Welding Inspector
NDT Level II UT, VT, MT and PT
NACE CIP Level I Coating Inspector
AWS Certified Welding Inspector
NDT Level II UT, VT, MT and PT
NACE CIP Level I Coating Inspector
Jason_alex
- Jason_alex
-
Guide

-
Posts:
-
Joined:Fri Jan 24, 2014 1:41 pm

- weldin mike 27
-
Weldmonger
-
Posts:
-
Joined:Fri Apr 01, 2011 10:59 pm
-
Location:Australia; Victoria
jwright650
- jwright650
-
Ace
-
Posts:
-
Joined:Wed Dec 03, 2014 3:27 pm
LOL...now you haveJason_alex wrote:LOL I have never seen anyone use a paper clip for filler......
John Wright
AWS Certified Welding Inspector
NDT Level II UT, VT, MT and PT
NACE CIP Level I Coating Inspector
AWS Certified Welding Inspector
NDT Level II UT, VT, MT and PT
NACE CIP Level I Coating Inspector
Return to “Tig Welding - Tig Welding Aluminum - Tig Welding Techniques - Aluminum Tig Welding”
Jump to
- Introductions & How to Use the Forum
- ↳ Welcome!
- ↳ Member Introductions
- ↳ How to Use the Forum
- ↳ Moderator Applications
- Welding Discussion
- ↳ Metal Cutting
- ↳ Tig Welding - Tig Welding Aluminum - Tig Welding Techniques - Aluminum Tig Welding
- ↳ Mig and Flux Core - gas metal arc welding & flux cored arc welding
- ↳ Stick Welding/Arc Welding - Shielded Metal Arc Welding
- ↳ Welding Forum General Shop Talk
- ↳ Welding Certification - Stick/Arc Welding, Tig Welding, Mig Welding Certification tests - Welding Tests of all kinds
- ↳ Welding Projects - Welding project Ideas - Welding project plans
- ↳ Product Reviews
- ↳ Fuel Gas Heating
- Welding Tips & Tricks
- ↳ Video Discussion
- ↳ Wish List
- Announcements & Feedback
- ↳ Forum News
- ↳ Suggestions, Feedback and Support
- Welding Marketplace
- ↳ Welding Jobs - Industrial Welding Jobs - Pipe Welding Jobs - Tig Welding Jobs
- ↳ Classifieds - Buy, Sell, Trade Used Welding Equipment
- Welding Resources
- ↳ Tradeshows, Seminars and Events
- ↳ The Welding Library
- ↳ Education Opportunities