Not just me. Little tricks that we use to cheat the math. Some days I just don't feel like dealing with it.
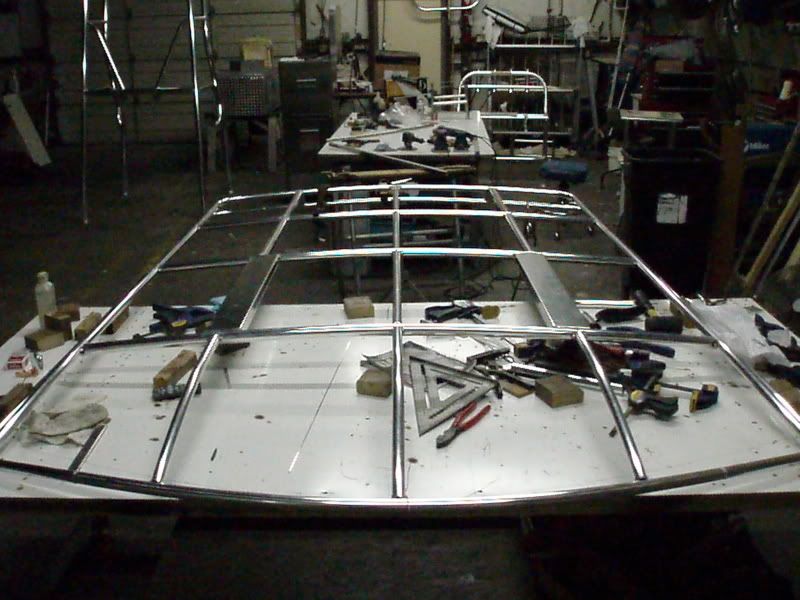
The idea is to get this 3D assembly right the first time. Not once, but yet again with it's mirror image too. I used two opposing layouts on my table for these parts that utilized the same control lines. It assures that everything will be aligned at exactly the same points from one side to the other.
By "dummies," I mean those little commando instant jigs of sorts made from whatever is at hand. The idea is to get these wrap around braces to fit 'exactly' on the layout. A flat table is a must. With compound copes, if you have to trim them to fit, they shrink in two directions when cutting in the bend.
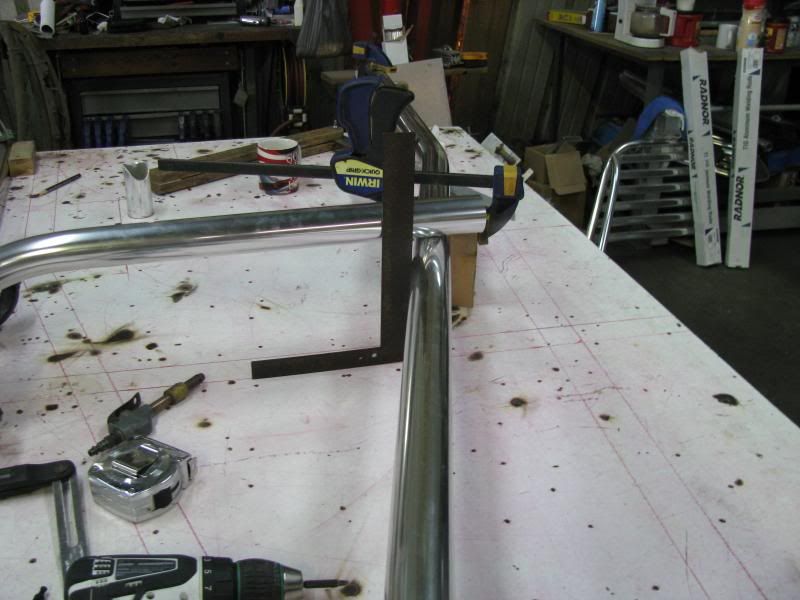
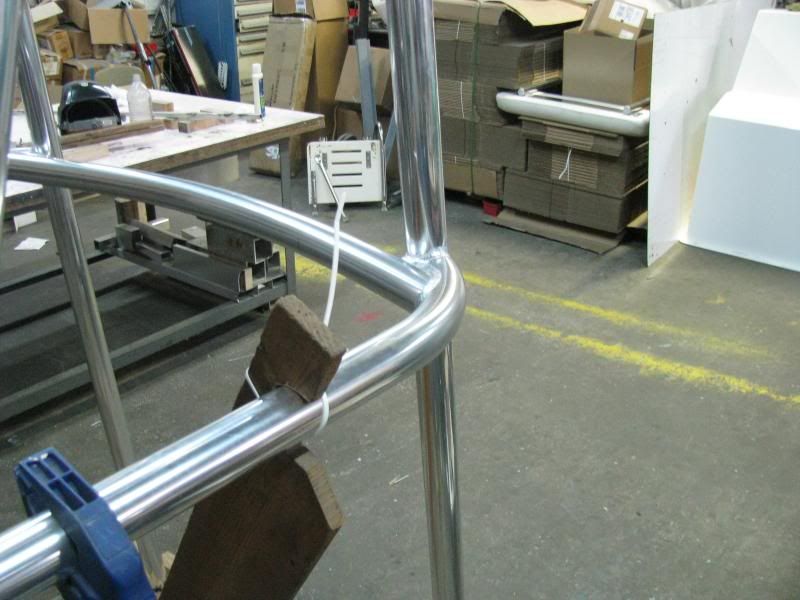
Here's where we want to end up. The legs that these go on, lean in 1 degree per side. That means the braces have to be set at 1 degree off of plumb to end up level once erected. If the two leg pipes were parallel, no big deal. These are at opposing angles with a cope in the bend at one end to make up for the 4.5" offset. The first set of "dummies" is the 3 wooden riser blocks holding the one leg 4.5" up.
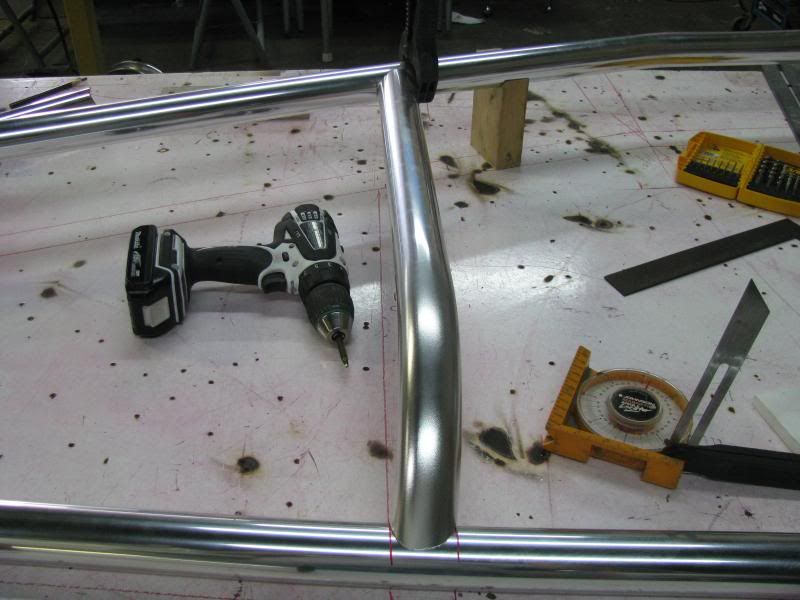
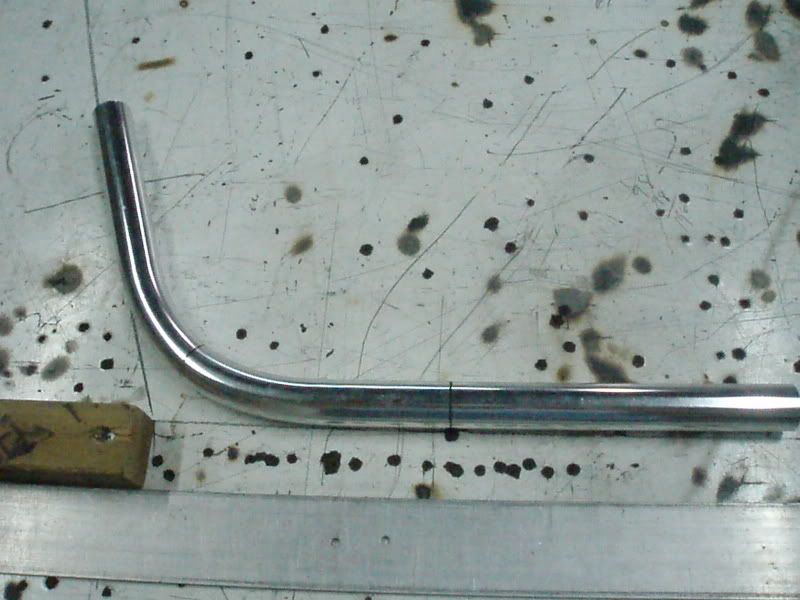
Here is the 2nd dummy set up. If I want the part to fit perfectly, I make the difficult cope in the bend on a table drawing and cut it out on the bandsaw. Then, just take a scrap of the same size pipe and capture it where the cope will go. This will allow it to sit level on the build, with the tail end running wild past where the 2nd cope will go.
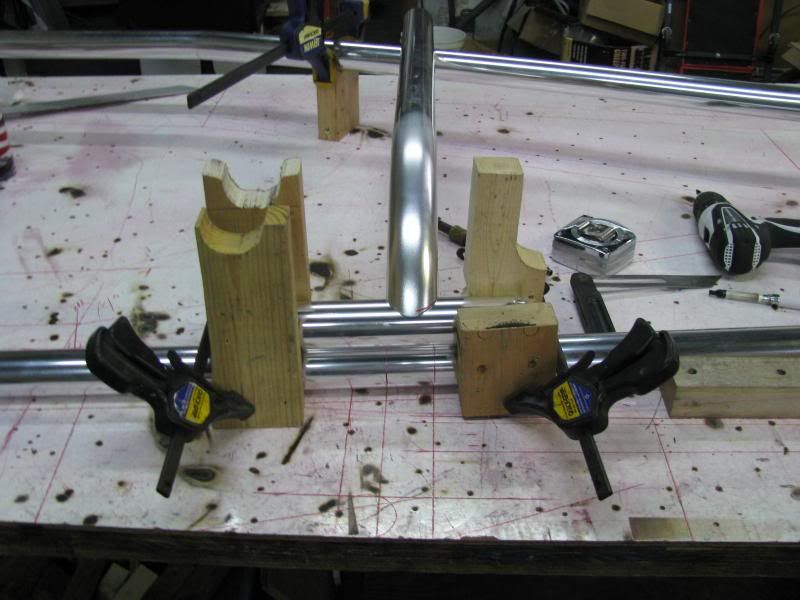
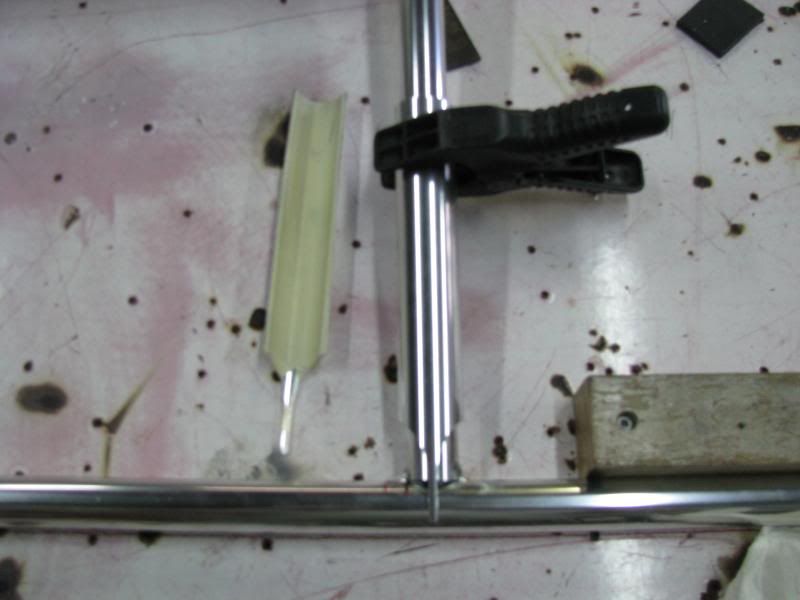
These next two photos should explain where I am going with this. Picking up my cope marks. Plumb up from my drawing to line it up and then use the square to capture the contact points for the cope. This cope happened to be 18 degrees.
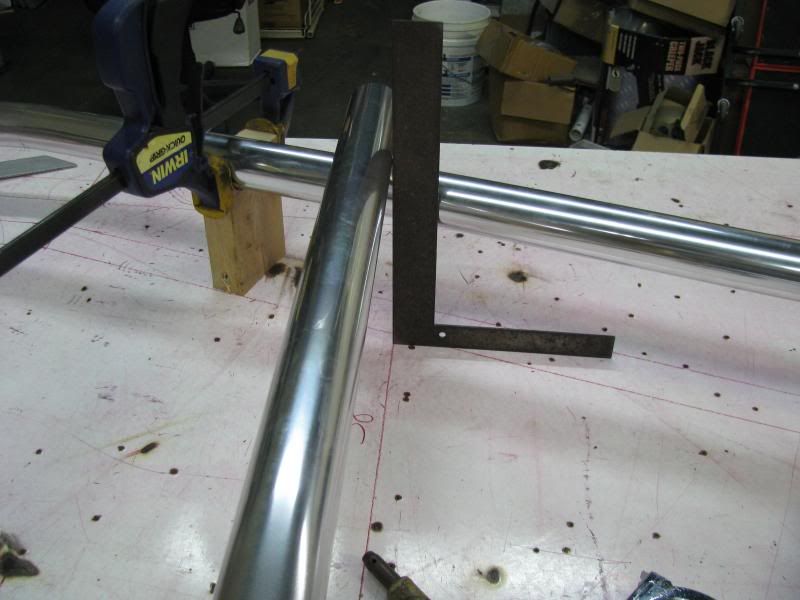
Boom.
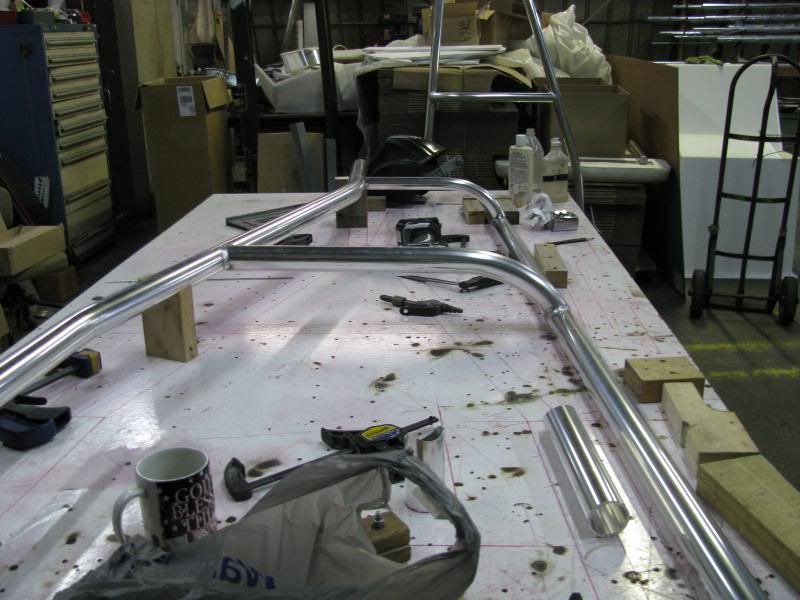
This brace needs to be 1 degree off as well. I do it with a tack. I 'know' about how big a tack I need for a certain degree, or, about two fat dips of filler per 1.5 degrees.
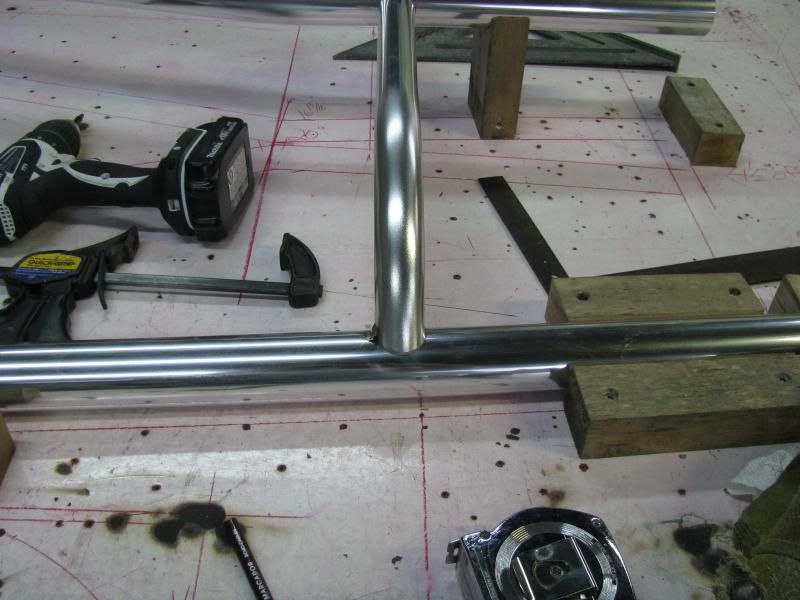
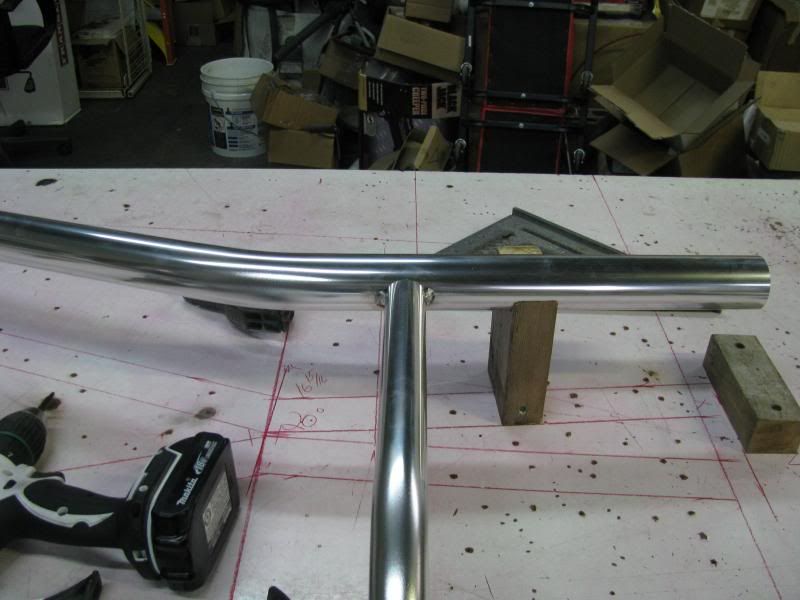
Then, I just freeze the angle with two tacks at the other end. When I tack the 2nd side of the leaned part, it will bring it back to about the 1 degree I needed.
Tig welding tips, questions, equipment, applications, instructions, techniques, tig welding machines, troubleshooting tig welding process
It ended up getting a curved front brace as well. To get these copes right when the footprint of the structure is close tolerances, is another feat in itself considering they are in the bends.
Miller ABP 330, Syncrowave 250, Dynasty 300 DX.
Honorary member of the Fraternity of Faded Tee Shirts.
- MinnesotaDave
-
Weldmonger
-
Posts:
-
Joined:Sun Oct 27, 2013 10:57 pm
-
Location:Big Lake/Monticello MN, U.S.A.
Hey thanks for posting that - nicely done
I especially liked the use of the framing square to mark the contact points for the cope.
Your "two fat dips = 1.5 degrees" is pretty cool too.
I especially liked the use of the framing square to mark the contact points for the cope.
Your "two fat dips = 1.5 degrees" is pretty cool too.
Dave J.
Beware of false knowledge; it is more dangerous than ignorance. ~George Bernard Shaw~
Syncro 350
Invertec v250-s
Thermal Arc 161 and 300
MM210
Dialarc
Tried being normal once, didn't take....I think it was a Tuesday.
Beware of false knowledge; it is more dangerous than ignorance. ~George Bernard Shaw~
Syncro 350
Invertec v250-s
Thermal Arc 161 and 300
MM210
Dialarc
Tried being normal once, didn't take....I think it was a Tuesday.
Just tricks from the piece work days, where every wasted move could equal many dollars off of the day. I used to watch some of these guys with scientific calculators going at it and then have to prove their math in practice. I also noticed that some had a pretty good collection of "trophies," which consisted of bent odds and ends gone wrong.
These are things they don't usually teach in school but probably should. Not so much the tricks themselves but, just enough to get young fabricators thinking outside the box. Anyone with a modicum of common sense will pick up on this faster than the math-only habit and become their own little problem solvers, with both a left, and right brain.
I have had that square for 25 years. I use it primarily to layout my bend marks on my pattern drawings. I still have it because it's ugly and nobody else wants it.
If anyone has any of their own to post, they are welcome to do so.
Miller ABP 330, Syncrowave 250, Dynasty 300 DX.
Honorary member of the Fraternity of Faded Tee Shirts.
- Otto Nobedder
-
Weldmonger
-
Posts:
-
Joined:Thu Jan 06, 2011 11:40 pm
-
Location:Near New Orleans
That's a fabulous lesson, Jeff!
Experience can definitely replace math in this kind of work. When fitting thin stainless pipe (sch. 5 and sch. 10), I've developed, through experience, a sense of how much each kind of weld will shrink, or in ells, "draw", and can offset my fits by eye. This saves lots of time and rework. I don't have quite the same sense of it for aluminum yet, but I weld much more stainless than aluminum.
Steve S
I figured you would know, Otto. Especially the point in time where you realize you can bet on it being a certain amount consistently.
I have worked for "math, and by the book only" places before and many of these tricks were simply not allowed, or the debris lying about in which to fashion them from. I have a heap of test bends next to my tool box that I use mostly for modelling the exact length of pipe for a certain part. There is a possibility of error with the math/formulas. A real test piece of a known length(the length of pipe all the test bends came from is marked accordingly. Otherwise, I use a standard length. 30" for 1.5", 28" for anything less) set on the layout never lies and keeps an additional reference alive throughout the process.
Test bends also are a fast and handy way to store bend marks for the layout with a surprising degree of accuracy. Especially handy when doing a lot of mirrored parts.
Here's a test bend in action for 3/4" 40. The bend marks on this particular bender we have are at the center of the bend. My test bend has a reference mark, exactly 6" away from the actual bend mark on it's straight section. I can then mark my reference mark on the table and measure 6" to get the actual bend mark without thinking twice. The test bend isn't exact for this layout but it's close. I can slide it back and forth to compensate.
Again a standard. For all my test bends except 1.5" and 2", I use the 6" reference. For the larger sizes, 10 & 12". I manage to get within a 32nd or less, but quickly.
Then we can keep all that math where it belongs. . .in our heads.
Miller ABP 330, Syncrowave 250, Dynasty 300 DX.
Honorary member of the Fraternity of Faded Tee Shirts.
- Otto Nobedder
-
Weldmonger
-
Posts:
-
Joined:Thu Jan 06, 2011 11:40 pm
-
Location:Near New Orleans
Where's that damn "like" button!
I have to admit, seeing the marks on your table, I (kind of) miss building fancy gates and handrails. I rarely get to lay things out on a table, now. It's usually in three-dimensional space, and I'm using my pipe-stands, vices, and tables to jig things up. So I'm fitting and measuring in free space. I'm not above using plumb-bobs and the floor for references, so it works the same, but it's not as tidy.
Steve S
- MinnesotaDave
-
Weldmonger
-
Posts:
-
Joined:Sun Oct 27, 2013 10:57 pm
-
Location:Big Lake/Monticello MN, U.S.A.
Here it is:
- image.jpg (16.65 KiB) Viewed 1883 times
Dave J.
Beware of false knowledge; it is more dangerous than ignorance. ~George Bernard Shaw~
Syncro 350
Invertec v250-s
Thermal Arc 161 and 300
MM210
Dialarc
Tried being normal once, didn't take....I think it was a Tuesday.
Beware of false knowledge; it is more dangerous than ignorance. ~George Bernard Shaw~
Syncro 350
Invertec v250-s
Thermal Arc 161 and 300
MM210
Dialarc
Tried being normal once, didn't take....I think it was a Tuesday.
- Otto Nobedder
-
Weldmonger
-
Posts:
-
Joined:Thu Jan 06, 2011 11:40 pm
-
Location:Near New Orleans
Thanks, you guys. I know y'all would have a blast building this stuff which is why I post it more than anything and, to keep the "Tips and Tricks" section of the forum true to it's name.
We just bid on some ornate aluminum fence work. I swear I heard him tell me that the pickets are all solid stock and something about "Bell bows."
Miller ABP 330, Syncrowave 250, Dynasty 300 DX.
Honorary member of the Fraternity of Faded Tee Shirts.
- Otto Nobedder
-
Weldmonger
-
Posts:
-
Joined:Thu Jan 06, 2011 11:40 pm
-
Location:Near New Orleans
Jeff,
I'd trade jobs with your for a week in a heartbeat, just to spend a little time on your side of the industry. I enjoy welding aluminum, and fabbing one-off things up, and you seem to have the best of both worlds in your trade.
Keep 'em coming... The posts show I'm not the only one who admires your work.
Steve S
Half the time I wonder if we don't happen by this forum as a vent, as much a share. Who else would we talk to about this stuff that would understand?
Other members from this forum have been to my shop to try their hand at it. I didn't have a lot of time to really get into a project, but anyone is welcome anytime.
I started in this marine stuff when there were at most, 6 shops that specialized with this aspect of welding in the state of FL. Now there is page upon page of them in a google search. I don't think I am so great, other than to have survived the market trends over the decades to still be doing it, while so many have folded in the process. I still keep in touch with some of the actual pioneers of this art.
With that said, y'all are great to share/vent this stuff with. I appreciate the interest.
Miller ABP 330, Syncrowave 250, Dynasty 300 DX.
Honorary member of the Fraternity of Faded Tee Shirts.
- dynasty200sd
-
Guide
-
Posts:
-
Joined:Sat Mar 08, 2014 10:39 pm
-
Location:Holley, FL
Where in Florida? I live in NW Florida between Pensacola and Destin.TamJeff wrote:Half the time I wonder if we don't happen by this forum as a vent, as much a share. Who else would we talk to about this stuff that would understand?
Other members from this forum have been to my shop to try their hand at it. I didn't have a lot of time to really get into a project, but anyone is welcome anytime.
I started in this marine stuff when there were at most, 6 shops that specialized with this aspect of welding in the state of FL. Now there is page upon page of them in a google search. I don't think I am so great, other than to have survived the market trends over the decades to still be doing it, while so many have folded in the process. I still keep in touch with some of the actual pioneers of this art.
With that said, y'all are great to share/vent this stuff with. I appreciate the interest.
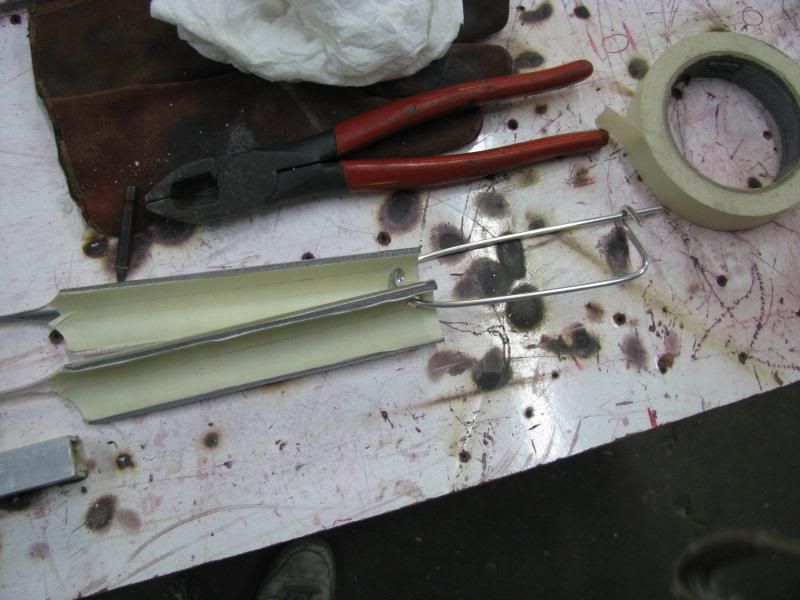
I reckon this falls into the "third hand" category but figured it fits here as well. I have to set bows, or arched pipes as framing for canvas. So I made a set of these to hold my bows flush to the perimeter rails while I tack them in place. They're lined with masking tape to keep from arcing out. They're made from a scrap of 1" sched 40, which is a perfect fit on the 3/4" bows with the tape. Saves a lot of time and the setup is nearly instantaneous. There is two, one for each end.
And a handy little filler wire clasp to keep them handily together. I hang them on the wall by all my other junk.
I suppose the masking tape should be mentioned as well. Amazing how rugged it is with regard to welding aluminum and I sure use it enough. Sure you can roast it into submission, but for fitting and heat associated with tacking, it's pretty resilient. As it is, with the help of these little doo-dads, I can fully fabricate and weld a 6'x7' canvas lid, with mounting points etc in about 4 hours. Double that for the double ring, clam shell deal pictured below.
I'm at the age where I refuse to work any faster. By now I figure I ought to be getting paid for what I know and make guest appearances, but that hasn't quite worked out.
It trips my boss out that I don't put two tables together for these builds. I guess it does look funny sitting there like that.
Miller ABP 330, Syncrowave 250, Dynasty 300 DX.
Honorary member of the Fraternity of Faded Tee Shirts.
Very nice work with this ! I would like to make
My own t top for my 16.5 ft boat. What grade of aluimum
Do you use to make those bends? Is there
Plans available out there for a guy to make a
Top like this for my boat? Very nice work!!!
My own t top for my 16.5 ft boat. What grade of aluimum
Do you use to make those bends? Is there
Plans available out there for a guy to make a
Top like this for my boat? Very nice work!!!
- Otto Nobedder
-
Weldmonger
-
Posts:
-
Joined:Thu Jan 06, 2011 11:40 pm
-
Location:Near New Orleans
Hi, mattc,
Thanks for bringing this one out of the basement!
I can tell you, TamJeff does not work from plans. He does one-off custom work in every case. If you read the entire thread, you'll see that he uses stock-bend pieces he stores to mock up his designs, but they are all "scratch-builds."
He also works primarily in anodized aluminum, presumably 6061.
I've not heard from him in a bit, so I hope your interest brings him out of the woodwork...
Steve S
I was wondering if it was 50 or 60 series aluminum, I was told
The 60 series didn't bend very well. And that 50
Series was best for bending. But,I dont know if that was accurate
Info. I have worked extensively with carbon and
Stainless steel,but I'm a rookie with aluminum.
The 60 series didn't bend very well. And that 50
Series was best for bending. But,I dont know if that was accurate
Info. I have worked extensively with carbon and
Stainless steel,but I'm a rookie with aluminum.
- Otto Nobedder
-
Weldmonger
-
Posts:
-
Joined:Thu Jan 06, 2011 11:40 pm
-
Location:Near New Orleans
6063 will bend tight... A soft-annealed 60-series.
I've bent 3/4" 6063 to a 4" radius on the bench, by hand.
This does not equate to Jeff's anodized stuff, though...
Steve S
I've bent 3/4" 6063 to a 4" radius on the bench, by hand.
This does not equate to Jeff's anodized stuff, though...
Steve S
Return to “Tig Welding - Tig Welding Aluminum - Tig Welding Techniques - Aluminum Tig Welding”
Jump to
- Introductions & How to Use the Forum
- ↳ Welcome!
- ↳ Member Introductions
- ↳ How to Use the Forum
- ↳ Moderator Applications
- Welding Discussion
- ↳ Metal Cutting
- ↳ Tig Welding - Tig Welding Aluminum - Tig Welding Techniques - Aluminum Tig Welding
- ↳ Mig and Flux Core - gas metal arc welding & flux cored arc welding
- ↳ Stick Welding/Arc Welding - Shielded Metal Arc Welding
- ↳ Welding Forum General Shop Talk
- ↳ Welding Certification - Stick/Arc Welding, Tig Welding, Mig Welding Certification tests - Welding Tests of all kinds
- ↳ Welding Projects - Welding project Ideas - Welding project plans
- ↳ Product Reviews
- ↳ Fuel Gas Heating
- Welding Tips & Tricks
- ↳ Video Discussion
- ↳ Wish List
- Announcements & Feedback
- ↳ Forum News
- ↳ Suggestions, Feedback and Support
- Welding Marketplace
- ↳ Welding Jobs - Industrial Welding Jobs - Pipe Welding Jobs - Tig Welding Jobs
- ↳ Classifieds - Buy, Sell, Trade Used Welding Equipment
- Welding Resources
- ↳ Tradeshows, Seminars and Events
- ↳ The Welding Library
- ↳ Education Opportunities