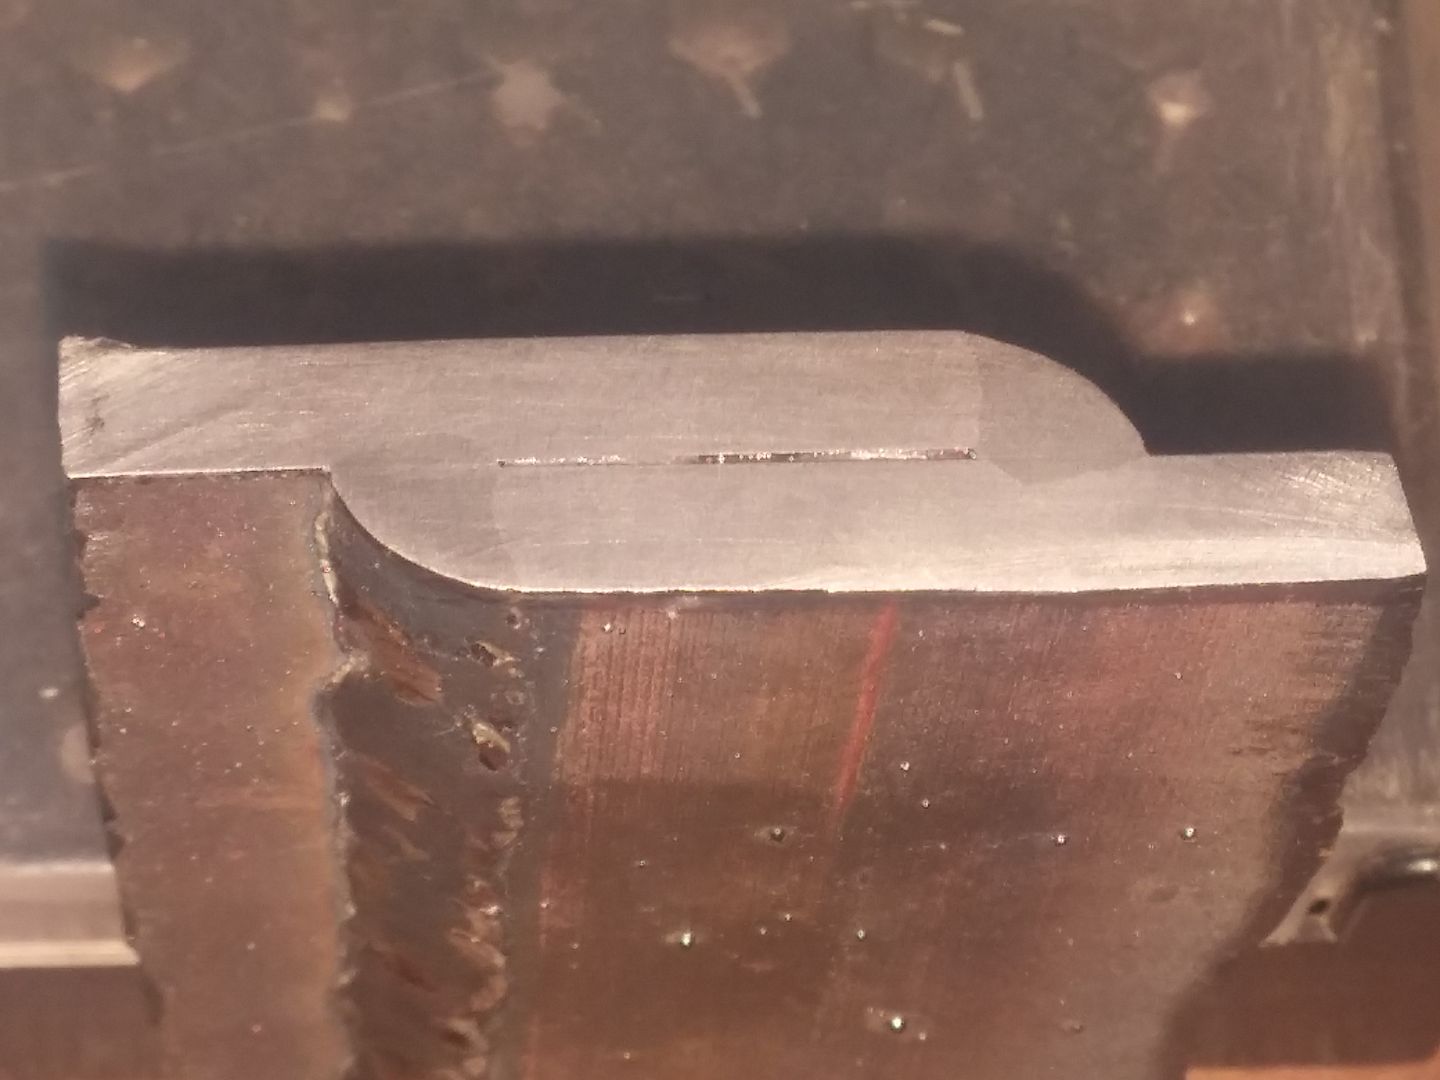
Tig welding tips, questions, equipment, applications, instructions, techniques, tig welding machines, troubleshooting tig welding process
Post Reply
paffy
  • Posts:
  • Joined:
    Sun Jun 12, 2016 4:48 pm

P1020786.JPG
P1020786.JPG (54.43 KiB) Viewed 1072 times
I've just made my first TIG weld. Seems to me I was dwelling too much at the start, then doing almost OK for an inch before I tripped and it all went downhill from there.

Am I on the right path here ? What should I change and concentrate on ?
exnailpounder
  • Posts:
  • Joined:
    Thu Dec 25, 2014 9:25 am
  • Location:
    near Chicago

Not real bad. You have the idea, you just need some seat time. Your metal is deeply etched so it's not clean and you would post better results if it was. My 2cts...post pics and stick around because we will try to help you. Your welds look fine for a FNG...just kidding... 8-)
Ifyoucantellmewhatthissaysiwillbuyyouabeer.
paffy
  • Posts:
  • Joined:
    Sun Jun 12, 2016 4:48 pm

Here's an attempt at a seam weld. I started, it seemed too cold, bumped the power couple amps.

I'm welding outdoors with a 5 cup and end up with a slight oxidation layer - would a gas lens prevent this ?
CAM00006.jpg
CAM00006.jpg (51.69 KiB) Viewed 1048 times
paffy
  • Posts:
  • Joined:
    Sun Jun 12, 2016 4:48 pm

Testing a tube joint to failure:
CAM00012.jpg
CAM00012.jpg (66.53 KiB) Viewed 1048 times
paffy
  • Posts:
  • Joined:
    Sun Jun 12, 2016 4:48 pm

inside of 50° tubing joint. The oxidation - how do I prevent it ?
CAM00016.jpg
CAM00016.jpg (31.84 KiB) Viewed 1049 times
paffy
  • Posts:
  • Joined:
    Sun Jun 12, 2016 4:48 pm

I have no welding experience and nobody to guide me, so any input will be highly appreciated !

For example - is it OK to do a 2nd pass over an ugly spot without any filler and "massage it" into a surrounding area ?
CAM00017.jpg
CAM00017.jpg (29.4 KiB) Viewed 1049 times
User avatar
  • Posts:
  • Joined:
    Thu Jan 06, 2011 11:40 pm
  • Location:
    Near New Orleans

paffy wrote:I have no welding experience and nobody to guide me, so any input will be highly appreciated !

For example - is it OK to do a 2nd pass over an ugly spot without any filler and "massage it" into a surrounding area ?
It's called "dry-washing" a weld, and it's fairly common practice (I do it often when there's a need for the weld to be more attractive than I've produced), though the golden-arms will deny doing it. However, there must be enough filler metal there in the first place, or dry-washing will produce undercut on the edges of the weld.

Have patience... this forum operates at a slower pace than most, but at a much higher level of quality.

Steve S
paffy
  • Posts:
  • Joined:
    Sun Jun 12, 2016 4:48 pm

Otto Nobedder wrote:
paffy wrote:I have no welding experience and nobody to guide me, so any input will be highly appreciated !

For example - is it OK to do a 2nd pass over an ugly spot without any filler and "massage it" into a surrounding area ?
It's called "dry-washing" a weld, and it's fairly common practice (I do it often when there's a need for the weld to be more attractive than I've produced), though the golden-arms will deny doing it. However, there must be enough filler metal there in the first place, or dry-washing will produce undercut on the edges of the weld.

Have patience... this forum operates at a slower pace than most, but at a much higher level of quality.

Steve S

Thank you ! I seem to struggle with slowing down my movement and dabbing too much rod in there. I've managed to get rid of the blobs by circling over them. It almost seems like I can direct the puddle with the gas flow and spread it that way...
Douglas
  • Posts:
  • Joined:
    Fri May 27, 2016 10:30 pm
  • Location:
    Northern Arizona

Have you tried Jody's Tig Welding Skill Drill? It helped find a good rhythm.
User avatar
  • Posts:
  • Joined:
    Thu Dec 26, 2013 12:41 am
  • Location:
    Laredo, Tx

You're obviously doing vehicle-related welding. Take your time if you're welding structural stuff. Get some naval jelly or phosphoric acid to etch your practice welds. But you need to properly slice them up to inspect penetration/fusion.

Image
Image
paffy
  • Posts:
  • Joined:
    Sun Jun 12, 2016 4:48 pm

Douglas wrote:Have you tried Jody's Tig Welding Skill Drill? It helped find a good rhythm.
That's what I started with ! Became an expert on resharpening the electrode during that exercise ...
paffy
  • Posts:
  • Joined:
    Sun Jun 12, 2016 4:48 pm

[quote="Oscar"]You're obviously doing vehicle-related welding. Take your time if you're welding structural stuff. Get some naval jelly or phosphoric acid to etch your practice welds. But you need to properly slice them up to inspect penetration/fusion.

That's the plan if I feel confident.

Is it OK if I keep ripping and bending the welds to see how/where they fail ? For example, the first weld in this thread , after I separated it, obviously didn't have enough penetration/fusion at several spots...

I'll definitely cut something across and put naval jelly on it though !
User avatar
  • Posts:
  • Joined:
    Thu Dec 26, 2013 12:41 am
  • Location:
    Laredo, Tx

paffy wrote:Is it OK if I keep ripping and bending the welds to see how/where they fail ? For example, the first weld in this thread , after I separated it, obviously didn't have enough penetration/fusion at several spots...
That's up to you, but ponder me this: even if a hypothetical weld is performed with the utmost care, and according to qualified procedure(s), you can still make it fail if you subject it to enough stress to rupture the material (just like anything else in this world). Does that give insight into where the weld procedure went wrong? (remember that it was performed "ideally"). Nope, it will just remind you that nothing is infinitely strong.
Image
User avatar
  • Posts:
  • Joined:
    Thu Jan 06, 2011 11:40 pm
  • Location:
    Near New Orleans

paffy wrote:
Oscar wrote:You're obviously doing vehicle-related welding. Take your time if you're welding structural stuff. Get some naval jelly or phosphoric acid to etch your practice welds. But you need to properly slice them up to inspect penetration/fusion.

That's the plan if I feel confident.

Is it OK if I keep ripping and bending the welds to see how/where they fail ? For example, the first weld in this thread , after I separated it, obviously didn't have enough penetration/fusion at several spots...

I'll definitely cut something across and put naval jelly on it though !
I recently did cut and etch work on carbon steel (a first for me, as I work primarily in stainless). The results are informative, and the method is in the posts.
http://forum.weldingtipsandtricks.com/v ... =24&t=9672

Steve S
paffy
  • Posts:
  • Joined:
    Sun Jun 12, 2016 4:48 pm

CAM00043.jpg
CAM00043.jpg (32.43 KiB) Viewed 754 times
I've tried some low clearance welds and got completely stuck on this one. Tried extending the electrode, but it wasn't shielded and just burned up. Same thing with building an argon dam with aluminum foil.

Is there a way to get in there somehow ? Stick weld it maybe ?
  • Posts:
  • Joined:
    Sun May 01, 2016 7:46 am
  • Location:
    Fort Myers Florida

Otto Nobedder wrote:
paffy wrote:I have no welding experience and nobody to guide me, so any input will be highly appreciated !

For example - is it OK to do a 2nd pass over an ugly spot without any filler and "massage it" into a surrounding area ?
It's called "dry-washing" a weld, and it's fairly common practice (I do it often when there's a need for the weld to be more attractive than I've produced), though the golden-arms will deny doing it. However, there must be enough filler metal there in the first place, or dry-washing will produce undercut on the edges of the weld.

Have patience... this forum operates at a slower pace than most, but at a much higher level of quality.

Steve S
I beg your pardon good man, I have dry washed a weld maybe once. Once every time I do very high end rail work :lol: Some people don't like the ripple effect, they like the perfect "caulk" look, usually the polished stainless/cable snobs.
AWS D1.1 / ASME IX / CWB / API / EWI / RWMA / BSEE
Scientists have substituted mathematics for experiments, and they wander off through equation after equation, and eventually build a structure which has no relation to reality." Nikola Tesla
User avatar
  • Posts:
  • Joined:
    Thu Dec 26, 2013 12:41 am
  • Location:
    Laredo, Tx

paffy wrote:
CAM00043.jpg
I've tried some low clearance welds and got completely stuck on this one. Tried extending the electrode, but it wasn't shielded and just burned up. Same thing with building an argon dam with aluminum foil.

Is there a way to get in there somehow ? Stick weld it maybe ?
with one of fhese
Image
Image
User avatar
  • Posts:
  • Joined:
    Sun Sep 22, 2013 10:14 am
  • Location:
    Minneapolis Mn 55407

Oscar wrote:
paffy wrote:
CAM00043.jpg
I've tried some low clearance welds and got completely stuck on this one. Tried extending the electrode, but it wasn't shielded and just burned up. Same thing with building an argon dam with aluminum foil.

Is there a way to get in there somehow ? Stick weld it maybe ?
with one of fhese
Image
I have one,handy little bugger,use it more than I thought,got it cause it was cute/cuddly. ;)
Everlast 250EX
Miller 250 syncrowave
Sharp LMV Vertical Mill
Takisawa TSL-800-D Lathe
Coupla Bandsaws,Grinders,surface grinder,tool/cutter grinder
and more stuff than I deserve(Thanks Significant Other)
paffy
  • Posts:
  • Joined:
    Sun Jun 12, 2016 4:48 pm

Here's my project that got me into welding:
CAM00201.jpg
CAM00201.jpg (57.09 KiB) Viewed 681 times
CAM00203.jpg
CAM00203.jpg (49.59 KiB) Viewed 681 times
I think it looks OK....
weldTheWorld
  • Posts:
  • Joined:
    Sat Aug 13, 2016 12:16 am

I don't think they look too bad. You're doing better than I was at that point lol
  • Posts:
  • Joined:
    Mon Jul 18, 2016 2:07 pm
  • Location:
    Mesa, AZ

Oscar Sanchez, Math Dept. Got a smarty pants in the house eh? :P That's pretty awesome if you're any degree of a mathematician. I'm pretty good at math and will always appreciate anyone who's gone my distance and further.

As for my fellow n00b, welcome! These guys here have been so helpful for me. I started my thread starting with my very first welds to a couple weeks later where we're at now. We've got several members here who've helped me along and gotten me on the right track. Freely ask anything you feel you need and beyond a lil scathing they'll be very educational :)

The most important n00b tip I can share with you is the Three Cs of TIG. clean Clean CLEAN! The second more important tip I can share, is patience, Patience, PATIENCE! You're not MIGin or Stickin so take your time, because you can with TIG. The 3Ps was the hardest one for me to understand because I live and breath process, not art.

You've got a good mindset with welding and breaking your pieces as long as it won't be a true final product. It will help teach you just how much penetration you have and then you can re-weld it pretending you're fixing something not to mention less wasted material and more practice time under the hood.

If you're doing car parts, particularly stuff that will have someone's life on a thread, then I highly suggest you spend a lot of time before you consider your first true safety concerning weld. That's just me but I don't think anyone in the world would disagree there. TIG is an art form, not a process like stick or MIG. Take your time, and once you get it, you still don't get it. It'll be a frustrating and wonderful journey which I've only just begun myself. After your first full week under the hood, you'll likely not regret a single moment and find yourself with a new addiction too :)

P.S. a good welding hood will do your wonders with TIG. I'm glad I sucked it up and purchased the Optrel e684 because it automatically adjusts shading to the arc light which is huge when you're learning to pulse the pedal.
Lincoln Electric AC225
Everlast PowerPro Multi-Process TIG/Stick/Plasma 256Si
Everlast W300 WaterCooler
Optrel e684x1
22+ Year Security Engineer developing cool shit and stoppin hackers :)
  • Posts:
  • Joined:
    Mon Jul 18, 2016 2:07 pm
  • Location:
    Mesa, AZ

Yep some more n00b tips from a n00b while they're still fresh in the n00b mind ;)

Tungsten grinding seems to be VERY important as well. I started out grinding at the bottom side of the wheel but you're really supposed to be grinding with the top. I found especially with aluminum that you need a really good grind. If you half ass it or if you get one deep flat side, your arc will be on a path of destruction rather than a path of beads. I had a flat spot once and I my arc ended up arc'ing to my cup rather than the plate which resulted in radiation burns on my part.

If you evenly grind it all the way around and look at it to confirm you've got even grinding then usually the arc is your last concern. If you have an irregular pattern say because the tungsten jumped off the wheel, then keep grinding otherwise you'll be troubleshooting something you'll never fix. A consistent grind/twist is all you need and you'll never have a reason to suspect the tungsten. If you stop for too long or it jumps off the wheel, continue grinding.

Sure eventually you'll have almost no tungsten left but you'll also have that tiny piece of tungsten you need when you step into that fancy lil pencil torch Oscar recommended. Rather than clipping a good piece, now you've got a piece that'll fit with a button cap! So keep it when it gets really short because with those cluster joints, you'll be happy you didn't waste any time learning and came out with a piece to start your career with :)

Last piece is if you can, move in side or shield your work area with say a 10'x10' gazebo or even some clothesline and some towels. I have never heard a single person complain about a gas lens no matter the job so it'll be worth it. With a way to block any wind and a gas lens you won't really be wondering if gas coverage is an issue assuming you've got gas and you set the flow right.

Since you're running steel you might appreciate the results of a gentle but thorough scotch brightening of your filler rod. I found it damn near impossible to get a shiny weld beyond joining parts without this. Even with joining my joints turned out better more often than not with some scotch brite. Oscar recommends I think the red or brown pads, not so much the green. I'm using green and I'm happy with the improved results. Regardless, my ER70S2 rods came in a crappy box that was beat up and my rods all had plenty of cardboard dust on them. This ended up being the final piece of the puzzle to getting a half ass decent weld. The rest was up to the operator which still has a long way to go.

If you have a heavy torch, or even if not, you might find a bunjee cord attached above you with the cable routed through it will take the weight off the torch so you don't have to figure out some random way to hold it. Using the bunjee took the weight of the torch out of the equation when I had to question my ability to progress so if you can, can't hurt!

My final tip, your gloves are the last thing you put away. You can take them off sure, just don't put em away till you shut the machine down, turned the gas off, and you really walk away. Your fingers will appreciate it.

Ok I'm done with my n00b to a n00b tips. Have fun and I look forward to watching your progress as I progress myself :)
Attachments
Tungsten grinding procedure
DSC03664.JPG (27.58 KiB) Viewed 622 times
Bunjee cord holding my #18 heavy torch to reduce weight
DSC03650.JPG (35.06 KiB) Viewed 622 times
Lincoln Electric AC225
Everlast PowerPro Multi-Process TIG/Stick/Plasma 256Si
Everlast W300 WaterCooler
Optrel e684x1
22+ Year Security Engineer developing cool shit and stoppin hackers :)
Post Reply