Page 69 of 131
Re: The what I welded today (/whenever) thread (pics please)
Posted: Mon Mar 21, 2016 8:47 pm
by zank
Re: The what I welded today (/whenever) thread (pics please)
Posted: Mon Mar 21, 2016 11:13 pm
by Hollywood1
looks good zank!
Re: The what I welded today (/whenever) thread (pics please)
Posted: Mon Mar 21, 2016 11:47 pm
by Rick_H
Tried my hand at some simple nut, bolt and fitting critters... Made some mice for my kids or Easter out of some scrap. I'll admit it was kinda fun!
Re: The what I welded today (/whenever) thread (pics please)
Posted: Tue Mar 22, 2016 4:49 am
by AFR_Autoworks
BigD wrote:AFR_Autoworks wrote:Every joint specified that requires gussets is where there would be two bars intersect to form an X. I would certainly agree that for most cases FIA is overkill. It is just great information to know. I find drift cages to be an absolute joke. Mind you the crashes that a drift car will see are very minor compared to rally.
Came across this today, goes back to what we were talking about... just because someone will let you do 9s passes with barely a hoop, it doesn't mean you should...
Video showing his "cage":
https://www.youtube.com/watch?v=e9UCaVGBd5k
RIP:
http://honda-tech.com/attachments/drag- ... 160709.jpg
Completed all of the additions I wanted to do. I couldn't fully weld the forward/upper joint on the gusset bars for the strut tower bars, will weld a 1/8" triangle plate in there to make up for that.
The attachment 10003252_10154212047013287_1222364715429269989_n.jpg is no longer available
The attachment 10357245_10154205593108287_3641707928343058516_n.jpg is no longer available
The attachment 1918848_10154212047008287_5219981817817531595_n.jpg is no longer available

- image.jpeg (95.23 KiB) Viewed 2243 times

- image.jpeg (64.75 KiB) Viewed 2243 times
Unfortunately he did not have enough cage to be running that kind of MPH or ET... It is really sad to see. I am sure someone somewhere is going to be in some pretty serious trouble for letting that happen.
One other thing I feel I should add for those new to roll cages... Although most sanctions to not require anti-intrusion bars, in my opinion they are an absolute must! A few years ago in a drift competition I put my E30 into a wall at 130km/Hr (or 80mph). I did not have them as they were not needed at the time. After almost losing my feet I know the importance of them first hand! The only thing that saved me is my cage was built really far forward, my door bars were way over constructed and I had a dash bar.
Re: The what I welded today (/whenever) thread (pics please)
Posted: Tue Mar 22, 2016 8:28 am
by Rick_H
@zank Beautiful work as always, so your building a fattie? 3" or 4"+?
Re: The what I welded today (/whenever) thread (pics please)
Posted: Tue Mar 22, 2016 12:59 pm
by Sandow
BigD wrote:
Yeah, when one of our guys crashed our Chump, it looked rough from the outside. The driver was only emotionally damaged and the car was almost unchanged between the axles, while outside of the cage it was wiped out pretty hard.
The attachment 10405281_10152910788208287_5478236345307868806_n.jpg is no longer available
I refused to get back in the car (I was pretty much done with this kind of racing at this point, maybe I'm not "hardcore" enough but this was unacceptable to me) but the other guys used two trucks to bend the ends straight as much as they could, sawzalled off the metal touching the tires and finished the race!
Yeah, we did something like that:

- one less opel
- IMG_20130922_160200.jpg (66.51 KiB) Viewed 2193 times
We got hit by an opel hard enough that the fender crunched in and the front right tire of the opel contacted the back of our front left. Opel popped straight up in the air about a foot and a half and came down with a frame bending thunk. I sliced the end of the fender off with a sawzall after some hammer time and then zip tied the bumper back together. Got back on the track after 15 min down lol.
More in keeping with what you guys had happen, a team a few spots down in the paddock separated the from and back of a pontiac after a pretty minor tap. The car was pretty much unseemed behind the driver seat and the only think that kept it together was the rear stays and the main hoop. They used cargo straps to pull the front and back into relative alignment and then tacked it in place. I jumped on board to help them after the race was done for the day. They had been using a flux core mig to try and do it all so there were aspects that were just a mess by the time I got in with tig. In the space of about 4 hours we had three layers of 11 gauge metal tying the front and back together as well as tying the left main hoop plinth to the transmission tunnel. Not my prettiest work (and the copious amount of booze they were pouring into may have contributed...) but they finished the next day of racing without issue.

- ick
- IMG_4528.jpg (72.88 KiB) Viewed 2193 times
We probably would have managed the most heroic repair award but these guys did an engine swap in speedos...

- OMG my eyes!
- IMG_4525.jpg (69.39 KiB) Viewed 2193 times
You've seen it. You can't unsee it.
-Sandow
Re: The what I welded today (/whenever) thread (pics please)
Posted: Tue Mar 22, 2016 1:19 pm
by Sandow
BigD wrote:The back stays are terminated on top of the stock spring perch area. This was part of the original roll bar and it's too much work to improve for now. At some point I would like to tie it into the strut towers and diff mount.
The backstay angle looks good and that is at least somewhat reinforced metal they are tied to so from the safety standpoint you seem ok. If you were going for frame rigidity, it wouldn't be perfect but you could tie the towers in from the sides like this without it being a huge amount of work. Granted, the only thing I like less that welding while contorted around a brake rotor is the joys of climbing into a trunk to weld...

- tower linkage
- My Ideas - 9.png (527.44 KiB) Viewed 2190 times
-Sandow
Re: The what I welded today (/whenever) thread (pics please)
Posted: Fri Mar 25, 2016 5:04 am
by ajlskater1
Had a run of 300 of these little 20 gauge 304 boxes to do today. Need to be water tight and full pen. Boss doesn't believe in purging lol used a block on the accident to trap the gas
Re: The what I welded today (/whenever) thread (pics please)
Posted: Fri Mar 25, 2016 5:49 am
by Coldman
You're making your butt boss look good!
Re: The what I welded today (/whenever) thread (pics please)
Posted: Fri Mar 25, 2016 7:18 am
by LtBadd
Coldman wrote:You're making your butt boss look good!
+1

Re: The what I welded today (/whenever) thread (pics please)
Posted: Fri Mar 25, 2016 11:57 am
by Rick_H
Custom parts for a bottle dryer I designed
Re: The what I welded today (/whenever) thread (pics please)
Posted: Fri Mar 25, 2016 1:28 pm
by LtBadd
Rick_H wrote:Custom parts for a bottle dryer I designed
Looks good Rick, seeing your weld reminds me of my last employer who was emphatic about us brushing our sst welds.
Re: The what I welded today (/whenever) thread (pics please)
Posted: Fri Mar 25, 2016 5:50 pm
by Rick_H
LtBadd wrote:Rick_H wrote:Custom parts for a bottle dryer I designed
Looks good Rick, seeing your weld reminds me of my last employer who was emphatic about us brushing our sst welds.
Mine all get pickled clean, and polished in most cases...
Re: The what I welded today (/whenever) thread (pics please)
Posted: Fri Mar 25, 2016 10:43 pm
by MosquitoMoto
Broken...
On the way...
...and done, ready for finishing.
Always a bit nervous about posting my meagre efforts here amongst the work of gurus, but what the heck. Apologies in advance for the lousy pics.
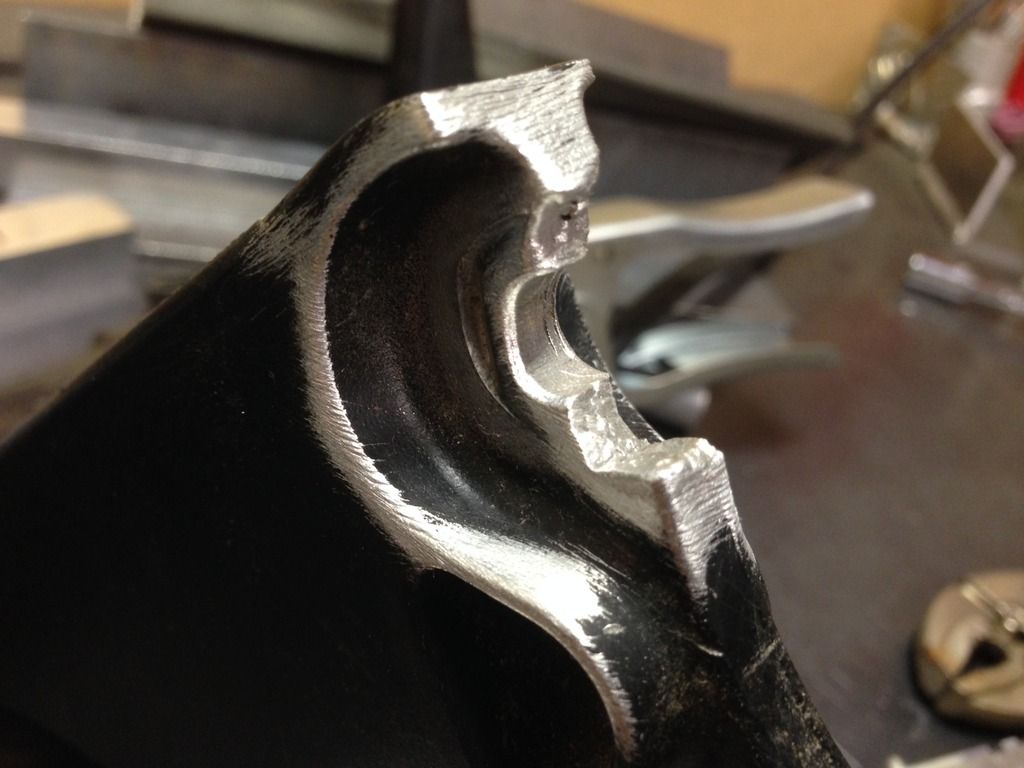
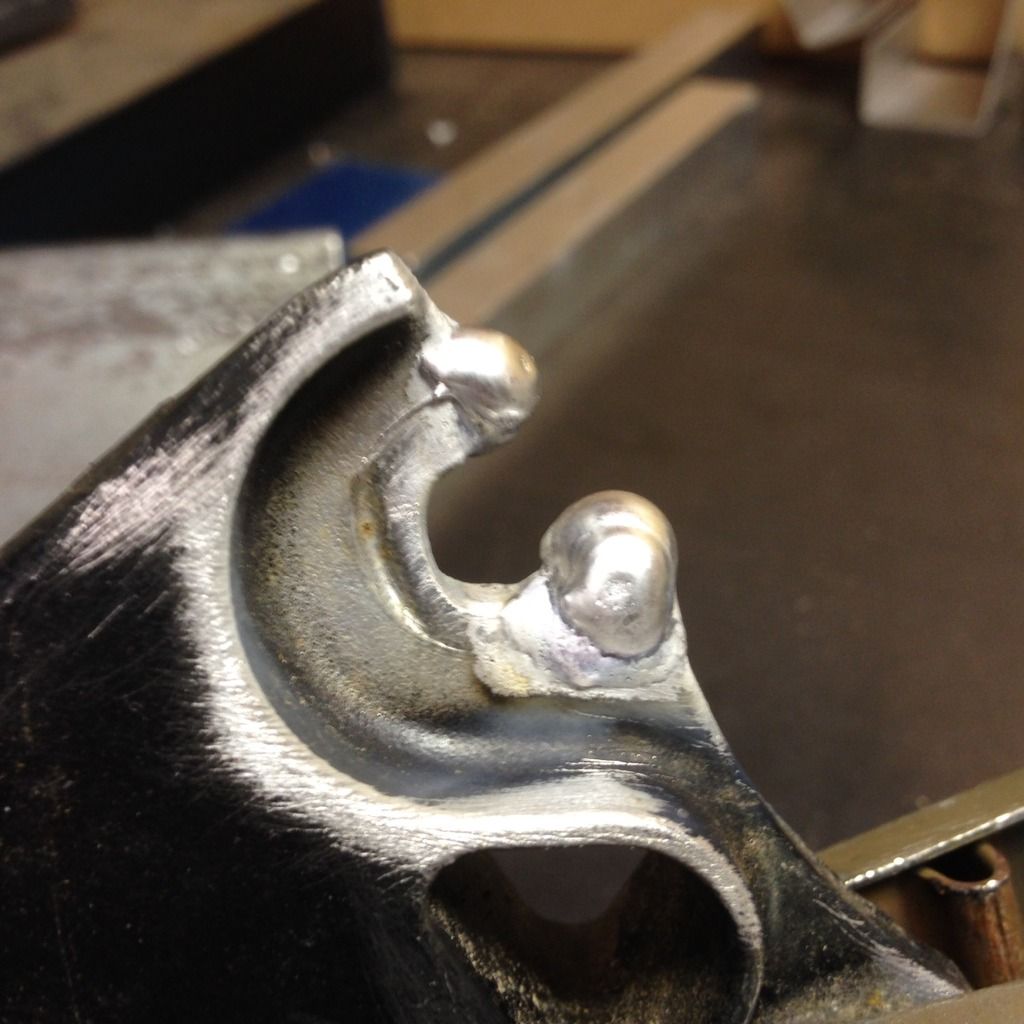
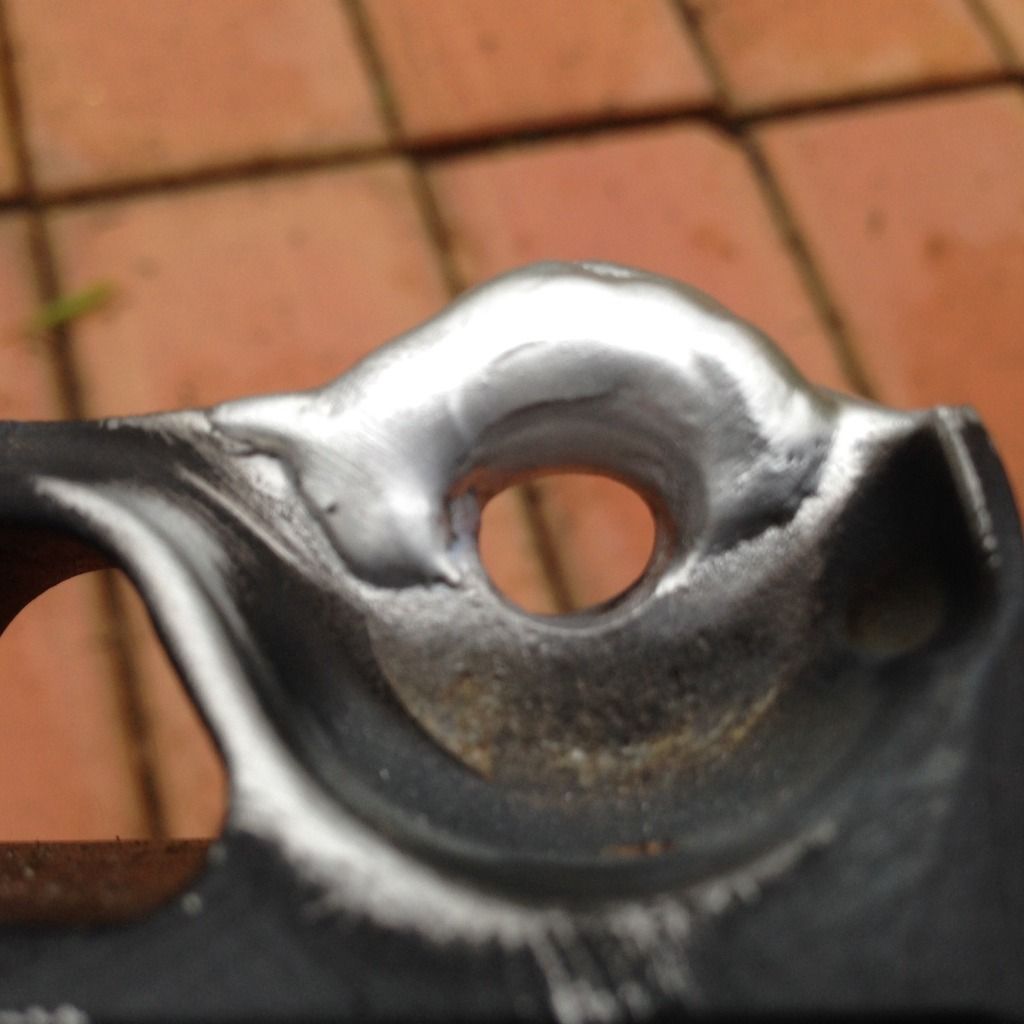
Tackled a broken cast aluminium motorcycle subframe yesterday. Needed to rebuild a missing bolt lug. Cleaned with brush and acetone, then got started.
85 amps, 30% cleaning, 120Hz, machine running AC squarewave. 2.4mm, 2 percent Lanth electrode, 5356 filler (2mm) and gas at around 8 lpm. Everything behaved. Let the cleaning action do its thang, then added some filler, let things cool a little, added some more. Surprised that black powder coat quite nearby wasn't affected at all.
Part has since been finished/shaped and is back in service - no porosity or nastiness. Pretty happy with the result. In retrospect 85 amps was probably a tad high and I could also have used 2.4mm filler instead of 2mm, but all good.
Always happy for any feedback, of course. Still just a noob at this, really and keen to learn more.
Kym
Re: The what I welded today (/whenever) thread (pics please)
Posted: Sat Mar 26, 2016 2:18 am
by OzFlo
Nice work Kym! So is this from your bike or somebody else's?
Rick_H and ajlskater1 nice work with the stainless..
Flo
Re: The what I welded today (/whenever) thread (pics please)
Posted: Sat Mar 26, 2016 7:24 am
by Harry72
Helped out a mate the other day, poor bugger was cruising along the hyway and ran over a centre punch of all things...
Went through the tyre and punched a neat hole in his near new 20" alloy rim!
The hole was about 6mm(1/4")in dia

Inside the rim after welding

outside the rim

The finished job

The rim is back on the car and balanced up well(was afraid of unbalancing the rim)with no leaks

charged him mates rate... 6 pack of amber fluid of course

I beveled the hole out with a countersink both sides then drilled out the centre with a 6mm drill, then cleaned up the paint work with a 80g zirc flap disc in my cordless drill(gentler than a grinder...).
was surprised just how thin these rims are(they're not cheapy's either) I estimate no more than 5mm thick, I put a SS backer to trap the argon and stop any drop outs(hell Im still a rookies rookie after all)
Settings, 200a AC square wave, AC balance at about 30%, freq 200hz, 3.2mm 2% lath, 6lpm and 1.6mm 5356 jammed in super fast.
Was the first time using my new CK20 torch... didnt feel any heat at all

The mate was pretty happy saved him about $500 on buying a new rim!
Re: The what I welded today (/whenever) thread (pics please)
Posted: Sat Mar 26, 2016 7:25 am
by Harry72
Dont post such bloody big photo's Harry!
Re: The what I welded today (/whenever) thread (pics please)
Posted: Sat Mar 26, 2016 12:22 pm
by LtBadd
Harry72 wrote:Dont post such bloody big photo's Harry!
Good job Harry
About the photo's we'll let you slide by this time!!
Re: The what I welded today (/whenever) thread (pics please)
Posted: Sat Mar 26, 2016 7:11 pm
by MosquitoMoto
OzFlo wrote:Nice work Kym! So is this from your bike or somebody else's?
Rick_H and ajlskater1 nice work with the stainless..
Flo
Cheers Flo. This is one of my own bikes. I also have a heap of steel frame welding to do on one of my old bikes in the near future. I'll put some pics up here as I progress.
Kym
Re: The what I welded today (/whenever) thread (pics please)
Posted: Sun Mar 27, 2016 6:32 pm
by ex framie
Gday Kym,
Nice work.
I'd be interested on how well that repair lasts, or if it cracks at the HAZ,cast is a funny animal.
Keep me posted please.
Re: The what I welded today (/whenever) thread (pics please)
Posted: Sun Mar 27, 2016 8:08 pm
by MosquitoMoto
ex framie wrote:Gday Kym,
Nice work.
I'd be interested on how well that repair lasts, or if it cracks at the HAZ,cast is a funny animal.
Keep me posted please.
Hey Pete.
Will do. I'd normally beat the crap out of it with a hammer to test the weld, but seeing as this is a usable part (road and track bike) I'll just fit it and see how it lasts.
The part is a subframe that supports the front fairing and instruments. One of the two lugs on the subframe was unbroken, so the repaired lug won't be taking the strain on its own.
And yes, I have also heard all sorts of varying info about cast aluminium - particularly about brittleness/softness at the HAZ. This is a standard Honda part. It welded beautifully and gave no trouble at all, but I've no idea whether this is now a lifetime strength repair or something that might eventually fail. In this case, I'll be the only one risking my neck, so that's okay....
Kym
Re: The what I welded today (/whenever) thread (pics please)
Posted: Fri Apr 01, 2016 11:32 am
by Skylineauto
Re: The what I welded today (/whenever) thread (pics please)
Posted: Fri Apr 01, 2016 3:39 pm
by big gear head
Looks like a lot of work, but it should flow much better.
Re: The what I welded today (/whenever) thread (pics please)
Posted: Sat Apr 02, 2016 5:19 am
by motox
what did you use to cut the pie shaped pieces?
craig
Re: The what I welded today (/whenever) thread (pics please)
Posted: Sat Apr 02, 2016 12:30 pm
by Skylineauto
big gear head wrote:Looks like a lot of work, but it should flow much better.
Most time consuming thing was making sure each section was round and flat. Lots of prep. but in the end it made it much easer to weld up.
motox wrote:what did you use to cut the pie shaped pieces?
craig
Horizontal band saw. Set the fence at 5.5 degrees and rotated the pipe 180 after each cut.


