Tig welding tips, questions, equipment, applications, instructions, techniques, tig welding machines, troubleshooting tig welding process
BigD
  • Posts:
  • Joined:
    Thu Jan 07, 2016 1:56 pm

GreinTime wrote: I'm just about finished with an exhaust for an E30 a friend put an M62TuB44 in. If you check out @greintime3592 on Instagram, I have some videos up there of it. I just got a replacement phone, and didn't back up any pictures or videos offf the old one so I'm starting fresh!

Sent from my VS995 using Tapatalk
I've got a 1000hp one myself
IMG_4389.JPG
IMG_4389.JPG (56.28 KiB) Viewed 2091 times
GreinTime
  • Posts:
  • Joined:
    Fri Nov 01, 2013 11:20 am
  • Location:
    Pittsburgh, PA

With an M62?

Sent from my VS995 using Tapatalk
@bigD
#oneleggedproblems
-=Sam=-
BigD
  • Posts:
  • Joined:
    Thu Jan 07, 2016 1:56 pm

GreinTime wrote:With an M62?

Sent from my VS995 using Tapatalk
Turbo S52, by one I meant E30
GreinTime
  • Posts:
  • Joined:
    Fri Nov 01, 2013 11:20 am
  • Location:
    Pittsburgh, PA

BigD wrote:
GreinTime wrote:With an M62?

Sent from my VS995 using Tapatalk
Turbo S52, by one I meant E30
That's what I figured lol. I want to do an S62 car, but don't want to pay for one. We did a Z3 Mcoupe S62 at a shop I worked at in Ohio, and it was a rowdy unit.

Sent from my VS995 using Tapatalk
#oneleggedproblems
-=Sam=-
  • Posts:
  • Joined:
    Sat Dec 03, 2016 9:22 am

Here’s a quick one. It’s an off-the-shelf 20” Eastwood metal brake that I got on sale for $130, or less, free shipping, no extortion paid to the involuntary State organization.
Eastwood.jpg
Eastwood.jpg (41.39 KiB) Viewed 2065 times
Cut Flanges.jpg
Cut Flanges.jpg (57.61 KiB) Viewed 2065 times
My indoor space is very limited for welding. So the first thing that I built when I finally decided to upgrade to an AC/DC TIG unit, a couple of years ago, was a very compact welding table. And I recently decided to add a rudimentary metal brake to my little workshop, so I selected this particular one because it seemed a perfect fit, with some slight modification only, to integrate onto the compact welding table and to also be able to be quickly removed with no tools, when desired.
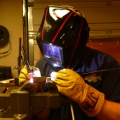
Tack Up.jpg
Tack Up.jpg (54.55 KiB) Viewed 2065 times
Weld Up.jpg
Weld Up.jpg (49.2 KiB) Viewed 2065 times
So, I’m happy to say that it swiftly (about 3 hours) came out as well or better than I thought it might. And due to the division-of-labor, the $130 was a nice value and time-saver over designing and building a custom/homemade brake. I mean, it’s great to see people making their own stuff that way. And that’s what I did for the compact welding table, because there was nothing off-the-shelf that suited my space and purpose at any price, so I did take the time for that project. But this metal brake was, for me, an easy choice. It’s not a finger-box style one, but for what I want to do, it’ll undoubtedly do fine for two or three sides of some .100 or .125 aluminum diamond plate stuff that I like.
EZ Mount.jpg
EZ Mount.jpg (39.5 KiB) Viewed 2065 times
Done.jpg
Done.jpg (54.57 KiB) Viewed 2065 times
Here's a late entry: I was curious about how I would go about making a softer radius for 90 degree bends on aluminum, to prevent chances of cracking. The fancier metal brakes have an adjustment for that. But for this simple brake, just using C-clamps to back-off the bar edge, instead of using the mostly-fixed T-handles, gives all the adjustability I'll probably ever want. And I think I could even use this thing like a finger/box brake too, for smaller stuff, by just using deep-throated C-clamps and some bar-strap segments. Wheee... this welding stuff is fun!!!!
Radius.jpg
Radius.jpg (28.5 KiB) Viewed 1994 times
Last edited by C. Livingstone on Wed Jan 04, 2017 12:37 pm, edited 3 times in total.
Peace be with you all,
Christian Livingstone
www.youtube.com/newjerusalemtimes

Everlast AC/DC 210EXT (2015)
CAT250D DC-TIG/Plasma Combo
User avatar
  • Posts:
  • Joined:
    Thu Jan 06, 2011 11:40 pm
  • Location:
    Near New Orleans

Pretty slick, Christian. I particularly like the threaded lifting eyes for bolts, so hand-tight is tight enough, and easy to loosen (and damn near any object that will fit the hole can be wrench if it's stuck).

I also agree with the purchase. Why re-invent the wheel when that was so economically available?

Steve S
  • Posts:
  • Joined:
    Sat Dec 03, 2016 9:22 am

Hey,

Thanks for that, Steve.

Yeah, the unit came with those clever, pop-pin-like T-handles for clamping stuff down, so I thought I'd try to keep the mounting hardware a similarly elegant solution too.
Peace be with you all,
Christian Livingstone
www.youtube.com/newjerusalemtimes

Everlast AC/DC 210EXT (2015)
CAT250D DC-TIG/Plasma Combo
Rcc
  • Rcc
  • Active Member
    Active Member
  • Posts:
  • Joined:
    Fri Aug 26, 2016 6:44 pm

Just got the furick 12 tried it out on some 1/8" stainless really good gas coverage
Attachments
image.jpg
image.jpg (28.75 KiB) Viewed 2189 times
  • Posts:
  • Joined:
    Tue Jul 19, 2016 6:52 am

BigD wrote: I've got a 1000hp one myself
Where do you run that?
-Jon

I learned how to weld at night, but not last night. (despite how my weld looks)

Lincoln Viking 3350 K3034-2&3
Dynasty 210DX w/cps and coolmate3
Lincoln Power Mig 180c
hermit.shed on instagram
User avatar

Rcc wrote:Just got the furick 12 tried it out on some 1/8" stainless really good gas coverage
Nice looking fillet there, is the Furick a 1" cup?
Richard
Website
BigD
  • Posts:
  • Joined:
    Thu Jan 07, 2016 1:56 pm

maker of things wrote:
BigD wrote: I've got a 1000hp one myself
Where do you run that?
Still testing it on smaller local tracks. I designed it for time attack at the big tracks, specifically my 2nd home, Mosport. But I've been finding various issues to work on and have endless scope creep. This winter I was just going to put in a cut-ring headgasket and dropped the motor to do it. And somehow that turned into converting the engine to dry sump and making AN cooling and powersteering systems. When I had the head and pan off, I decided to pull the whole bottom end apart to check the bearings. The bearings looked rough for how much time is on the motor, even with that power level so I took it all apart to replace the bearings. I paid someone to build this motor for me initially... last time I do that. He managed to put it together leaving out the oil squirters (and not capping the holes). In retrospect, the bearings looked amazing for having a 1/4" oil pressure vent.
Rcc
  • Rcc
  • Active Member
    Active Member
  • Posts:
  • Joined:
    Fri Aug 26, 2016 6:44 pm

LtBadd wrote:
Rcc wrote:Just got the furick 12 tried it out on some 1/8" stainless really good gas coverage
Nice looking fillet there, is the Furick a 1" cup?
I believe it is 3/4". Will measure tomorrow. First time giving it a shot had the stick out way out and seemed to still cover good was at about 25cfh
Attachments
image.jpg
image.jpg (35.55 KiB) Viewed 2113 times
User avatar
  • Posts:
  • Joined:
    Sat Aug 01, 2015 8:38 am
  • Location:
    The Land Down Under

Stumbled on a cheap Furick 14 recently and very impressed. Amazing coverage, not particularly gas hungry.


Kym
Rcc
  • Rcc
  • Active Member
    Active Member
  • Posts:
  • Joined:
    Fri Aug 26, 2016 6:44 pm

great cup so far hope to get some more use this week with it.


Rob
User avatar
  • Posts:
  • Joined:
    Tue Dec 13, 2016 9:24 pm
  • Location:
    Clearwater Florida

Next project, a custom cart for a bread slicer. Manufacturer sells one but its all gray painted steel.
Bread slicer wheeled stand 2.JPG
Bread slicer wheeled stand 2.JPG (82.22 KiB) Viewed 2045 times
Bread slicer wheeled stand.JPG
Bread slicer wheeled stand.JPG (97.6 KiB) Viewed 2045 times
They wanted one that was stainless so it matched the kitchen.

1/4" 304 S.S plates for top and removable shelf. Everything is stainless, even the screws and washers. Only thing not stainless is the casters on the bottom.

Had this good idea of eliminating the tradiitonal kitchen bolt through where you put a bolt all the way through the tube and you see it on the other side. Instead I welded in 5/16" X 18 nuts to holes and used them for thread, ended up just threading the 1/8" of metal on some of them but it turned out really good.
IMG_1901.jpg
IMG_1901.jpg (39.74 KiB) Viewed 2045 times
IMG_1902.jpg
IMG_1902.jpg (39.65 KiB) Viewed 2045 times
IMG_1903.jpg
IMG_1903.jpg (32.71 KiB) Viewed 2045 times
Let me know what you think :)
if there's a welder, there's a way
Poland308
  • Posts:
  • Joined:
    Thu Sep 10, 2015 8:45 pm
  • Location:
    Iowa

Welding nuts on to thin SS so I don't have to thread it is a favorite of mine. That way when someone messes up the threads (and someone will, or breaks off a bolt) you just thin wheel the bad one off and weld on a new one.
I have more questions than answers

Josh
User avatar
  • Posts:
  • Joined:
    Tue Dec 13, 2016 9:24 pm
  • Location:
    Clearwater Florida

Poland308 wrote:Welding nuts on to thin SS so I don't have to thread it is a favorite of mine. That way when someone messes up the threads (and someone will, or breaks off a bolt) you just thin wheel the bad one off and weld on a new one.
Absolutely, a very usefull solution to most things. I have had sheet metal doors that were put together with the weldable nutserts but they were never welded, so you try to take the 2 sheets apart and the nut just spins, drives me nuts (no pun intended) every since then, I always weld nuts if I put em on something permanent like this.
if there's a welder, there's a way
Rick_H
  • Posts:
  • Joined:
    Sat Feb 08, 2014 1:50 pm
  • Location:
    PA/MD

Just a little carbon steel, haven't been taking a ton of pics of stuff lately.
Attachments
IMG_20170104_193129585.jpg
IMG_20170104_193129585.jpg (42.05 KiB) Viewed 2176 times
IMG_20170104_212912_334.jpg
IMG_20170104_212912_334.jpg (77.51 KiB) Viewed 2179 times
I weld stainless, stainless and more stainless...Food Industry, sanitary process piping, vessels, whatever is needed, I like to make stuff.
ASME IX, AWS 17.1, D1.1
Instagram #RNHFAB
User avatar

Rick_H wrote:Just a little carbon steel, haven't been taking a ton of pics of stuff lately.
Looks good Rick, good to see you posting again!
Richard
Website
Chuck_junks
  • Posts:
  • Joined:
    Fri Apr 08, 2016 2:00 am
  • Location:
    Western Washington

Image

I work in a commercial laundry for multiple hospitals and due to our new infection control procedures the new disinfectant we have to use in our surgery towel pack room started peeling the paint off our Norman Lift Tables... can't have paint chips making it's way in to an "OR". My plant manager wanted to scrap the 5 tables and buy stainless steel tables like you would see in a restaurant kitchen. The downside is you lose the function of the lift table which lifts a basket/cart across from the operator and pull linen out across the table rather than bending over and pulling out of a basket next to you. My solution that he let me try a "one off" of was to weld a sheet of stainless (88"x34") to the table top. This pic is the operator side of the table, 88" outside corner and 34" fillet. So the process... 16ga 304 stainless to 14ga mild steel using 1/16 and 3/32 309L filler, 75-95 amps, 3/32 2% lanthanated tungsten, gas lens with a #7 cup. Using a TIG Finger and some tricks from Jody like some big blocks of aluminum I rescued from a recycling bin (Navy Shipyard!) made the job a breeze. Got a text this morning that 4 more sheets of stainless had been picked up and to continue with the job!


Sent from my iPhone using Tapatalk
User avatar
  • Posts:
  • Joined:
    Sat Aug 01, 2015 8:38 am
  • Location:
    The Land Down Under

Good work, Chuck.

Smart thinking and a really comprehensive, informative post. Thank you for sharing.


Kym
Jakedaawg
  • Posts:
  • Joined:
    Mon Feb 16, 2015 8:45 pm
  • Location:
    Near Traverse City, Mi.

Rick_H wrote:Just a little carbon steel, haven't been taking a ton of pics of stuff lately.
In one of your pics I see a pair of gloves, do you like those? I have the same pair I think but had a hard time feeling the filler rod. I am just learning though. My "go to " gloves have been a pair of split deerskin that are really soft but don't do much for heat when you get down to the nub of the filler rod. I bought that pair thinking the leather on the fingertips would give me more grip on the filler but they seem to be too thick for my little skills.
Miller Dynasty 280 DX, Lincoln 210 MP, More tools than I have boxes for and a really messy shop.
Rick_H
  • Posts:
  • Joined:
    Sat Feb 08, 2014 1:50 pm
  • Location:
    PA/MD

Jakedaawg wrote:
Rick_H wrote:Just a little carbon steel, haven't been taking a ton of pics of stuff lately.
In one of your pics I see a pair of gloves, do you like those? I have the same pair I think but had a hard time feeling the filler rod. I am just learning though. My "go to " gloves have been a pair of split deerskin that are really soft but don't do much for heat when you get down to the nub of the filler rod. I bought that pair thinking the leather on the fingertips would give me more grip on the filler but they seem to be too thick for my little skills.
They are the HD Weld Porn gloves, I love them.... Favorite gloves right now. They fit great, hold up very well. I feed .030" wire with no issues, I find the feel nice. I also have the light duty gloves, no issues there either. I use to wear the kidskin Tillmans or the Millers, just wasn't happy with the life of the gloves, but they worked just fine.

It takes some time, I've been together welding for quite awhile.
I weld stainless, stainless and more stainless...Food Industry, sanitary process piping, vessels, whatever is needed, I like to make stuff.
ASME IX, AWS 17.1, D1.1
Instagram #RNHFAB
Rick_H
  • Posts:
  • Joined:
    Sat Feb 08, 2014 1:50 pm
  • Location:
    PA/MD

LtBadd wrote:
Rick_H wrote:Just a little carbon steel, haven't been taking a ton of pics of stuff lately.
Looks good Rick, good to see you posting again!
@LtBadd
Yeah, looking forward to doing it more again, been a messy few months in life. Happy New Year Rich! I like my WTT brothers.
I weld stainless, stainless and more stainless...Food Industry, sanitary process piping, vessels, whatever is needed, I like to make stuff.
ASME IX, AWS 17.1, D1.1
Instagram #RNHFAB
BigD
  • Posts:
  • Joined:
    Thu Jan 07, 2016 1:56 pm

I want to learn to weld titanium so I started playing with building a purge setup. Bought some 063 copper to build a little purge box. Never welded copper before, got some 14 gauge romex as filler but I actually found if I pulsed the pedal while moving quickly, I had better luck using no filler at all. Drilling the holes sucked. I didn't think ahead about how the plate would cave so it was hard to keep the holes lined up. Had to cut it apart to flatten it out again and reweld the cap. Ugly but should do the trick. Just need to add the nipple.
14624564_832578286881014_2520553312013516800_n.jpg
14624564_832578286881014_2520553312013516800_n.jpg (61.03 KiB) Viewed 2041 times
15803705_830747323729666_5337200604261384192_n.jpg
15803705_830747323729666_5337200604261384192_n.jpg (65.66 KiB) Viewed 2041 times
Post Reply