When I first ran across this thread I was hopeful a good solution could be found. A number of posters offered suggestions and asked for additional information. I also created a thread over on weldingweb to get some more eyes on the topic:
http://weldingweb.com/showthread.php?53 ... IG-Amptrol
While waiting for additional input, I started gathering info and exploring options. I believe Mike is using a Longevity 250ex which has pulse, 2T, and 4T options. However, based on his comments, I believe he is asking for a mouth operated solution that replicates the actions of a traditional foot pedal variable amperage control.
Most basic pedals use a micro switch to initiate arc, and a rotary potentiometer to control amperage. A DIY approach might include a low cost micro-switch and potentiometer operated by an RC hobby servo. Since we are introducing electrical/electronic components into the mix, we could also consider digital switches and solid state components like digital potentiometers (DigiPots). However, even though I might be willing to let the blue smoke out of my Lincoln 175 by an experiment gone bad, I can’t risk implementing something that might create issues with someone else’s equipment.
The final solution must work reliably, effectively, and safely on equipment that I am not familiar with and can’t test. So, I slowed down and broadened the scope to identify a more systematic, universal approach. For now, my focus is using, where possible, off-the-shelf commercial products.
At this point, I do not believe a simple mouth-operated mechanical/pneumatic type of device will produce a long-term satisfactory result. I am leaning toward some form of proportional, sensor-based solution. The sensor(s) will integrate with an electrical (likely electronic) circuit to provide the final welder control functions.
If an effective solution emerges that addresses the unique challenges of this application, it should open the door to adapting the circuit to meet the needs of other users with unique physical challenges. A side benefit is that able-bodied welders who do a lot of out-of-position work or operate in difficult environments might find good amperage control alternatives as well.
I have defined the key elements and rationale (as I see them). Some of this info is contained in other posts, but is condensed here for reference. I may be off base on some of the details, so clarifications/corrections are welcomed.
The goal is to provide the user with an effective solution while meeting several key requirements:
1. Meet or exceed the response characteristics of traditional foot pedal/torch mounted amperage controls
2. Adapt to the specific needs and personal preferences of the user
3. Protect the user from potentially hazardous conditions
4. Provide a ruggedized solution to withstand a commercial/production environment
5. Protect the welding equipment from damage/warranty issues caused by a badly engineered solution.
An effective solution should meet these guidelines.
My test machine is a Lincoln 175 Square Wave TIG. This is an older design, transformer-based machine. The max weld amperage is set at the machine.
The welding process is controlled by (from the Lincoln literature):
1) A Lincoln Foot Amptrol (K870) is included with the Square Wave TIG 175 for remote current control while TIG welding.
2) K812 Hand Amptrol ™ may be used in place of the Foot Amptrol if a thumb operated remote control is desired.
3) K814 Arc Start Switch -The Arc Start Switch may be used instead of the Foot Amptrol included with the Square Wave TIG 175. It allows on/off TIG welding at the current set by the Current Control on the control panel. The Arc Start Switch does not provide remote current control.
The Lincoln Foot Amptrol pedal uses a micro-switch to initiate the welding process and a 10K rotary potentiometer (linear taper) to control amperage. The initial down-pedal movement triggers the switch and initiates the welding process at the minimum amperage value (in this case the pot is at 10K ohm). Pressing the pedal further rotates the pot and increases weld amperage (up to the maximum value previously set at the welder). The Hand Amptrol works similarly. Other manufacturers use similar processes, although the Ohm value of the potentiometer can vary from manufacturer-to manufacturer and even between models.
Now, using the form-follows-function approach, the initial focus is to duplicate this functionality with an alternate user input control process (mouth-operated in this case).
Approach I – Mouth Operated Alternative to Basic Foot Pedal/Hand Amperage Control
I started designing a system using RC type hobby servos to control a rotary type Amptrol (foot pedal) and getting ideas from a thread on weldingweb where some guys are creating a DIY wireless pedal:
http://weldingweb.com/showthread.php?52 ... foot-pedal
However, I ran across a CK Worldwide Linear Amptrak on eBay for $50. The Amptrak uses a linear pot (a finger-controlled North/South slider) to initiate arc and increase/decrease welding amperage. This one is designed for a 14 pin ESAB, and I ordered a 6-pin Amphenol plug so I can adapt it to the Lincoln.
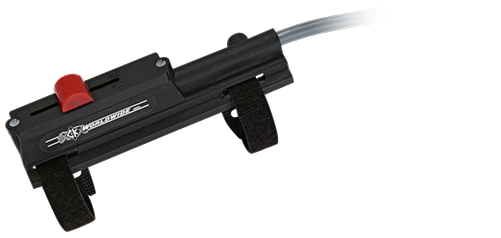
The AmpTrak has a roughly 30 mm range of travel and slides pretty easily. Automating the control will require some type of linear actuator. A number of hobby/RC type linear actuators might work, but I settled on the Firgelli mini-linear actuator line. They are pricey (around $90) but very robust, with numerous models and options to control speed, and precision/granularity to cleanly operate the slider.
I identified the Firgelli P16–P or T16-P actuators with 22:1 drive ratios. These actuators should allow end-to-end travel amperage control of less than 1 second:


Firgelli also offers a Linear Actuator Control Board (LAC). The board allows you to calibrate speed, sensitivity, minimum/maximum travel limits etc. A major feature of the LAC is that it can also be controlled from an external source (Digital: USB, RC Servo, 1 kHz PWM or Analog: 0–3.3 V, 4–20 mA):
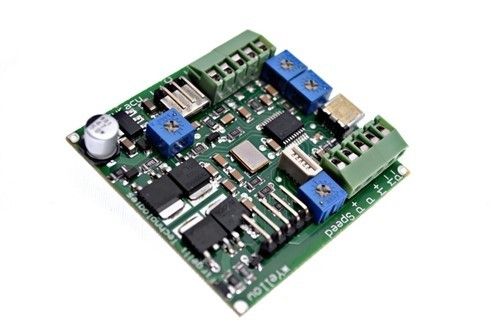
This opens the door to numerous input control options.
The "P" version of the actuator also returns a feedback signal and a multi LED indicator strip is available to display the actuator’s current position:

Between the cost of the amperage control ($50 in my case but $250+ retail off-the shelf) and the cost of the Firgelli Linear Actuator, LAC, LED display and ruggedized case ($200), costs start to add up. However, as the operating parameters are better defined, hopefully, a less costly form-factor can be designed.
BTW: For this application, the AmpTrol would not be mounted on the torch. Also, if needed, the linear actuator could be removed and the AmpTrak could be mounted to the torch and used normally.
Unfortunately, when I went to order the actuator, I found out that these models are in pre-production, undergoing quality control testing and are not currently shipping. So, that approach was put on hold.
User Interface (mouth/alternative control)
Implementing some form of mouth control begins with reviewing best practices and products currently available in the assistive/adaptive technology field. Products commonly referred to as “sip and puff” are available to help disabled persons control various devices. One option is the Sip/Puff headset from Origin Instruments. This is a headset that fits securely over the users ears. The system includes replaceable straws and moisture filters.
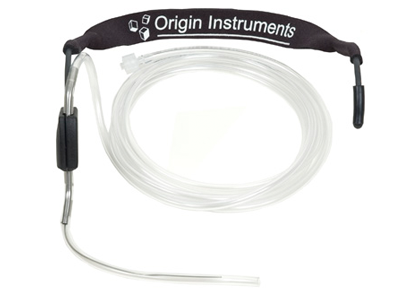
The user sips or puffs on a tube/straw and these actions are translated into control actions. In many instances, the Sip/Puff headsets operate pneumatically controlled micro switches to trigger and control actions. In our case, the welder needs more than binary on/off functions. The welder needs to be able to have continuous, real-time proportional control of the welding current.
Origin Instruments also markets a device called the Breeze.
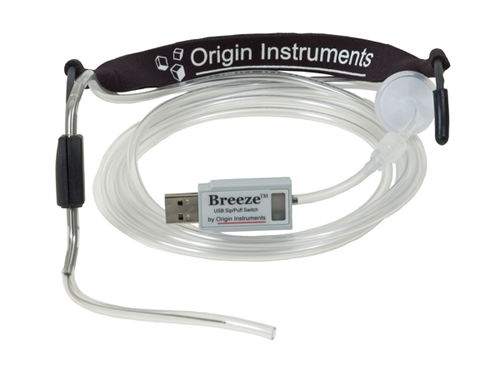
The Breeze is a USB device with a pressure sensor. The Breeze emulates the features of a basic USB joystick. Sip/Puff pressure produces two discrete outputs: a button press (left/right) event and an XY (joystick) value proportional to sip/puff breath pressure.
The Breeze would connect to a micro-controller (likely Arduino or Teensy) which then controls the welding process.
So, now I we have to add in the cost ($135 for the Sip/Puff Headset and $160 for the Breeze) plus the Arduino bread boarding/development environment.
BTW: Integrating the Breeze with an Arduino (which controls the welder) opens the door to other input and control options besides the sip/puff headset (finger flex, motion, voice?, etc.)
I recently ran across an open source project “openSip+Puff” that may provide a lower cost alternative to the Breeze. I am following up to get additional information.
Safety and Efficiency
After working through the process, I realized that even if a good mouth/breath/alternative control can be developed, adding tubing or wiring from the helmet to the welder control circuit will introduce additional obstacles and hazards that will get in the operator’s way and interfere with the effectiveness of the solution (especially when user mobility is already compromised). Also, even with careful opto-isolation, I believe the user could still be exposed to electrical/shock hazards (especially on systems with high frequency). As a result, the final solution should include a wireless control option.
Wireless
Some form of hobby RC control or Arduino (xBee?) based platform could be used. However, this adds a range of unknowns (RF interference, security, operating range… etc.) which add to complexity and development costs. Again, while a DIY wireless option might work for some tech-minded users, a better universal option involves adapting a commercially available wireless pedal. Both Miller and Lincoln offer wireless pedals, but at a high price. Linemaster Switch Corporation advertises a wireless pedal option for $395. I recently found that Arc-Zone is now marketing their own wireless pedal (for Miller and Lincoln) at cost point of $449 (hmmm…it sure looks like the Linemaster model). These two caught my eye because of lower cost and because they use a Hall effect sensor instead of a potentiometer.
According to Wikipedia,
“A Hall effect sensor is a transducer that varies its output voltage in response to a magnetic field. Hall effect sensors are used for proximity switching, positioning, speed detection, and current sensing applications. In its simplest form, the sensor operates as an analog transducer, directly returning a voltage”.
In this case, stepping on the pedal doesn’t rotate a pot, it moves a permanent magnet which causes the Hall Effect sensor to vary output voltage.
If the transmitter portion of the wireless pedal could be adapted to work with the Sip Puff Breeze (via an Arduino microcontroller), development would just focus on integrating the Breeze with the Arduino and wireless pedal transmitter circuit. This option appears the best solution since it eliminates the complexity of my prior approach (adapting a torch mount amperage control) and the need to acquire a linear/rotary actuator and LAC control board.
According to the Linemaster tech support, their wireless pedal only works with specific Miller and Lincoln machines. The reason is that the wireless receiver gets power from the welder and not all welders prove appropriate voltage sources. My Lincoln 175 Square Wave TIg is not listed, although the Lincoln Wireless pedal is compatible with the 175. After looking at the Lincoln literature, looks like the Lincoln receiver gets power from a separate 115VAC source.
Linemaster does have an optional Industrial Receiver for various applications and alternate welders (I believe it gets power from a separate 115 VAC source as well). I will be following up to see this unit can be adapted to operate the 175 (for research/testing) and hopefully adapted to operate Mike’s welder.
Side Bar
While the primary goal is providing an alternative weld control option that emulates a current amperage control, a secondary consideration is to see if any additional features can be introduced. For example, the current pedal/hand amperage weld control process is a closely-coupled operation. Initial motion triggers the arc and continued movement controls the amperage. Since arc initiation and amperage control are two distinct operations, what if they were separately controllable functions? Decoupling these functions and opens the door for additional features and enhancements not currently available.
With this in mind, revisit the Sip Puff Breeze. Sipping or puffing produces two distinct events, 1) a joystick button click, and, 2) a proportional value (X or Y like a joystick movement).
With Arduino programming, if the arc initiation function could be handled by the button click event and amperage control (proportional XY), the combination might offer additional options to control the welding process. These independently controlled processes could incorporate the features of the Pedal, torch mounted Amptrol and Arc Start Switch and open the door for features not previously available.
Here are a few examples-
Tack Weld
Currently, using a pedal, the operator sets the maximum desired amperage at the welder, gets into position, then “stomps” the pedal to initiate arc and quickly ramp current up to max output. The operator then quickly “gets off the pedal” to stop the arc.
If the arc initiation function is independent from the amperage control, the operator might have other options to control the tack weld process. For example, if the amperage control could be set to the desired tack amperage BEFORE initiating the arc, the operator could avoid the “stomp-then-get-off-the pedal quickly” tack-weld process entirely.
Slope
Since the Arduino controls the amperage, it might be possible to introduce some form of variably timed up/down slope feature.
Pulse
A user-settable, variable timing circuit could be used to “pulse” the arc switch, or cycle the amperage control (Hi/Low) to achieve a pulsed output.
Argon flow
Another option might include and auxiliary circuit for Argon flow. The 175 has a ½ second pre-flow and 15 second post flow (fixed – nonadjustable). If an additional gas solenoid were added to the equation, a separate user-initiated method could trigger gas flow (independent of arc) to control back purge or extend pre-flow and/or post-flow.
These are presented as food for thought, but probably achievable once the basic system is up and running.
BTW: There is an interesting thread on the Everlast forum where a user added a number of these features to his welder using an Arduino:
http://www.everlastgenerators.com/forum ... th-Arduino
Status
My next steps are:
1) Save up my pennies and buy the Linemaster wireless pedal.
2) Figure out if I can control the Linemaster wireless system with an Arduino
3) Move ahead with the sip/puff user input control.
So, for now, until more info is available (and budgets allow), I am kind of on hold with this project.
