Tig welding tips, questions, equipment, applications, instructions, techniques, tig welding machines, troubleshooting tig welding process
User avatar
  • Posts:
  • Joined:
    Thu Jan 06, 2011 11:40 pm
  • Location:
    Near New Orleans

zank wrote:
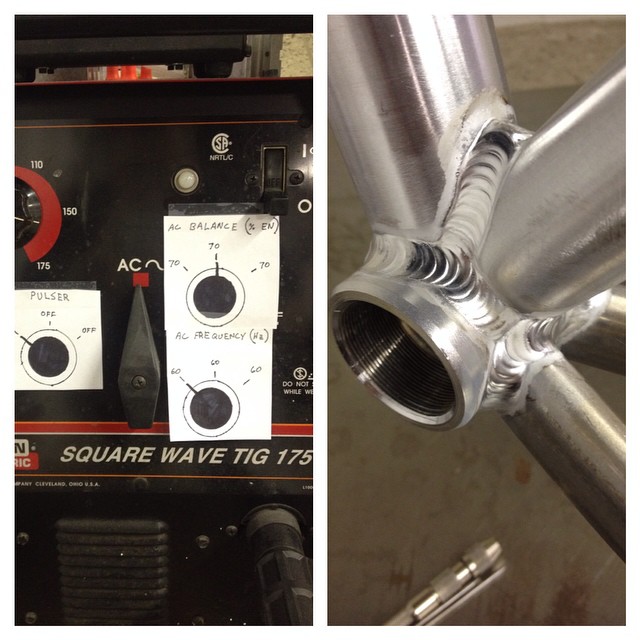
...Steve, yeah, I'm still too close with the tungsten. I am so used to keeping such a tight arc with steel and titanium. And I still need a lot of practice on my stops...
I did a BIG job of 6061T-6, with the same 5183. It was all pipe, mostly 3" sch. 10. I developed a habit that helped me. It took time to perfect, but I developed a rythm where as I added rod I would draw the torch back slightly to allow for the swell of the addition to the puddle, and move back in as I advanced. (Oddly, this worked best to music... :roll: ) This allowed me to stay in tight constantly while keeping the tungsten out of the puddle. (Was 10% x-ray, and it didn't take much tunsten residue in the puddle for a "fail".)

As for the stops, I learned to take advantage of the residual heat, and "button off" my welds much like when MIG welding. I'd pause maybe half a second to let the puddle cool, then hit the pedal and feed rod in a brief motion.

I think you're doing great! It's just the fact that you're so accustomed to welding metals with much lower expansion/shrink volumes that is giving you issues.

Patience and practice...

Steve S
jcw
  • jcw
  • Workhorse
    Workhorse
  • Posts:
  • Joined:
    Wed Jul 23, 2014 4:31 pm
  • Location:
    Chicago

I always thought 7 series aluminum was not considered weldable.

But I have a bike at home (GIant I think) that is obviously welded and says 7000 series made in the USA on it too.
awill4wd
  • Posts:
  • Joined:
    Thu Jan 31, 2013 3:57 am
  • Location:
    Berwick, Melbourne, Australia

My daughter asks me if I can make some fairy wings for some upcoming charity events?
Well, what's a welding Dad to do?
He makes them out of Titanium wire of course! :mrgreen:

Image

Image
We are Tig welders, gravity doesn't worry us.
Miller Dynasty 350
OTC hybrid wave 300 amp inverter Tig at work (Now retired)
Kemppi MLS 2300 inverter, 230 amps of welding brilliance for home use
User avatar
  • Posts:
  • Joined:
    Tue Jul 01, 2014 4:34 am
  • Location:
    Skiatook, Oklahoma

Okay, that's awesome. Lol [THUMBS UP SIGN]

Sent from my SM-G900R4 using Tapatalk
TamJeff
  • Posts:
  • Joined:
    Tue Dec 04, 2012 4:46 am

Agreed. That is awesome, along with the other posts I have forgotten to mention during this thread.
Miller ABP 330, Syncrowave 250, Dynasty 300 DX.
Honorary member of the Fraternity of Faded Tee Shirts.
TamJeff
  • Posts:
  • Joined:
    Tue Dec 04, 2012 4:46 am

Nothing fancy. Sometimes I just feel like an old aluminum whore.
8 hrs from start to finish. One day warning. Welds are decent. It's straight and square, and I even bird mouthed the rafters. My boss doesn't know it's done and the truck is supposed to be there in the morning. He didn't think it could be completed in time. When he left today, I only had the ends tacked together. I braced it with a bit of a crown on the rear stringers before I welded it. It settled down to 1/8" above string straight across the top in 14' 6" length. Much better than having it sag in the middle.

200 amps, no pedal. Perfect for welding 1" long welds on 1"x1/8" square tube.

Image
Miller ABP 330, Syncrowave 250, Dynasty 300 DX.
Honorary member of the Fraternity of Faded Tee Shirts.
User avatar
  • Posts:
  • Joined:
    Thu Jan 06, 2011 11:40 pm
  • Location:
    Near New Orleans

So, that's an awning frame?

How'd you get roped into that?

As usual, nice work!

Steve S
TamJeff
  • Posts:
  • Joined:
    Tue Dec 04, 2012 4:46 am

I walked in yesterday and there was 7 pieces of square tube with a yellow note paper stuck to it with a pencil drawing and a deadline for this morning. It was still at the shop tonight when I left, which means it will still be there tomorrow.

It has pipe sleeves in the front corners that house 1.5" sched 40 legs that will hold the front of it up. I didn't bother to measure or pattern for the bird mouths in the rafters. I just checked to make sure both end walls were the same size and clamp up this makeshift stop and down leg to transfer my angles in place using the one end of the awning as a gauge for all. Just cut the appropriate mitre on the one end that goes against that stop so you only have to mark the one end.
Image

Image

Image

Just have to make sure the china marker is sharp and cut the line off.
Miller ABP 330, Syncrowave 250, Dynasty 300 DX.
Honorary member of the Fraternity of Faded Tee Shirts.
User avatar
  • Posts:
  • Joined:
    Thu Jan 24, 2013 6:44 am

Almost ready for heat treat.

ImageSinglespeed Cyclocross by Zanconato Custom Cycles, on Flickr
User avatar
  • Posts:
  • Joined:
    Thu Jan 06, 2011 11:40 pm
  • Location:
    Near New Orleans

zank wrote:Almost ready for heat treat.
Looks like you've got the aluminum sorted out just fine!

Steve S
TamJeff
  • Posts:
  • Joined:
    Tue Dec 04, 2012 4:46 am

Nice bike frame.
Miller ABP 330, Syncrowave 250, Dynasty 300 DX.
Honorary member of the Fraternity of Faded Tee Shirts.
Rick_H
  • Posts:
  • Joined:
    Sat Feb 08, 2014 1:50 pm
  • Location:
    PA/MD

Made a small platform the other day for my fathers boat, this way he doesn't have to kneel or prop on the motor. I don't get to weld alum as much anymore so I really enjoyed this! 6061or I would have bent it.
Attachments
IMG_20140824_182006899.jpg
IMG_20140824_182006899.jpg (51.73 KiB) Viewed 2810 times
I weld stainless, stainless and more stainless...Food Industry, sanitary process piping, vessels, whatever is needed, I like to make stuff.
ASME IX, AWS 17.1, D1.1
Instagram #RNHFAB
User avatar
  • Posts:
  • Joined:
    Wed Aug 06, 2014 12:48 am
  • Location:
    Melbourne, Australia

Nice job Rick. I'm impressed !

Trev
EWM Phonenix 355 Pulse MIG set mainly for Aluminum, CIGWeld 300Amp AC/DC TIG, TRANSMIG S3C 300 Amp MIG, etc, etc
TamJeff
  • Posts:
  • Joined:
    Tue Dec 04, 2012 4:46 am

Nicely/neatly done, Rick.
Miller ABP 330, Syncrowave 250, Dynasty 300 DX.
Honorary member of the Fraternity of Faded Tee Shirts.
User avatar
  • Posts:
  • Joined:
    Thu Jan 24, 2013 6:44 am

Beautiful, Rick!

I've been having fun testing out my new machine upgrades and settings.

ImageGetting my new machine settings dialed in. by Zanconato Custom Cycles, on Flickr
noddybrian
  • Posts:
  • Joined:
    Thu Jan 24, 2013 12:13 pm

I love the upgrades ! - glad to see you kept with a conventional panel - those new digital things seem very complicated to set up - maybe you could print some stickers for the Gurus favorite rule off 33 setting ! - actually it just shows how ( annoyingly ) good a weld can be made with plain old school equipment in the right hands ( and with decent eyesight ! ) - keep up the great work it's like looking at art - but you realize you & TamJeff make some of us here that don't do much Tig at a time feel a bit well inadequate !
User avatar
  • Posts:
  • Joined:
    Thu Jan 06, 2011 11:40 pm
  • Location:
    Near New Orleans

Zank,

That's some great work!

I was sure with your experience and skill that you'd pick up that thin-wall aluminum quickly, and you've proved it!

That looks fabulous.

Steve S
User avatar
  • Posts:
  • Joined:
    Thu Jan 24, 2013 6:44 am

Brian, Steve, thank you. It's been fun. I've been concentrating hard on getting that toe to feather in nicely into the tube. I always feel like I'm running that ragged edge though and close to blowing a hole. I have been studying John Marcella's welds and am always blown away by how his bead width is so consistent. I'm just always thinking about that.

My stops still look bad. I need to just grab a piece of sheet and do Jody's aluminum drill and just focus on stops. Run a few dips and fill the crater. Move over a bit, start a new bead, run a few dips, and fill the crater. Lather, rinse, repeat.
User avatar
  • Posts:
  • Joined:
    Wed Aug 06, 2014 12:48 am
  • Location:
    Melbourne, Australia

Zank, that weld could've come out a whole lot better if you used a setting other that 70% on the AC Balance! (ha ha)

Nice job, like the others have said, standard equipment and great skill can be combined to produce an outstanding result.
EWM Phonenix 355 Pulse MIG set mainly for Aluminum, CIGWeld 300Amp AC/DC TIG, TRANSMIG S3C 300 Amp MIG, etc, etc
User avatar
  • Posts:
  • Joined:
    Thu Jan 24, 2013 6:44 am

I kept turning the dials, but all of the settings seemed the same :lol:

Thanks though. The nice thing about running a basic machine is that you can really understand how some of the advanced features can really help. I will appreciate them a lot when I get a machine that has them.
awill4wd
  • Posts:
  • Joined:
    Thu Jan 31, 2013 3:57 am
  • Location:
    Berwick, Melbourne, Australia

Again something a bit different for me.
This one is an Aluminium copy of a mid 70's Lamborghini Espada radiator.
I can't say work is ever boring :lol:
Regards Andrew from Oz.
Attachments
20140902_145912.jpg
20140902_145912.jpg (64 KiB) Viewed 3156 times
20140902_145538.jpg
20140902_145538.jpg (64.94 KiB) Viewed 3156 times
20140902_145522.jpg
20140902_145522.jpg (69.41 KiB) Viewed 3156 times
We are Tig welders, gravity doesn't worry us.
Miller Dynasty 350
OTC hybrid wave 300 amp inverter Tig at work (Now retired)
Kemppi MLS 2300 inverter, 230 amps of welding brilliance for home use
User avatar
  • Posts:
  • Joined:
    Thu Jan 24, 2013 6:44 am

Awesome! Beautiful job.
User avatar
  • Posts:
  • Joined:
    Thu Jan 24, 2013 6:44 am

Bill Beauregard
  • Posts:
  • Joined:
    Thu Jan 24, 2013 9:32 pm
  • Location:
    Green Mountains of Vermont

Very, very nice. What's your balance set at?
User avatar
  • Posts:
  • Joined:
    Thu Jan 24, 2013 6:44 am

Thanks, Bill. I was at 65% EN and 150 Hz. The 7005 material runs a little dirtier than 6061. The extra cleaning is a big help.
Post Reply