Page 1 of 1
Stainless Steel weld grey
Posted: Tue Feb 22, 2011 11:32 pm
by mr 32
Hi Everyone
still new to tig welding but know why around.
need some help with welding stainless steel. im practicing on some 3mm pipe about 60mm in dia
I am back purging the pipe so im not getting any black on the inside. but on my hot side my welds are really grey.
my weld puddle would be about 3-4mm in size. cup size 7 and gas flow on the gun is 15l. filler rod is 316L
ive tried less amps but seems that when i dip the wire in it is too cold and the puddle shrinks wire gets stuck
any ideas?
thanks
Re: Stainless Steel weld grey
Posted: Wed Feb 23, 2011 11:57 am
by kermdawg
What are your amps set at and whats the alloy of the pipe? When your doin stainless the rod will tend to get stuck in the puddle, but you cant have to much amperage cause youll just burn up the pipe(which it sounds like is happenin to you). You gotta be quick with your rod and just feed it in more, you cant just lay it in there like you do with mild steel.
Your amps should be -roughly- half what they are when welding stainless versus mild steel of the same thickness. Thats real approximate though.
Are you usin a gas lense setup or just a regular tig cup? You need a gas lense for welding stainless, or yuo gotta really jack up the flow.
Re: Stainless Steel weld grey
Posted: Wed Feb 23, 2011 5:44 pm
by mr 32
kermdawg wrote:What are your amps set at and whats the alloy of the pipe? When your doin stainless the rod will tend to get stuck in the puddle, but you cant have to much amperage cause youll just burn up the pipe(which it sounds like is happenin to you). You gotta be quick with your rod and just feed it in more, you cant just lay it in there like you do with mild steel.
Your amps should be -roughly- half what they are when welding stainless versus mild steel of the same thickness. Thats real approximate though.
Are you usin a gas lense setup or just a regular tig cup? You need a gas lense for welding stainless, or yuo gotta really jack up the flow.
the pipe is 316 my amps are set to about 100-11- amp but i wont go over 3/4 on my foot peddle
im not using a gas lense just a regular lense. i might have to look into getting one.
i tried just fusing one pipe last nigth with the same set up the weld had a yellow blue tinge to them.
Re: Stainless Steel weld grey
Posted: Wed Feb 23, 2011 7:34 pm
by kermdawg
Sorry I'm real bad with metric conversions. 3mm is damn near 1/8 ", I thought it was alot less than that(like 16 guage). If your runnin about 3/4 pedal off 100 amps thats 75 amps, and that should be ballpark where you want to be heat wise.
If your not running a gas lense setup, the way I was taught you should crank your gas flow up to about 30 cfm. If your runnin the gas lense you can keep it around 20. You really need that gas coverage on stainless alot more than you do on aluminum or mild steel. Some of them torchs got a little rectangular deal to provide a trailing gas shield while the weld cools behind your arc.
Re: Stainless Steel weld grey
Posted: Wed Feb 23, 2011 8:39 pm
by mr 32
kermdawg wrote:Sorry I'm real bad with metric conversions. 3mm is damn near 1/8 ", I thought it was alot less than that(like 16 guage). If your runnin about 3/4 pedal off 100 amps thats 75 amps, and that should be ballpark where you want to be heat wise.
If your not running a gas lense setup, the way I was taught you should crank your gas flow up to about 30 cfm. If your runnin the gas lense you can keep it around 20. You really need that gas coverage on stainless alot more than you do on aluminum or mild steel. Some of them torchs got a little rectangular deal to provide a trailing gas shield while the weld cools behind your arc.
thanks for your help
i just got a gas lense to try out, ill grab some picutres and give it a try
thanks again
Re: Stainless Steel weld grey
Posted: Sat Feb 26, 2011 8:23 pm
by jakeru
Rather than weld the entire joint all at once, try breaking it into several shorter stitch welds, and allow some time in between the stitches to allow the work to cool. Be sure to let the post-flow shielding gas keep flowing over your just welded area until it has adequately cooled to stay bright silver, if possible.
If needbe, you can break your weld joint into more than one pass, rather than trying to get it all done in one really thick pass. Use tighter parts fit-up, smaller diameter filler rod, and shorter arc length as needed to get your puddle & weld bead size smaller.
Another thing you can do, is break your weld joint into several 'stitch" welds, allowing time to cool in between as needed. While you are post-flowing gas right after completeing a weld, use the color of the glowing metal in the area to get some feedback about how hot the part has gotten. Big glowing red area, that takes a long time (> 10 seconds) to go back to non-glowing = you probably got too much heat into your joint. Time to take a break and let the work cool for at least a few minutes before running the next stitch. You're probably going to need to let the post flow run for a long time. Small glowing red area, that reverts to non-glowing in short time (< 3 seconds) = your part hasn't gotten that hot yet, probably can go ahead and weld another stitch without much waiting.
Make sure to keep your post flow running as long as is necessary for the glowing red metal to no longer glow (and a while longer). Re-trigger the post flow if needed with a quick bump on your footpedal. Also, watch your torch angle. Don't angle it too far forward, but rather keep it more vertical to let your shielding gas flow out behind the weld seam... covering that hot area you just welded. A gas lens with big cup, and proper gas flow adjustment to get good gas coverage will help. On my most recent stainless project (.050" tubing) I used a #8 gas lens with about 15 cfh argon.
And finally, like an oil film over water, a thin oxidation film over clean ferrous metal will have rainbow hues, with colors varying depending on the thickness of the film. If you want to see all the colors of the rainbow, just make some clean and bright ferrous metal glow red with your tig torch, and remove the torch abruptly without letting post-flow shield the joint. You will see a progression of colors from thin film (where the metal didn't get that hot) to thick (where it got hottest.) Also, note that dull grey oxidation color = extremely thick layer (many seek to avoid this.)
Re: Stainless Steel weld grey
Posted: Thu Mar 10, 2011 7:01 am
by mr 32
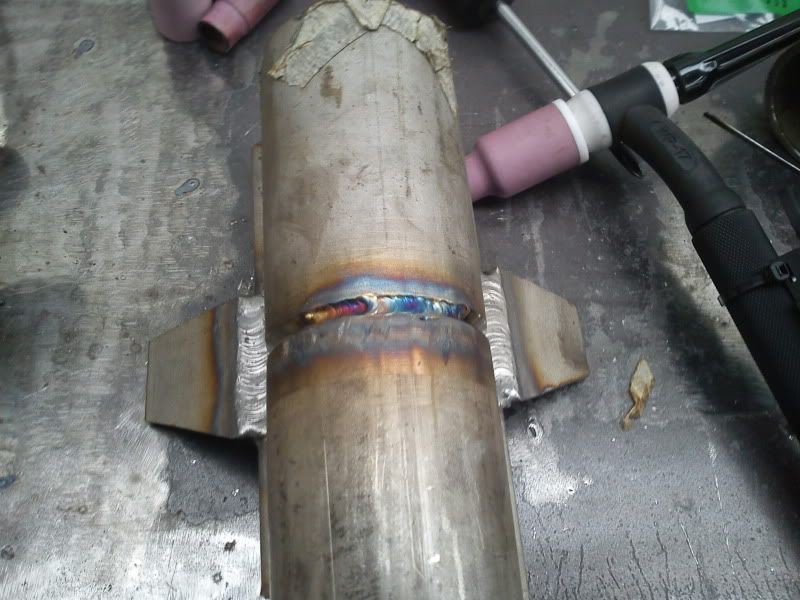
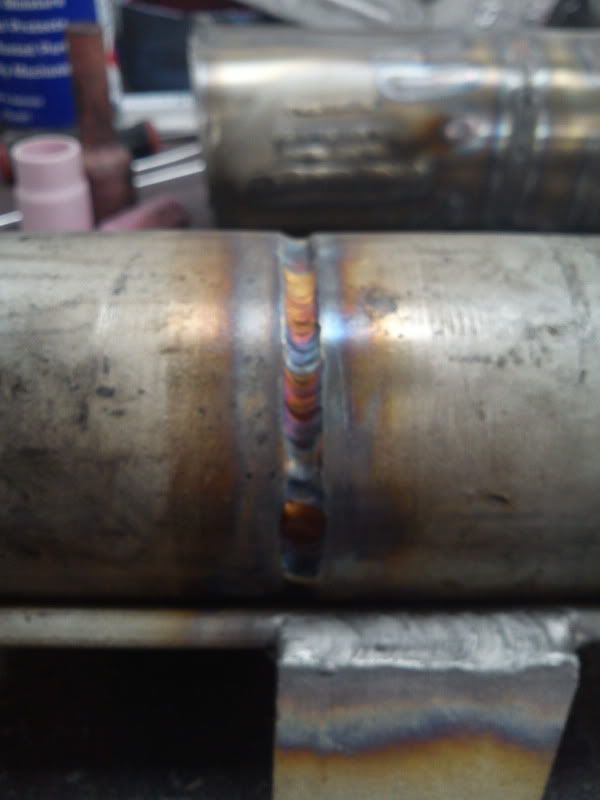
finally got a chance to give it another go this afternoon.
using a gas lense up with a number 8 cup with 13-14 l
let me know what you think (sorry about the phone picutres)


Re: Stainless Steel weld grey
Posted: Thu Mar 10, 2011 8:29 pm
by Otto Nobedder
Looks to me like the gas lens was a big help. I only weld stainless w/ a plain collet body when it is the only way to reach my weld.
Your colors suggest you still got a little warm, but just in a few places. That yellow "straw" color is your goal, but you didn't damage the parent metal anywhere in the pictures you posted. Nice job.
Your HAZ showed a bias to one side (left, in the second picture). This may be a result of your viewing angle while welding, but I thought you should be aware of it.
Steve
Re: Stainless Steel weld grey
Posted: Thu Mar 10, 2011 10:27 pm
by mr 32
thanks steve
ive got a few more pipes to practice on, hopefully get a constitant straw colour after a few
i think the HAZ to the laft was from the veiwing angle, i might try bing up a bit higher when i weld,
i was welding the way i was loking in the first picture if that makes sense
Re: Stainless Steel weld grey
Posted: Fri Apr 01, 2011 9:38 am
by TT350
If your weld is gray or black you may be welding to cold and slow.
I set my Lincoln Ideal Arc 300 so that the foot pedal is a on/off switch.
If I try to regulate the amps with the pedal the weld will look like crap.
I set the amps at the machine and as soon as I step on the pedal I have a
puddle and I’m moving.
I find that if I treat SS like AL and try to ramp up the amps with the pedal
I have welds that are dark and ugly.
Re: Stainless Steel weld grey
Posted: Sun Apr 03, 2011 9:31 pm
by Cjfabs
With stainless you want as much gas coverage as possible. You want to use the largest cup exit diameter that you can still weld the part comfortably. 99% of the stainless welding I do I use a champagne cup flowing anywhere from 35-50 cfm. There are many factors the contribute to getting a consistent white or semi gold appearance to a stainless welded joint. For starters your amperage set on the machine should never be higher than the thinnest part you are welding. In my profession I weld a lot of .028 and .035 347 and 316L. Make sure you are back purging the part being welded and use the appropriate tungsten diameter for the current being used. I prefer 1.5% -2% lanthenated tungsten instead of thoriated. Lanthenated is not radioactive and also allows better arc starting characteristics. Lanthenated also works incredible with inverter based welders, i.e. Dynasty 200/350 for welding Aluminum. Just remember to take your time and let time be your friend. So many welders try to hammer down and let 'er rip. Another tip is to post purge a minimum of 20 seconds. I generally never post purge less than 30 and usually more around 60 seconds. LEAVE YOUR WELDING TORCH OVER THE AREA YOU JUST WELDED. TAKE YOUR TIME. The welding rod also cools the puddle so you can help your heat issues by adding more rod and going slower. Make sure you are not removing the welding rod from your gas shielding since by doing so you would be depositing oxidation and contamination into the weld. Oxidation is your enemy and an inert atmosphere is your savior. I have touched on many sub topics but your main goal should be to allow the time you are over a given part of the do the work not your foot pedal. Good luck and this I my first post here so. Hope I helped. Feel free to ask any and all questions. Cheers!

