Tig welding tips, questions, equipment, applications, instructions, techniques, tig welding machines, troubleshooting tig welding process
User avatar
  • Posts:
  • Joined:
    Mon May 21, 2018 9:47 pm
  • Location:
    Phoenix, AZ

Hello, I am total noob in TIG, having just purchased my first TIG welder and finished a cart. Struggling with laying beads.
Setup:
* HTP Invertig at 150A, frequency 60Hz, balance 75%
* Argon 14cfh
* CK20 water cooled torch, size 7 cup, gas lens, 3/32" lanthanated electrode, stickout 0.31"
* Aluminum 1/8" plate, plastic sheet just removed yesterday, cleaned with Scotchbrite and a dedicated S/S brush.
* 1/16" 4043 filler

Ignore the bumps, this is the backside of a plate on which I practiced puddles laid out in a grid (following 6061.com's method)
IMG_0797.jpg
IMG_0797.jpg (35.83 KiB) Viewed 2321 times
[/list]

I could not keep the puddle wide enough (scribed lines are 3/8" apart) and could not feed the filler fast enough. Also the weld has black soot in it.

The second half of the second row is now 3/32" filler, and I feel it was easier to feed, but I still ramped up as I went along:
IMG_2749.jpg
IMG_2749.jpg (43.54 KiB) Viewed 2321 times
Then I reduced the current to 130 Amps:
IMG_8176.jpg
IMG_8176.jpg (36.38 KiB) Viewed 2321 times
Still looks porous, rough and mixed with black stuff. Any pointers are desperately needed, and greatly appreciated. Thank you!
HTP Invertig 221H w/ Arctic Chill cooler and CK20 torch
Lincoln MP210 -- SOLD
Optrel Crystal 2.0
Rstamp
  • Posts:
  • Joined:
    Mon Oct 30, 2017 7:36 pm

I'm not sure sure on an htp, but you may want to turn your frequency to 120 and your balance to about 60. You don't look to have very much cathotic etching going on, and it looks like your cups dragging in your weld
cj737
  • Posts:
  • Joined:
    Thu Sep 29, 2016 8:59 am

For 1/8" plate, trying to fill a 3/8" wide gap (scribed line width) you need 1/8" filler. At least 3/32, but 1/8" is more practical. 1/16th is too thin for that amperage and fill width.

Reduce your scribe width to 1/8", use 3/32 filler, and have another go. 150A to start is fine, but you will want to back off that heat pretty soon after you get your bead running along.

The black soot looks to be 2 issues: The first is likely AC Balance is pretty high at 75%. That's not much cleaning action. Drop to 68% and see how it improves. Also, what grade of material is the "shiny new sheet"? Some aluminum is not easily welded and creates really crappy welds. The second likely issue is torch angle/length. Aluminum welding is not very tolerant like DC TIG for having a long arc, and a flat torch angle. Just check your torch is staying in position as you move along, and the arc length is equal to the filler diameter (or very close to it).
User avatar
  • Posts:
  • Joined:
    Thu Dec 26, 2013 12:41 am
  • Location:
    Laredo, Tx

cj737 wrote:For 1/8" plate, trying to fill a 3/8" wide gap (scribed line width) you need 1/8" filler. At least 3/32, but 1/8" is more practical. 1/16th is too thin for that amperage and fill width.

Reduce your scribe width to 1/8", use 3/32 filler, and have another go. 150A to start is fine, but you will want to back off that heat pretty soon after you get your bead running along.

The black soot looks to be 2 issues: The first is likely AC Balance is pretty high at 75%. That's not much cleaning action. Drop to 68% and see how it improves. Also, what grade of material is the "shiny new sheet"? Some aluminum is not easily welded and creates really crappy welds. The second likely issue is torch angle/length. Aluminum welding is not very tolerant like DC TIG for having a long arc, and a flat torch angle. Just check your torch is staying in position as you move along, and the arc length is equal to the filler diameter (or very close to it).
I agree. Bump the balance down to 65%, and make sure you have the torch on the negative output. It makes a difference on machines that are not 50/50 balance.

The aluminum, as was said, may not be an easily weldable aluminum alloy. It could also be a welable aluminum alloy, that has been anodized. That is not much gooder! Anodization is like a super extra thick oxide layer that does not "brush off" easily. Ever see those blue/red/colored Mag-light flashlights (or similar)? Well those "colors" are anodizations. It would take major brushing to really get all that off (compared to un-anodized aluminum). The problem with clear anodization, is that you can't see it, so if it's there, even if you brush it a little bit, it can still be there.

I also vote for excessive tungsten stickout past the cup, AND too much torch angle. It should be at most 15-20º from the vertical, when welding in the 1G horizontal flat position. Your only goal with 1st time TIG welding aluminum, is to get 1, just 1 clear shiny puddle. Not adding filler, not moving to get a bead going. Just 1 single proper, clean , shiny puddle with a little bit of etching around it. Nothing in your pictures indicates you have obtained this. Of course, when you left off the arc, and the puddle solidifies it will not necessarily be shiny/reflective, but none the less it will be clean with perhaps a hazy gray look to it.

This is an old pic of mine. Pay attention only to the color the solidified puddle (disregard the settings, as this was a test piece). That is roughly what you need to get.
Image
Image
User avatar
  • Posts:
  • Joined:
    Mon May 21, 2018 9:47 pm
  • Location:
    Phoenix, AZ

Guys, thank you! Lots of useful feedback. Once done with the turkey, I'll see if I can sneak into the garage and try some of the changes and will report back.
Grateful for this community. Happy Thanksgiving everyone!
HTP Invertig 221H w/ Arctic Chill cooler and CK20 torch
Lincoln MP210 -- SOLD
Optrel Crystal 2.0
User avatar
  • Posts:
  • Joined:
    Sun Sep 10, 2017 9:58 pm
  • Location:
    Pearland, TX

I had a problem similar to this. Check for leaks and if there aren’t any get a bottle with argon. I had a contaminated tank. It cleared right up after I did that. Just another thought.


Sent from my iPhone using Tapatalk
User avatar
  • Posts:
  • Joined:
    Mon May 21, 2018 9:47 pm
  • Location:
    Phoenix, AZ

After reading the excellent feedback above, I think excessive torch angle was one of my MANY problems, so tried to pay attention to it this morning. Lowered the balance to 65% and raised the frequency to 100Hz. Went back to the 1/16" filler, as I can't seem to melt the 3/32" filler fast enough. Used a new tungsten (3/32") and made sure the stickout is 3x its diameter. Gotta run to work now, will try again tonight. Any feedback on this?
IMG_2236.jpg
IMG_2236.jpg (46.89 KiB) Viewed 2206 times
HTP Invertig 221H w/ Arctic Chill cooler and CK20 torch
Lincoln MP210 -- SOLD
Optrel Crystal 2.0
User avatar
  • Posts:
  • Joined:
    Thu Dec 26, 2013 12:41 am
  • Location:
    Laredo, Tx

Much better. But I'd like to know where you got the "3x the diameter as stickout" that you mentioned. Tungsten stickout is generally guided by the orifice size of the cup your are using, whether it be a standard gas cup or a gas lens nozzle. Think about it---if you use a 1/8" tungsten (hypothetically), with the "rule" you mentioned, you would need a 3/8" stickout, but what if you're only using a #4 cup?? Then the stickout PLUS the arc length has the edge of the gas nozzle would be a good 1/2" from the weld puddle(!) :shock: . In other words, that scenario simply does not work IMO.

The relative size of the gas nozzle dictates the maximum stickout that can be used. Of course gas lens cups allow for more stickout than regular cups, but generally speaking you don't want to extend the tip of the tungsten more than 1 [regular] up diameter (under perfect conditions and very high operator skill). If you factor in non-steady hand movement/jarring/shaking up and down, then you need to be even more conservative with the stick out.
Image
User avatar
  • Posts:
  • Joined:
    Mon May 21, 2018 9:47 pm
  • Location:
    Phoenix, AZ

Oscar wrote:But I'd like to know where you got the "3x the diameter as stickout" that you mentioned.
I don't know for sure how to dial the stickout, but the 3x tungsten diameter comes from the CK Worldwide "Technical Specifications for TIG Welding" (http://www.ckworldwide.com/technical_specs.pdf).
tungsten stickout.jpg
tungsten stickout.jpg (99.56 KiB) Viewed 2183 times
My setup:
cup size 7 stickout.jpg
cup size 7 stickout.jpg (78.75 KiB) Viewed 2180 times
HTP Invertig 221H w/ Arctic Chill cooler and CK20 torch
Lincoln MP210 -- SOLD
Optrel Crystal 2.0
Poland308
  • Posts:
  • Joined:
    Thu Sep 10, 2015 8:45 pm
  • Location:
    Iowa

3 x would be a maximum. You will get better results with 1 to 1-1/2 times.
I have more questions than answers

Josh
User avatar
  • Posts:
  • Joined:
    Mon May 21, 2018 9:47 pm
  • Location:
    Phoenix, AZ

blue tungsten2.jpg
blue tungsten2.jpg (31.21 KiB) Viewed 1927 times
blue tungsten1.jpg
blue tungsten1.jpg (30.95 KiB) Viewed 1927 times
At some point today, my tungsten turned blue. Pretty sure I didn't dip, but replaced the tungsten anyway. What caused it?
HTP Invertig 221H w/ Arctic Chill cooler and CK20 torch
Lincoln MP210 -- SOLD
Optrel Crystal 2.0
User avatar
  • Posts:
  • Joined:
    Thu Dec 26, 2013 12:41 am
  • Location:
    Laredo, Tx

koenbro wrote:
Oscar wrote:But I'd like to know where you got the "3x the diameter as stickout" that you mentioned.
I don't know for sure how to dial the stickout, but the 3x tungsten diameter comes from the CK Worldwide "Technical Specifications for TIG Welding" (http://www.ckworldwide.com/technical_specs.pdf).
I see. As was said, what they fail to mention is that the 3x-tungsten-diameter is not what "it is supposed to be", but rather a maximum as a general rule, for an experienced welder under pristine, controlled conditions. By the time you factor in the arc length from the tip of the tungsten to the actual workpiece, it is really stretching it (the gas coverage) out, which when coupled with a shallow torch angle, leads to unfavorable welding conditions. IMO, it is better to govern one's self by the cup/nozzle diameter. Unless it's a gas lens, I tend to prefer:

Standard gas nozzle:
  • ½ to ¾ of the cup diameter for the tungsten stickout, so that when you factor in the arc length, you're roughly ~1 cup diameter from the edge-of-the-cup to the work piece.
for a Gas lens:
  • ½ to 1-½ cup diameters for the tungsten stickout, so when you factor in arc length, you end up no more than about 2 cup diameters from the work piece.
That's just me though. ;)
Image
User avatar
  • Posts:
  • Joined:
    Mon May 21, 2018 9:47 pm
  • Location:
    Phoenix, AZ

Oscar wrote: for a Gas lens:
  • ½ to 1-½ cup diameters for the tungsten stickout, so when you factor in arc length, you end up no more than about 2 cup diameters from the work piece.
OK I will use this rule and give it a try tomorrow, thanks for the clarification. I have used today the stickout = cup diameter and here is the result:
day2 2255.jpg
day2 2255.jpg (129.42 KiB) Viewed 1853 times
HTP Invertig 221H w/ Arctic Chill cooler and CK20 torch
Lincoln MP210 -- SOLD
Optrel Crystal 2.0
Warrenh
  • Posts:
  • Joined:
    Thu Apr 27, 2017 12:31 pm

Try a slight pause after you add your filler. You will see the puddle even out and match the width you are trying to get. Your beads will start looking more consistent when you do this.

Sent from my moto g(6) (XT1925DL) using Tapatalk
User avatar
  • Posts:
  • Joined:
    Mon May 21, 2018 9:47 pm
  • Location:
    Phoenix, AZ

Impressions from Day #3 of TIG

So I continued to practice on 1/8" Aluminum (called my supplier and they said it's 6061). I am cutting 6x4" pieces here is the third from today:
day 3.jpg
day 3.jpg (85.19 KiB) Viewed 1816 times
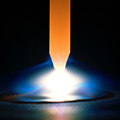
I made a few changes: first, I increased the frequency to 200Hz and it seems the puddle is better (can't explain). Then I switched to a pyrex cup and had a blue Tungsten tip a few times, so increased the gas flow from just below 15 to just above 15 cfh.

Interestingly I only dipped the Tungsten once in the puddle, but touched the filler to the Tungsten countless times.

I struggled with several issues at the same time. First, I find feeding the wire consistently to be very difficult; between 3 pairs of gloves, have opted for thin HD mechanics gloves, that are not well shielded from heat. Otherwise I have zero tactile feel. Also finger positioning was hard, so ultimately I came up with this, because I can use the pinky to direct the wire into the puddle:
feeding position.jpg
feeding position.jpg (66.72 KiB) Viewed 1816 times
Second, I am struggling very much with the tempo. I guess experience will help, but in the meantime I bought a metronome (thank you Amazon same day delivery):
metronome.jpg
metronome.jpg (50.69 KiB) Viewed 1816 times
Trouble is I can hardly hear it even with ear buds, as the welder (mostly the arc) is very loud. Nonetheless, I think the metronome helps. Thank you @Warrenh for the helpful suggestion to stop after the filler. I already feel that finding some rhythm like that will be the key (that plus consistent feeding of the filler) to more even beads.

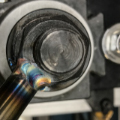
Finally, the pyrex vs the size 7 pink cup seem equivalent to me. Here is the former:
day 3 setup.jpg
day 3 setup.jpg (89.51 KiB) Viewed 1816 times
You folks are super helpful, and I learned a lot from the above suggestions. Any other thought is gratefully received.
Last edited by koenbro on Sun Nov 25, 2018 9:54 am, edited 2 times in total.
HTP Invertig 221H w/ Arctic Chill cooler and CK20 torch
Lincoln MP210 -- SOLD
Optrel Crystal 2.0
User avatar
  • Posts:
  • Joined:
    Thu Dec 26, 2013 12:41 am
  • Location:
    Laredo, Tx

koenbro wrote:
Oscar wrote: for a Gas lens:
  • ½ to 1-½ cup diameters for the tungsten stickout, so when you factor in arc length, you end up no more than about 2 cup diameters from the work piece.
OK I will use this rule and give it a try tomorrow, thanks for the clarification. I have used today the stickout = cup diameter and here is the result:
[/attachment]
It is not a rule. Those are simply the guidelines that I personally use. It's not something that I consciously think about because it is only a small part of the puzzle. With TIG welding, everything plays a part. For example, gas flow also plays a huge part. Joint geometry also plays a huge part. Those distance guidelines are simply what my tungsten stickout ends up falling under, throughout various different welding conditions. TIG welding is like String Theory---there are at least 11 dimensions, no single one of which is solely responsible for the outcome of the final weld bead. When I'm adjusting tungsten stickout it is generally as short as possible, but long enough that I can see the arc at the end of the weld bead depending on the positioning of my head, which of course will vary with the joint geometry and physical positioning of one's own body. This is where doing "dry runs" helps out. Very generally speaking, I always go with the shortest tungsten stickout that I can manage, and still be able to complete the weld run, even if it is with a gas lens. This saves on shielding gas because the shorter the stickout AND arc length, the lower the gas flow you need for proper shielding (because the cup orifice as a whole is closer to the base metal), whether it be a standard cup/nozzle or gas lens nozzle.

I also find it very important to be able to distinguish between the tip of the tungsten and the arc cone, and thus the base metal. If you can't see the tip of the tungsten, even if it is just barely, then you can't accurately judge arc length, for the sake of consistency and closeness. Thus helmet darkening is of paramount importance for me. This pic is an illustration of what I attempt to see using helmet visibility adjustments with regards to visibility, not stickout:
Image


Granted that looks like steel welding, but I think it gets the point across of what I'm trying to describe.
Last edited by Oscar on Sun Nov 25, 2018 4:25 pm, edited 1 time in total.
Image
User avatar
  • Posts:
  • Joined:
    Tue Apr 11, 2017 10:31 pm

@ koenbro - solid advice above. Continue to systematically work through the process towards excellence. One step at a time.

Strongly encourage you to sign up for formal live training. Face and voice with an experienced human is best. As an alternative or complementary approach, another solid course of action is to invest $45 and surf to http://www.6061.com for video lessons with Aaron. He’s a super talented instructor, fabricator, and videographer in welding Aluminum and ferrous materials. His MO for teaching is top-tier.

Good luck with your journey.
Purpose, then passion. Practitionership. Obsession and hard work. That's the discipline.
User avatar
  • Posts:
  • Joined:
    Mon May 21, 2018 9:47 pm
  • Location:
    Phoenix, AZ

Oscar wrote: It is not a rule. Those are simply the guidelines that I personally use. It's not something that I consciously think about because it is only a small part of the puzzle. With TIG welding, everything plays a part. For example, gas flow also plays a huge part. Joint geometry also plays a huge part. Those distance guidelines are simply what my tungsten stickout ends up falling under, throughout various different welding conditions.

Great discussion, helps understand the relationship of different parameters; I did not consider the arc length before. I also liked the image, and made it my avatar, hope that's ok.
HTP Invertig 221H w/ Arctic Chill cooler and CK20 torch
Lincoln MP210 -- SOLD
Optrel Crystal 2.0
User avatar
  • Posts:
  • Joined:
    Mon May 21, 2018 9:47 pm
  • Location:
    Phoenix, AZ

Arclight Ironworks wrote:Strongly encourage you to sign up for formal live training. Face and voice with an experienced human is best.
My LWS offers classes but are booked until January. I work full time, and welding is a hobby, so need to see how it fits in my work calendar too, but I want to take some face-to-face. Also thought of going to Vegas to Jason the Fabricator for a class.
Arclight Ironworks wrote:As an alternative or complementary approach, another solid course of action is to invest $45 and surf to http://www.6061.com for video lessons with Aaron. He’s a super talented instructor, fabricator, and videographer in welding Aluminum and ferrous materials. His MO for teaching is top-tier.
Yes, I did that last week, and am following his method. Cannot recommend him highly enough, and I watched all the videos several times before I even picked up my torch. The method of making puddles and the idea of using the metronome come from him. I think any noob is well served by buying his course. I even wrote Aaron to let him know that I liked them.
HTP Invertig 221H w/ Arctic Chill cooler and CK20 torch
Lincoln MP210 -- SOLD
Optrel Crystal 2.0
User avatar
  • Posts:
  • Joined:
    Mon May 21, 2018 9:47 pm
  • Location:
    Phoenix, AZ

Day 4.

Played again with aluminum, and tried to improve consistency. In the meantime I forgot about proper angle:
day 4. 01.jpg
day 4. 01.jpg (58.9 KiB) Viewed 1772 times
But at least I realized immediately what am I doing wrong (or so I think).

Then tried to fine tune the heat:
day 4. 02.jpg
day 4. 02.jpg (58.1 KiB) Viewed 1772 times
Finally, tried to jam down on the filler:
day 4. 03.jpg
day 4. 03.jpg (61.07 KiB) Viewed 1772 times
Weld #8 is the best I have done so far. Taking a break now, as I've got to go to work today. Will report back with any progress. Thanks for all the help.
HTP Invertig 221H w/ Arctic Chill cooler and CK20 torch
Lincoln MP210 -- SOLD
Optrel Crystal 2.0
User avatar
  • Posts:
  • Joined:
    Sun Nov 19, 2017 10:09 am

Why does this post remind me of a pic of beating a dead horse?
Lincoln MP 210, Lincoln Square Wave 200,
Everlast 210 EXT
Thermal Dynamics 25 Plasma cutter

" Anything that carries your livelihood wants to be welded so that Thor can’t break it."
CJ737
tweake
  • Posts:
  • Joined:
    Mon Dec 18, 2017 4:53 am
  • Location:
    New Zealand

koenbro wrote:
Second, I am struggling very much with the tempo. I guess experience will help, but in the meantime I bought a metronome (thank you Amazon same day delivery):
this may sound strange to the pro's on here but i would not worry about that to much.
better to see whats happening with the puddle and react to that than try to keep good timing.
i find that tends to be important when your dealing with material or joints that are not nice and even.
tweak it until it breaks
cj737
  • Posts:
  • Joined:
    Thu Sep 29, 2016 8:59 am

tweake wrote:
koenbro wrote: Second, I am struggling very much with the tempo. I guess experience will help, but in the meantime I bought a metronome (thank you Amazon same day delivery):
this may sound strange to the pro's on here but i would not worry about that to much.
better to see whats happening with the puddle and react to that than try to keep good timing.
i find that tends to be important when your dealing with material or joints that are not nice and even.
I’d agree with you, Tweake. Tempo is only critical using an orbital in my book. I use the pedal to keep up, or slow down while I adjust the puddle or filler rod.
User avatar
  • Posts:
  • Joined:
    Thu Dec 26, 2013 12:41 am
  • Location:
    Laredo, Tx

tweake wrote:
koenbro wrote:
Second, I am struggling very much with the tempo. I guess experience will help, but in the meantime I bought a metronome (thank you Amazon same day delivery):
this may sound strange to the pro's on here but i would not worry about that to much.
better to see whats happening with the puddle and react to that than try to keep good timing.
i find that tends to be important when your dealing with material or joints that are not nice and even.
I agree. The whole tempo thing is the icing on the cake when you've already nailed down every other parameter, and now the only thing to move onto is stacking evenly spaced dimes. Tempo will not hold the torch for you at the correct angle, it will not set-up the torch parts, it won't set the machine up for you, it won't steady your hand with respect to arc length, it will not move your filler rod hand to feed in the same exact amount of filler each time, it will not activate your forearm/wrist/hand muscles to rotate the torch on round tubing, it won't tilt your head that teensy weensy amount that you need to to have that just-right view of the puddle as you scoot along, and so on, and so on. :D
Image
User avatar
  • Posts:
  • Joined:
    Mon May 21, 2018 9:47 pm
  • Location:
    Phoenix, AZ

tungstendipper wrote:Why does this post remind me of a pic of beating a dead horse?
Not sure, but that is my learning style. Take notes so I can replicate and go back if I change something and it does not work out. As a hobbyist, I sometimes take a leave of absence of months, and surely is nice to go back and pick up something right where I left it.
HTP Invertig 221H w/ Arctic Chill cooler and CK20 torch
Lincoln MP210 -- SOLD
Optrel Crystal 2.0
Post Reply