I'm in the process of building an aluninium dining table out of some old Beech 18 flaps and some 4x3 I-Beam for the structure.
Can anyone tell me the order in which to weld two bits of beam together to minimise distortion? They will be mitered at about 90° to each other.
The beam is 4”x3”, is about 1/4” thick. I want to weld the full periphery of the joint, along the web too, which is slightly lower thickness at 3/16”. 6061 alloy.
Thanks!
Tig welding tips, questions, equipment, applications, instructions, techniques, tig welding machines, troubleshooting tig welding process

- PilotMarky
-
New Member

-
Posts:
-
Joined:Wed Jun 05, 2019 4:02 pm
-
Location:Detroit

- LtBadd
-
Weldmonger

-
Posts:
-
Joined:Sun Apr 12, 2015 4:00 pm
-
Location:Clearwater FL
-
Contact:
Miter joints pull no matter what. Tack, measure and tap back, tack, repeat. Get lots of tacks. Weld opposite sides as you go.
I’d start welding the vertical flange after lots of tacks personally. inside, then outside. Then top flat, then bottom flat. I’d weld from outside towards inside of the miter on the flats.
Good luck, take your time. Allowing the material to rest helps most in controlling distortion and aluminum is notorious for heat retention.
- PilotMarky
-
New Member
-
Posts:
-
Joined:Wed Jun 05, 2019 4:02 pm
-
Location:Detroit
Here's a pic..
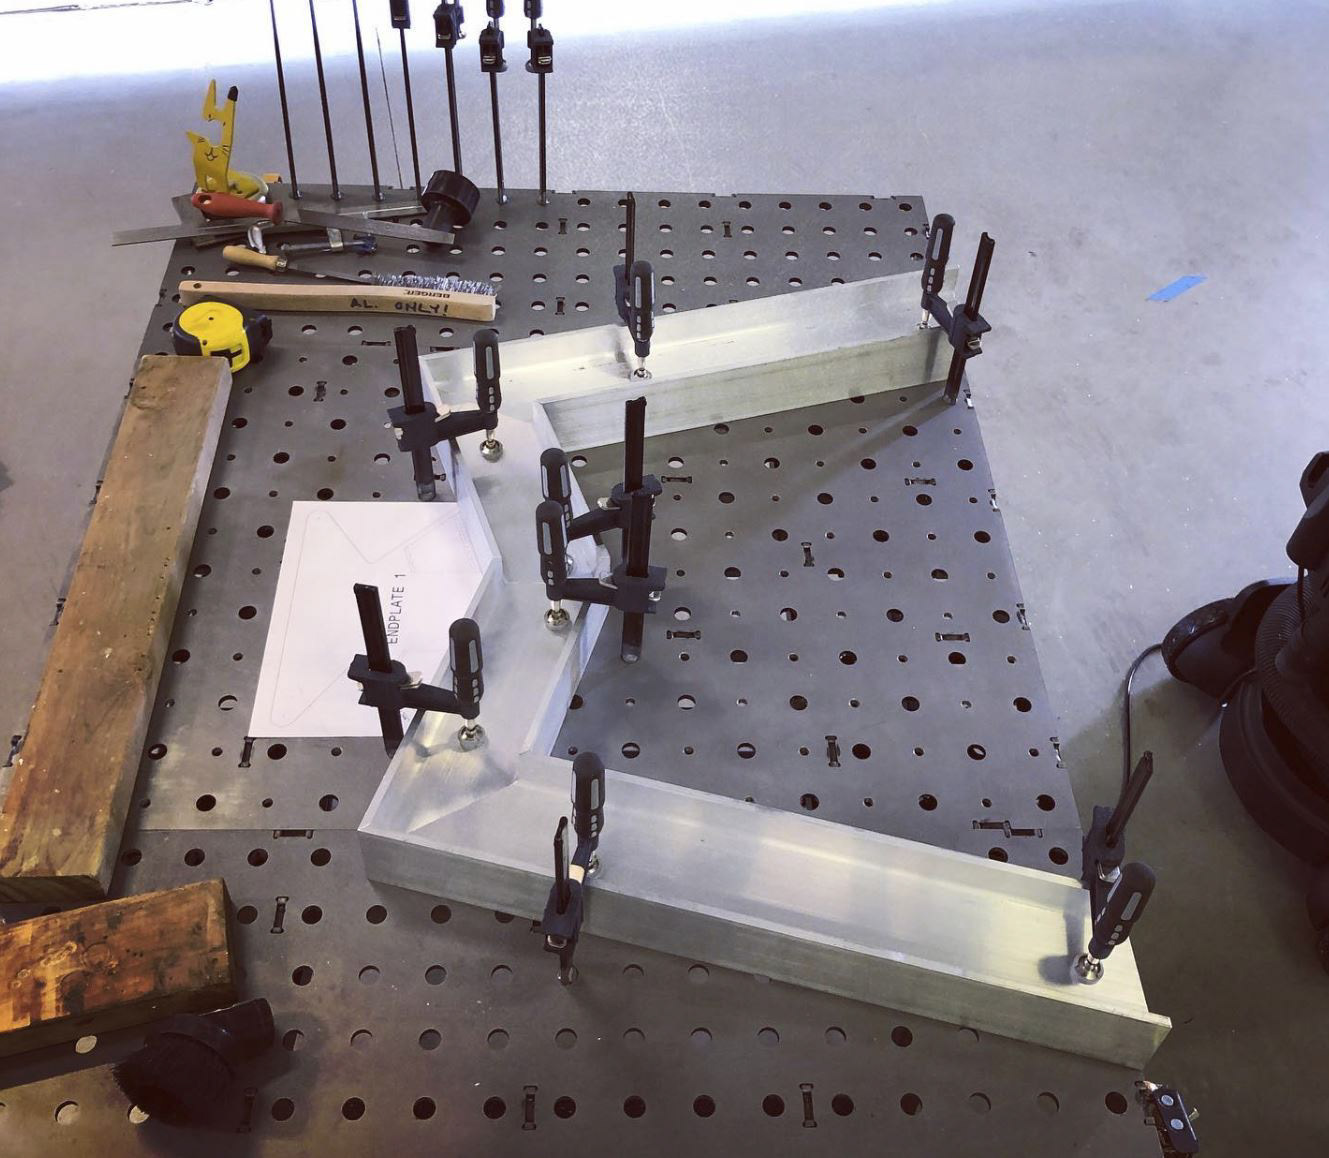
There will be two sets of legs like this.
Thanks for the tips!
There will be two sets of legs like this.
Thanks for the tips!
Mark
Miller Dynasty 280DX
Miller Coolmate 1.3
Miller Dynasty 280DX
Miller Coolmate 1.3

Some pre-heat might even be a good idea. Slows the cooling rate, minimizes residual stresses, and makes the actual weld easier on the start. I think 6061 tolerates about 250°F without any adverse effects. I'm sure you can find it if you look it up.
I would do the web first, inside to outside. Then the outside corner joint, grind,sand the sharp corner back a little for a better result. The inside corner joint I would do last. Do all three mitres like that and allow to cool. Flip over and do the other side.
The frame is clamped down nicely on the table. If you can also clamp down horizontal movement restraints on the legs that would also help.
I'm not sure preheat is necessary, your 280 will handle it. I think it's more important to put in plenty of tacks.
FWIW, I think 5356 would be the best filler for this application.
Flat out like a lizard drinkin'
- PilotMarky
-
New Member
-
Posts:
-
Joined:Wed Jun 05, 2019 4:02 pm
-
Location:Detroit
Awesome, thanks to everyone for the tips! I ordered some 5356 filler and will give it a try.
Mark
Miller Dynasty 280DX
Miller Coolmate 1.3
Miller Dynasty 280DX
Miller Coolmate 1.3

Make sure you post up a pic when its done, 
Pete
Pete
Pete
Esab SVI 300, Mig 4HD wire feeder, 30A spool gun, Miller Passport, Dynasty 300 DX, Coolmate 4, Spectrum 2050, C&K Cold Wire feeder WF-3, Black Gold Tungsten Sharperner, Prime Weld 225
Esab SVI 300, Mig 4HD wire feeder, 30A spool gun, Miller Passport, Dynasty 300 DX, Coolmate 4, Spectrum 2050, C&K Cold Wire feeder WF-3, Black Gold Tungsten Sharperner, Prime Weld 225
Return to “Tig Welding - Tig Welding Aluminum - Tig Welding Techniques - Aluminum Tig Welding”
Jump to
- Introductions & How to Use the Forum
- ↳ Welcome!
- ↳ Member Introductions
- ↳ How to Use the Forum
- ↳ Moderator Applications
- Welding Discussion
- ↳ Metal Cutting
- ↳ Tig Welding - Tig Welding Aluminum - Tig Welding Techniques - Aluminum Tig Welding
- ↳ Mig and Flux Core - gas metal arc welding & flux cored arc welding
- ↳ Stick Welding/Arc Welding - Shielded Metal Arc Welding
- ↳ Welding Forum General Shop Talk
- ↳ Welding Certification - Stick/Arc Welding, Tig Welding, Mig Welding Certification tests - Welding Tests of all kinds
- ↳ Welding Projects - Welding project Ideas - Welding project plans
- ↳ Product Reviews
- ↳ Fuel Gas Heating
- Welding Tips & Tricks
- ↳ Video Discussion
- ↳ Wish List
- Announcements & Feedback
- ↳ Forum News
- ↳ Suggestions, Feedback and Support
- Welding Marketplace
- ↳ Welding Jobs - Industrial Welding Jobs - Pipe Welding Jobs - Tig Welding Jobs
- ↳ Classifieds - Buy, Sell, Trade Used Welding Equipment
- Welding Resources
- ↳ Tradeshows, Seminars and Events
- ↳ The Welding Library
- ↳ Education Opportunities