hi guys
i work 100% aluminum and i have no problems
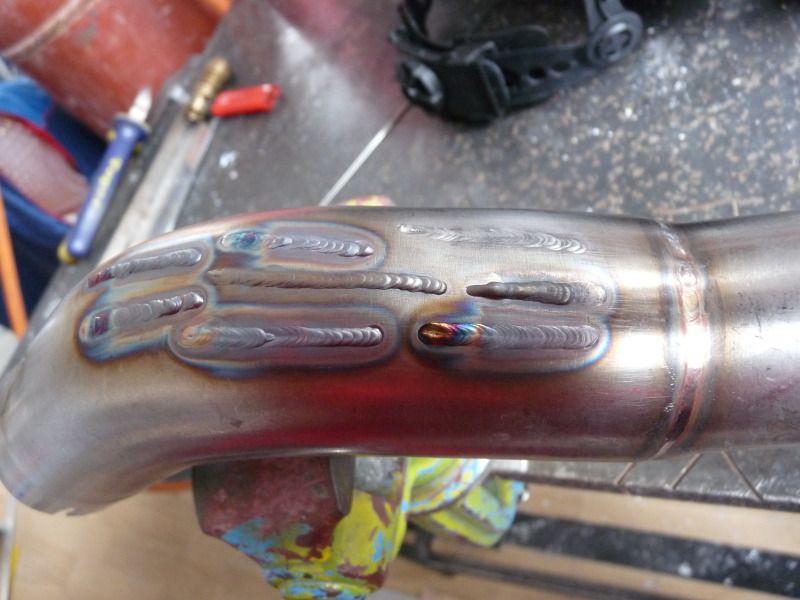
today i started to do a few beads on an exhaust 304 material, 0.8mm thick
rod is 1.2mm 308 material , tungsten is 1.6mm lantanated sharp point
tried different amperage but result is awful
i increased the 99.5 purity argon to 8-9l/min
cup size is 7
here are a few photos
any suggestions about how to increase quality on my welds?
Don't be so hard on yourself. If you've been doing just aluminum for some time, that's not as bad as you think. Hand your rig and some aluminum to a stainless welder, and be prepared to see several feet of dog turds.
The larger cup will help with the color, though the way your welds brushed off, the oxides aren't a problem, especially for the purpose.
I think your instincts for aluminum are making you run hot and fast for stainless. 0.8 mm (.032") should be done very slowly, probably under 25 A (especially when you actually do a joint... The surface beads you're running are similar to a cap). I think I'd set my machine to 25, and not be much over half-pedal after the start.
Take this for what it's worth . About the thinnest thing I weld these days is .069" (1.8mm), and I set for 35 A and keep about half-pedal for most of that.
thanks Steve
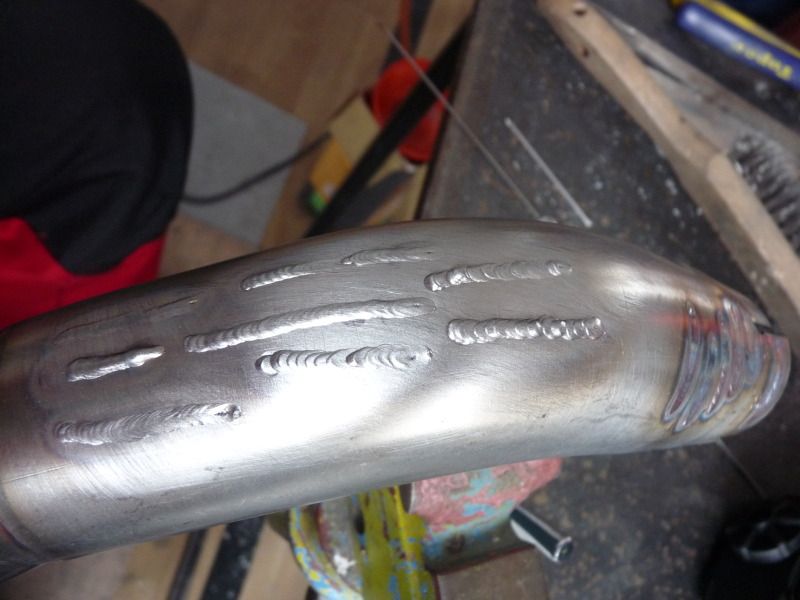
i tried with a large lens, it's better but the inside of the pipe gets contaminated. nasty looking
is there any way to do this without gas purge inside the pipe?
i have seen this guy on youtube and he doesnt use gas purge , gets nice welds inside and out
how is that possible?
I have seem that vid too, and all i can offer is that it seems to be welded fairly cold, so that the back of the pool wasnt too molten thus not allowing to much atmospheric contamination . Maybe? I see you commented on that video? I hope they reply.
It looks like that you have used way too much filler wire.
Try some pulse welding without filler rod, that's is the secret to get really neat looking welds on thin stainless tubing and also put a root gas inside. Plain argon or Formier 10 works fine. It does help to control the puddle and the root won't sugarise.
Cheers!
Markus
Btw here's one good tip by Jody. Maybe a self-evident thing, but sometimes we just forget the basics...
I think I'd set my machine to 25, and not be much over half-pedal after the start.
Sorry if this is side tracking a little...
Having not used a foot pedal in the past (just got myself one a week recently) I was under the impression once the foot pedal is plunged in the machine.The machines Amp settings are now over ridden. The dial on the side of the peddle then dictates the max amperage when the peddle is all the way down.
So setting the machine at 25A and using no more than 1/2 pedal has me a little confused.
Kurt
Off grid workshop - Melting metal with power from the sun .
racingparts wrote:thanks Steve
i tried with a large lens, it's better but the inside of the pipe gets contaminated. nasty looking
is there any way to do this without gas purge inside the pipe?
i have seen this guy on youtube and he doesnt use gas purge , gets nice welds inside and out
how is that possible?
Theres a product called "Solarflux" that would be ideal for your application. It's a powder you mix with denatured alcohol to make a paste you "paint" on the backside of your weld, creating a "flux", and is quite effective at preventing "sugaring". It's not perfect, but it's plenty good enough for exhaust tube.
I think I'd set my machine to 25, and not be much over half-pedal after the start.
Sorry if this is side tracking a little...
Having not used a foot pedal in the past (just got myself one a week recently) I was under the impression once the foot pedal is plunged in the machine.The machines Amp settings are now over ridden. The dial on the side of the peddle then dictates the max amperage when the peddle is all the way down.
So setting the machine at 25A and using no more than 1/2 pedal has me a little confused.
Kurt
If you set your machine for 100A and you floor your foot pedal, you will weld with 100A. If you use 50% foot pedal, 50A.
Not sure what you mean by 'dial' on the side of your foot pedal.
Setting machine at 25A and using no more than 1/2 pedal will grant you 12.5A or less, in theory.
"Not sure what you mean by 'dial' on the side of your foot pedal."
Interesting.
Some variation where command is "FULLY" remote?
I have an ESAB 90i at work that won't accept command from a 14-pin Miller remote. I assumed it was a "jumper" connection to tell the machine the remote was attached, as there's no "panel" selection for it.
Perhaps the OP's machine actually has peak amps adjustable with a knob at the pedal? Perhaps my ESAB miniarc expects the same?
Never heard of any of this, but that doesn't rule it out...
The machine I have has a knob-dial- pot (what ever you want to call it) on the side of the foot pedal 0 - 200A and you set that to where you want the Max amps to be when you step on the pedal 100% . It doesn't matter where you set the max amps on the machine as soon as the pedal is plunged in its overridden by the peddle setting .
you can see the nob in the pic
I have seen a few setup like mine. Though you end up with the same result in the end with both styles mine is just set remotely. Its handy if you don't want to go back to the machine all the time as you can just bend down and adjust the pedal (though bad I guess if you some how knocked it but hasn't happened yet)
Kurt
Off grid workshop - Melting metal with power from the sun .
offgridqld wrote:The machine I have has a knob-dial- pot (what ever you want to call it) on the side of the foot pedal 0 - 200A and you set that to where you want the Max amps to be when you step on the pedal 100% . It doesn't matter where you set the max amps on the machine as soon as the pedal is plunged in its overridden by the peddle setting .
you can see the nob in the pic
I have seen a few setup like mine. Though you end up with the same result in the end with both styles mine is just set remotely. Its handy if you don't want to go back to the machine all the time as you can just bend down and adjust the pedal (though bad I guess if you some how knocked it but hasn't happened yet)
Kurt
I'm guessing that foot pedal would work with the ESAB 90i Miniarc I'm stuck doing ASME code welds with. It's the only machine we have that will fit the manways to where I'll weld. I'm stuck with scratch-start, regardless, but for code welds, I'd LOVE to have a remote amp control, whether thumb or pedal.
it depends on your machine. On miller welders you set your amperage on your machine and just use the pedal. So if o set the machine to 200 and use use half pedal I am using 100 amps. I have seen on the longevity welders that once you plug the pedal in it acts as your amperage control. So if you set that to 200 and used half pedal you would get a 100 amps. On the longevity once you plug your pedal in it overrides the dial on the machine and the dial on the pedal because you amp control. Hope that helps.
This Everlast machine, PowerArc 160 STH states it has a simple amp control, where the peddle always has control over its full range capability, regardless of the setting on the main panel.
"PowerARC series CC IGBT inverter: Stick welder
Processes: SMAW, GTAW
PRODUCT NOTES: This unit is equipped with a built in gas solenoid and does not require a gas valve torch. A built in switch also allows the operator to choose between High Frequency or Lift Start function with meet environmental requirements. This unit uses simple control over the amps with the optional foot pedal. This means the amp range will always be 5-160 amps (or equivalent max amps during 120 V operation). The panel amp knob does not dictate the maximum amps available at the pedal. "
Sounds like there is 3 variations of foot pedals depending on machine model and manufacturer .
Style 1) Foot pedal is 0-100% of the Max amps set on the machine. (most likely the best option)
Style 2) Foot pedal is 0-100% of the Max amps but max amps is adjustable with dial on side of foot pedal (less accurate setting due to using a dial vs digital display)
Style 3) Foot pedal is 0-100% of the max amps of the machine but the max amps available and can not be set lower. (very basic and always running at max amps)
I was playing with my foot pedal on the weekend (dial on the side) The only thing I don't like about it is it just has - and + and no printed scale to know where your setting the amps. Its a 180 deg pot so one improvement will be marking lines around the pot with a fine pen at 1/4 - 1/2 - 3/4 positions. That should make it easy to eye ball where I am setting the amps.
Kurt
Off grid workshop - Melting metal with power from the sun .