Tig welding tips, questions, equipment, applications, instructions, techniques, tig welding machines, troubleshooting tig welding process
countryboy1127
- countryboy1127
-
Workhorse

-
Posts:
-
Joined:Wed May 01, 2013 7:28 pm
I have a small project coming up having to weld 1 1/2 sch 80 aluminum . just building a frame 45s and 90s whats the best way to prep the pipe ? should I bevel leave a landing etc. i've never welded aluminum pipe so this would be greatly appreciated .

- Otto Nobedder
-
Weldmonger

-
Posts:
-
Joined:Thu Jan 06, 2011 11:40 pm
-
Location:Near New Orleans
I assume you are butting pipe at these angles, rather than welding in ells, since it's a frame rather than process pipe?
Personally, I like a 45* bevel for Aluminum. For sch. 80 I'd have a good 3/32 land with only a 1/16" gap. I don't have the benefit of pulse features on my current machines, so I have to do it with the pedal. I'll set max amps at 200-225, with as little "cleaning" as I can get away with.
I'll start by preheating my start point at around 80 amps (a guess--I can't read it with my hood down) until I see metal get shiny and wet. This takes a bit on sch. 80, but helps get the heat into the metal ahead of you. Then I'll mash the pedal and feed rod, for maybe a third of a second, back down to 30-40 amps (the heat is in there now), advance, and repeat. It's a timing thing... you should see the gap just begin to keyhole at lower amps, then mash and feed. As you continue to build heat in the pipe, you'll need less pedal when you feed.
Open root aluminum is a finesse and practice thing. When I was doing x-ray aluminum pipe (process), it all had backing rings... MUCH easier.
Steve S
countryboy1127
- countryboy1127
-
Workhorse
-
Posts:
-
Joined:Wed May 01, 2013 7:28 pm
I also don't have the benefit of a pulse feature on my machine its a power tig 185 . you think that machine could handle the job beings your saying your running at 200 + amps ? and I don't really know how to feather the pedal I haven't really used one more used to finger amp controls (and don't have one of those on this machine either) . and yes I will be butting these together at 45s and 90s . ill definitely give all this a try and see how it works out for me.( this aluminum welding is learning curve ) I have used backing rings in stainless and carbon a time or two and and is much easier than open root .
- Otto Nobedder
-
Weldmonger
-
Posts:
-
Joined:Thu Jan 06, 2011 11:40 pm
-
Location:Near New Orleans
Yeah, the 185 can do it. You'll only be at "max" in pulses, and you may need a li'l bit more than 1/3 second, just at the start. Once the heat soaks, you'll be well within the range of that machine. Once the pipe is hot out ahead of your weld, you might only be using 125-150 amps for the "pulse".
There are other experienced aluminum welders here, so don't hang your hat on my suggestions. Others may have ideas from their own methods that maywork for you as well. Give it a bit, and see who else posts.
Steve S
There are other experienced aluminum welders here, so don't hang your hat on my suggestions. Others may have ideas from their own methods that maywork for you as well. Give it a bit, and see who else posts.
Steve S
I make the bevel large enough so that the tungsten fits down in the joint, with a 1/16th land, butted tight. I grind off the sharp outside corner so that it is flat, 45 degrees to the joint. I pulse weld it in reverse, so that the shielding gas is flowing directly at and under the weld puddle. Pulsing at 250 amps, I need no prep on sched 40 other than grinding off the sharp points of the outside corner, so that the weld is uniform band all the way around the joint, and equal penetration. On sched 80, I remove roughly half of the average thickness so that the metal is about equal to sched 40 in mass.
This is a sched 40 joint, but I can do the same with 80.
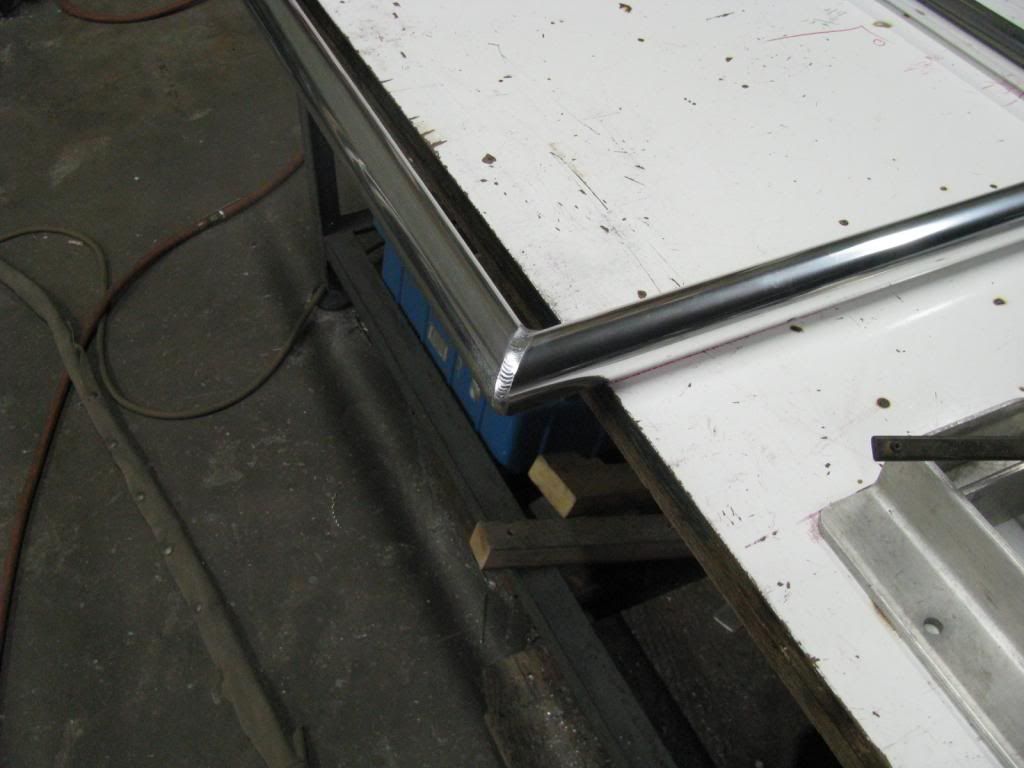
The outside corner was flattened to the width of the weld joint. The sharp edge on each piece was sanded off to about an 1/8th land, making a 1/4" flat when the two were put together.
If need be, I have some t6 80 at the shop I can prep and set up as an example.
This is a sched 40 joint, but I can do the same with 80.
The outside corner was flattened to the width of the weld joint. The sharp edge on each piece was sanded off to about an 1/8th land, making a 1/4" flat when the two were put together.
If need be, I have some t6 80 at the shop I can prep and set up as an example.
Miller ABP 330, Syncrowave 250, Dynasty 300 DX.
Honorary member of the Fraternity of Faded Tee Shirts.
Honorary member of the Fraternity of Faded Tee Shirts.

- Otto Nobedder
-
Weldmonger
-
Posts:
-
Joined:Thu Jan 06, 2011 11:40 pm
-
Location:Near New Orleans
Nice, Jeff, as usuall.
Remember the OP is limited to 185 Amps by his machine, but this only changes "on" time.
And for the OP's benefit, I'll mention that you don't use remote amp control, other than "On/Off", and use this to pulse manually.
Steve S
Remember the OP is limited to 185 Amps by his machine, but this only changes "on" time.
And for the OP's benefit, I'll mention that you don't use remote amp control, other than "On/Off", and use this to pulse manually.
Steve S
countryboy1127
- countryboy1127
-
Workhorse
-
Posts:
-
Joined:Wed May 01, 2013 7:28 pm
tam jeff that is some sweet looking welds . i will be trying all this out very soon .im assuming your using a flap disk to sand the bevels and edges with ? i wont ask you to take anymore of your time just to show me how you setup and prep the pipe. i appreciate everyones time and advice they share on this forum . i must have read a million different post already .and yea otto i know the current finger amp control only works on and off . i use to have a syncrowave 250 with a finger amperage control .would it benefit maybe to have a mix of helium added in to up the heat without having to max out the machine or maybe a pre heat before ?
Flap wheel would work, as will a milk wheel, but I prefer a stationary belt sander with some 60 grit on it, or even a hand held belt sander clamped in a vise.
Miller ABP 330, Syncrowave 250, Dynasty 300 DX.
Honorary member of the Fraternity of Faded Tee Shirts.
Honorary member of the Fraternity of Faded Tee Shirts.
- Otto Nobedder
-
Weldmonger
-
Posts:
-
Joined:Thu Jan 06, 2011 11:40 pm
-
Location:Near New Orleans
Helium and preheat will both help you, but mostly at startup. Once you have enough heat to maintain the puddle size you're looking for without the rod "sticking" as you dip, you won't need to be maxed out to continue.
Preheat is a lot cheaper than helium, though, so unless you have ready access to helium, I'd save that money until you have a heavy section to weld.
I tend to really work the pedal on aluminum, espcially if I have a gap to fill, so I think I'm going to have to experiment with Jeff's method. The SW 250 DX I use at work allows me to set the pedal or thumbwheel to "on/off", with amps set at the panel. I'm so used to welding stainless... I maintain a constant arc, even if I back off to 25 amps, to see where I'm going, so I tend to forget the "flashlight effect" of a hot pure tungsten with a nice ball on it.
Steve S
countryboy1127
- countryboy1127
-
Workhorse
-
Posts:
-
Joined:Wed May 01, 2013 7:28 pm
I think ill use the pre heat method, I do have access to a torch just help on start up.im gonna try and experiment with feathering the pedal , I may mess a few tungsten up but Ive read quit a few threads talking about it . Its just gonna take practice and a lot of patients . thanks again guys
countryboy1127
- countryboy1127
-
Workhorse
-
Posts:
-
Joined:Wed May 01, 2013 7:28 pm
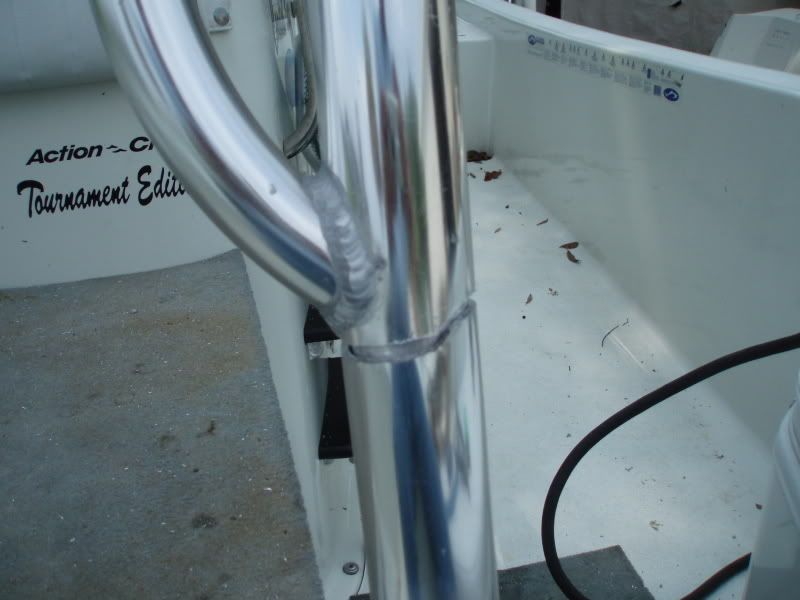
ok guys its not sch 80 but I found a piece of 40 and beveled it and gave it shot .I didn't have acetone to clean the pipe with so I just buffed it off and went with it . I don't think it came out bad, but it definitely isn't as nice as tamjeffs . still not used to feathering the pedal but all in all I think its not bad. I did get pretty good penetration , one spot was over penetrated but not bad . what do you guys think ?
- pipe.jpg (89.76 KiB) Viewed 2589 times
- pipe 3.jpg (99.9 KiB) Viewed 2589 times
- Otto Nobedder
-
Weldmonger
-
Posts:
-
Joined:Thu Jan 06, 2011 11:40 pm
-
Location:Near New Orleans
That's not bad at all!
Two things I'd point out, were I an instuctor or inspector...
The bead should be a little "fuller". Yours appears to be nearly flush with the pipe. Since this is sch 40, you probably did it in one pass, so this is still remarkably good if aluminum pipe is new to you. On sch 80, two passes will solve this problem for you.
Also, I see "cratering" where you tail off each segment of the weld. This is because aluminum shrinks so much when it cools, you really have to kind-of "overfill" as you tail off. It's a trial-and-error thing at first, but becomes second nature.
You've clearly got it figured out... It's just practice from here.
Steve S
countryboy1127
- countryboy1127
-
Workhorse
-
Posts:
-
Joined:Wed May 01, 2013 7:28 pm
steve yes I only used one pass to fill. I did notice it was kinda low or not full enough . i think im pushing enough wire but its still a learning curve beings its my first tig on aluminum pipe . i think im making to big of steps instead of of stacking them tighter .
alexa the penetration was not bad, had one spot that wasn't quit fully fused and i had one spot where it was to hot and over penetrated a little the spot where it wasn't fully fused was the starting point and i didn't pre heat the pipe any.
alexa the penetration was not bad, had one spot that wasn't quit fully fused and i had one spot where it was to hot and over penetrated a little the spot where it wasn't fully fused was the starting point and i didn't pre heat the pipe any.
You did well. And like Steve, I am also thinking that from here on out it's to be a practice issue. Another trick on structural stuff, is to use hot dogs for open butts. It saves so much time, just for helping to keep things strait initially, plus allowing to open the gap up without any beveling at all and buy some time at the root. I make these hot dogs a dozen at a time out of other scraps of pipe and tubing. By the time you penetrate the hot dog, and convex the bead face, you should end up with a sched 60 weld on sched 40 pipe.
In the repair below, I also used it because this truss was in a bad area so the pin helps to reinforce the heat zone issue here. It really helps with dry assembly too, without having to clamp a bunch of helpers to your work or with continuity issues with the ground. I can't just clamp a ground anywhere on this polished pipe I work with and an arc out can roach the whole works in an instant.
I've tried it both ways. The hot dog method saves me a lot more time over the long haul. I would never end a truss midway like this with such a wimpy structure, regardless.
Miller ABP 330, Syncrowave 250, Dynasty 300 DX.
Honorary member of the Fraternity of Faded Tee Shirts.
Honorary member of the Fraternity of Faded Tee Shirts.
countryboy1127
- countryboy1127
-
Workhorse
-
Posts:
-
Joined:Wed May 01, 2013 7:28 pm
I appreciate everyones advice and help.i thought about using another piece of pipe or tubing for that sorta like a backing ring . I don't have a lot of left over material just yet but when I do I will remember this . I have a job coming up soon ill post pictures as I go along .
- Otto Nobedder
-
Weldmonger
-
Posts:
-
Joined:Thu Jan 06, 2011 11:40 pm
-
Location:Near New Orleans
Given the choice,
I'll weld aluminum pipe with a backing ring every time. This was even specified on an x-ray job I was on, and it makes life much easier.
Steve S
I'll weld aluminum pipe with a backing ring every time. This was even specified on an x-ray job I was on, and it makes life much easier.
Steve S
countryboy1127
- countryboy1127
-
Workhorse
-
Posts:
-
Joined:Wed May 01, 2013 7:28 pm
I've welded some stainless with a backing ring and it definitely made the job a lot better and faster .
countryboy1127
- countryboy1127
-
Workhorse
-
Posts:
-
Joined:Wed May 01, 2013 7:28 pm
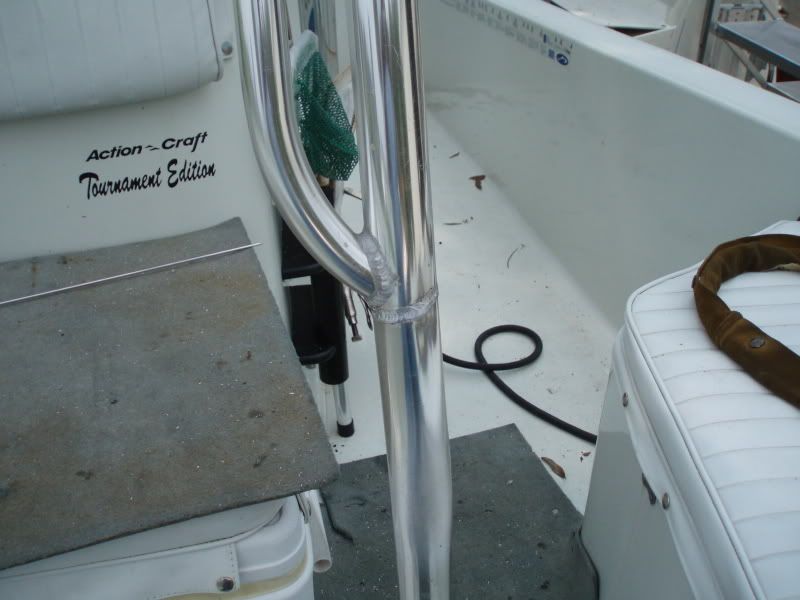
ok guys here the latest try at it what do you guys think? i keep seeing little black dots in the weld after im done .could it be a gas problem or tungsten
- 20130611_210440_resized.jpg (202.89 KiB) Viewed 2538 times
- 20130611_210432_resized.jpg (143.84 KiB) Viewed 2538 times
- 20130611_210428_resized.jpg (209.09 KiB) Viewed 2538 times
Looking good so keep at it. Perhaps you are lifting the cup (too much torch angle?) too far away from the weld puddle. In the last decade, it's been fashionable to work with the tungsten way out of the cup. That's all fine and well if you use lenses, but I don't weld that far out unless I have tight inside corners. I use no more than 1/4" of tungsten exposed unless it needs to be. I don't find lenses to be necessary welding smaller pipe 2" and under. Sometimes a bit of a ballooned gas shield is beneficial in these situations.
Miller ABP 330, Syncrowave 250, Dynasty 300 DX.
Honorary member of the Fraternity of Faded Tee Shirts.
Honorary member of the Fraternity of Faded Tee Shirts.
- Otto Nobedder
-
Weldmonger
-
Posts:
-
Joined:Thu Jan 06, 2011 11:40 pm
-
Location:Near New Orleans
I agree with Jeff!
That'd look "pretty good" for many experienced aluminum hands. That looks GREAT for no longer than you've been working with it.
"Pepper" in the welds is not uncommon, when your gas supplier views you as a "hobbyist/home shop" welder. You get the bottle that was mid-transition from 75/25 to straight argon, and the purity isn't up to "code". This isn't really a big deal for most welds, unless you get moisture in the gas...
If a wire-wheel will take it off easily, it's only surface contamination (floaties, I like to call them), and is a non-issue for most things you'll weld.
countryboy1127
- countryboy1127
-
Workhorse
-
Posts:
-
Joined:Wed May 01, 2013 7:28 pm
i try to keep the tungsten stuck out about half the width of the cup which im using a number 8. I did have to extend it out a little to reach behind the 45s though . I do see peppering on the weld buts its not all the time or on the entire weld . I don't know maybe its me and my lack of experience . I did grind a weld out cause I saw what looked like pin holes form in the puddle while welding , but when I ground it out there were no signs of pin holes ,at least not that I could see . i am also getting a large ball on the end of my tungsten is that to much positive or negative . and thanks for the confidence boosting compliments that's only my 5th aluminum pipe weld ever .once again thanks for all the advice and help guys its much needed and appreciated .
For that material you should be able to use balanced AC. Also, make sure the ball is not sagging to one side of the cup blocking the gas flow in different positions. The ball should stay centered. Wonky gas can cause the tungsten to ball erroneously as well. Play with the High Freq settings if your machine is equipped with it. Just about every machine I have used has a different sweet spot.
I wouldn't just rely on grinding or sanding to clean those joints outside of the actual joint prep. I would use a Stainless wire brush on the area outside, if anything, and wipe off the pipe after cleaning it if using abrasives. Sanding sometimes gives the appearance of it being clean when it actually isn't and you may actually embed contaminant into the aluminum. Also, if you 'grain' the pipe in other than the direction of weld travel, the edges of your weld puddles may be drawn into this grain by capillary action, giving the edges an irregularity instead of a crisp line. I typically tack up my parts and then wire brush it
Also, watch the cleaning action when you start your arc. Notice if you see any black residue creep from the weld zone. If it does, wait until it is cooked away from the joint by the cleaning action.
Miller ABP 330, Syncrowave 250, Dynasty 300 DX.
Honorary member of the Fraternity of Faded Tee Shirts.
Honorary member of the Fraternity of Faded Tee Shirts.
countryboy1127
- countryboy1127
-
Workhorse
-
Posts:
-
Joined:Wed May 01, 2013 7:28 pm
The ball does tend to sag to one side sometimes. My balance is set to around 9 o'clock on the dial I tried to adjust up more and the tungsten just melts away. If I go down to lowest setting for max penetration I don't get good cleaning action .there is a black residue when I first start the arc , I do let disapate before starting to weld . I see everyone elses weld beads are shiney and mine have a dull whitish haze over them . Thanks again this is why I joined this forum , the knowledge and experience you guys have and share is enormous thanks again .
Return to “Tig Welding - Tig Welding Aluminum - Tig Welding Techniques - Aluminum Tig Welding”
Jump to
- Introductions & How to Use the Forum
- ↳ Welcome!
- ↳ Member Introductions
- ↳ How to Use the Forum
- ↳ Moderator Applications
- Welding Discussion
- ↳ Metal Cutting
- ↳ Tig Welding - Tig Welding Aluminum - Tig Welding Techniques - Aluminum Tig Welding
- ↳ Mig and Flux Core - gas metal arc welding & flux cored arc welding
- ↳ Stick Welding/Arc Welding - Shielded Metal Arc Welding
- ↳ Welding Forum General Shop Talk
- ↳ Welding Certification - Stick/Arc Welding, Tig Welding, Mig Welding Certification tests - Welding Tests of all kinds
- ↳ Welding Projects - Welding project Ideas - Welding project plans
- ↳ Product Reviews
- ↳ Fuel Gas Heating
- Welding Tips & Tricks
- ↳ Video Discussion
- ↳ Wish List
- Announcements & Feedback
- ↳ Forum News
- ↳ Suggestions, Feedback and Support
- Welding Marketplace
- ↳ Welding Jobs - Industrial Welding Jobs - Pipe Welding Jobs - Tig Welding Jobs
- ↳ Classifieds - Buy, Sell, Trade Used Welding Equipment
- Welding Resources
- ↳ Tradeshows, Seminars and Events
- ↳ The Welding Library
- ↳ Education Opportunities