
Can anyone give me good advice on doing a full penetration butt weld with a stop half way on 6 inch long 1/8th inch thick mild steel. It's for my City & Guilds qualification.
I'm currently using copper backing bar, 2,4 mm electrode ground to a long taper point, 100 amps foot peddle control. I can get the penetration but the weld seems rather wide about 5 mm (1/4 inch). I'm keeping a very tight arc, the tungsten is almost touching the weld pool. It seems no matter what I try I just can't get the weld any narrower. Also when I stop then restart the weld always ends up being different
Any pointers or advice would be welcome, also what would be an acceptable width of weld for this joint
Cheers
Tig welding tips, questions, equipment, applications, instructions, techniques, tig welding machines, troubleshooting tig welding process

- AKweldshop
-
Weldmonger

-
Posts:
-
Joined:Wed Oct 23, 2013 3:30 pm
-
Location:Palmer AK
Are you using a inverter or transformer 
with a inverter you can adjust the frequency to pinpoint the arc.....
good luck John
John
with a inverter you can adjust the frequency to pinpoint the arc.....
good luck
Just a couple welders and a couple of big hammers and torches.
Men in dirty jeans built this country, while men in clean suits have destroyed it.
Trump/Carson 2016-2024
Men in dirty jeans built this country, while men in clean suits have destroyed it.
Trump/Carson 2016-2024


I think he missed the mild steel part.
A shorter taper or a smaller tungsten will narrow your arc cone. I would typically be running around 120 to 130 amps for that as well. 1/4 inch bead width on 1/8 sheet doesn't seem excessive to me though. What requirements have they given you for this qualification?
And what do you mean by different after restart?
Nick
noddybrian
- noddybrian
-
Weldmonger
-
Posts:
-
Joined:Thu Jan 24, 2013 12:13 pm
Yes normal frequency control is only relevant to AC & aluminum - but Jody has a theory of using pulse ( look at his video's concerning rule of 33 ) where he states that use of high speed pulse will focus the arc despite being on DC - his usual application is to avoid too much heat near edges especially on stainless - but it may be worth experimenting if your machine supports this function - it should help - though I think it's really just a matter of getting a comfortable position & practice ! 1/8" is not so thin as to usually cause problems & I would say that total weld width of double the thickness is not excessive - if you think about thicker material being done full penetration by the time you have 70 degrees of prep angle & a cover pass on top it would be acceptable on most jobs - it's possible that heat soak into the copper backing strip is making the weld more difficult - if there is a stated procedure that requires this then live with it - but I should have thought open root would be better - but that's an opinion from the UK where backing strips are used far less commonly & on very specific applications.
Good luck.
Good luck.
What gap are you using? Are you doing anything to the edges of the metal other than cleaning? Is a certain size bead specified because a 1/4" wide butt weld bead on 1/8" steel is not too large in most cases.
Wow thanks guys for all the help your giving me. Right, to clarify a few points . I've enrolled on a city and guilds level 2 course here in the UK the course starts at the end of January next year. The welds that will be examined are lap joint, fillet joint , corner joint, round tube to flat plate and vertical full penetration butt joint. All on 3 mm mild steel and all require a stop and start halfway during the weld.
I am wanting to get well ahead so that other time on the course can be used to do more complicated welds. Now I can't get in touch with the tutor as he's in hospital after an operation. I've tried posting in the UK but haven't had much help. Now , I know you can use a backing plate for the vertical weld but not sure if you can leave a route gap or bevel the edges. I know they are using 2.4 mm electrodes as they just use the one size due to cost ( to me that seems wrong as I'd use a 1.6 mm).
Now from what I've tried so far, not using a backing plate leaves an ugly mess on the rear, so I know you need to use it. I have used 1.6 mm filler rod with the plates butted up and 100 amps foot controlled. Also tried a long taper on the tungsten and also a 90 degree taper on the tungsten as I read that this angle will give the deepest penetration . None of this seems to work well so I'm now trying tapering the joint down from 3 mm to 1mm again using the backing plate and trying different tungsten tapers but still using 100 amps . I moved up to 2.4 mm filler rod as the 1.6 leaves a concave weld. I'm still not getting good penetration and I'm having to travel what seems really slow to try and get good penetration . Now someone told me 100 amps max would all that's required for this weld but I noticed you said you use 140 amps so I'm off to try that.
I must admit I thought the fillet weld would have been the hardest and I practised this and I can get a really nice neat tight weld on that but this Butt joint is driving me crazy I never expected to have so much trouble with it
I would use more amps, especially if you are maxing out your foot pedal. A slight stepping motion may help with the suck-back that is causing the concavity with your root. If you can use a small gap it would really help because then you could see your root pass going in.
I've tried bevelling to full depth and increased the amps which seems to vastly improve things, I'm trying to get the bead as neat and narrow as I can. If I could achieve 4mm then I would be pleased but am I expecting too much
If you are beveling then tack up and measure your groove width before you begin welding. Then you can just nip the outer edge of the groove. That is as small as the weld can be, because if it is any smaller it will not fill the groove.
- AKweldshop
-
Weldmonger
-
Posts:
-
Joined:Wed Oct 23, 2013 3:30 pm
-
Location:Palmer AK
Sorry about the Frequency mix-up, thinking Aluminum 
But, yes, use a needle point tungsten
Pulsing might help,
Move forward, pulse, dip, move forward, pulse, dip
2 cents
John
But, yes, use a needle point tungsten
Pulsing might help,
Move forward, pulse, dip, move forward, pulse, dip
2 cents
John
Last edited by AKweldshop on Sun Dec 22, 2013 6:30 pm, edited 1 time in total.
Just a couple welders and a couple of big hammers and torches.
Men in dirty jeans built this country, while men in clean suits have destroyed it.
Trump/Carson 2016-2024
Men in dirty jeans built this country, while men in clean suits have destroyed it.
Trump/Carson 2016-2024
Thanks for that sorry for the delay didn't notice it had gone on to 2 pages. I know it might be a pain but any chance you could take me through step by step how you would tackle it including filler size, amperage , electrode size, root gap ( if at all ) , bevel ( I'm doing a 45 deg full depth)
If its too much trouble I understand. There are loads of vids on aluminium butt welds but none on mild steel full depth. I just want to try and get it right. Up to now I've used 24 metres of 3x 20 mm mild steel so as you can see I'm trying my best but frustration is starting to set in. I just love TIG welding but I've hit a dead end here but I won't give up. My local steel supplier loves me as does the scrap man
If its too much trouble I understand. There are loads of vids on aluminium butt welds but none on mild steel full depth. I just want to try and get it right. Up to now I've used 24 metres of 3x 20 mm mild steel so as you can see I'm trying my best but frustration is starting to set in. I just love TIG welding but I've hit a dead end here but I won't give up. My local steel supplier loves me as does the scrap man
Are you trying to complete the weld in one pass? If you are beveling and running more than one pass, these are some things to consider.
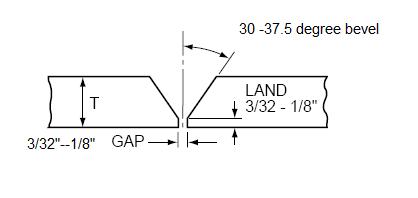
Land and gap should be about the same.
0" land and 0" gap
1.6mm land 1.6mm gap and so forth.
I would run this with very little land and gap with a 1.6mm filler rod and I would use pulse if it was available. Just make sure you see both walls of the base metal breaking down and entering the weld pool and a very small keyhole opening up. I am not sure about amps because I use a foot pedal but I would set it on around 100 and pedal it. I would bump it to about 125 after I put in the root. I never use a backing so I can't speak to that but I would think that it would help to keep the root flush on the back side.
Please excuse my ignorance but what do you mean by 'land'.
Yes the weld has to be done in one pass. Just got some bad news from the college today, my course won't be starting in Jan . There not sure when but they will be in touch. Looks like the tutors op was more serious then he thought.
I can't see the requirement being the plates being butted up close because it just seems almost impossible to do with 1/8th inch thick. They must allow you either a root gap or beveled edges to get full penetration.
If you were using either what max amps, root gap size or bevel and filler would you use and roughly what size bead would you expect
Many thanks
Thanks for that, that's a real help. Just so you know I'm 49 years old and have dabbled in Tig on and off . It's just recently I decided to take the plunge and buy a decent ac/dc machine. I want to do it justice by producing neat and tidy welds constantly. That's why I enrolled on a Tig course at college as well. Like I've said before I really really enjoy doing Tig I find it so satisfying . I know it needs practice ,practice and more practice which I'm willing to do. I can't thank people enough for responding and trying to help me , many many thanks
Ok I give up, I don't normally but this has got me beat. I have now used 24 metres about 70 ft of 3 mm x 20 mm of mild steel (over 100 attempts) and I'm still not any closer. I either get I nice 5 mm bead and no full penetration or full penetration but a concave bead or full penetration and a sagging bead. I'm totally stumped as to what to do.. All my other welds are fine , fillet ,lap, external corner etc there all fine but this vertical butt has got me beat. Personally, If I was to do it my own way I would do it as a two pass weld on 3mm mild steel. Doing it in one pass just seems impossible
Does anyone have any suggestions or am I right in what I'm saying
Does anyone have any suggestions or am I right in what I'm saying
I've found this as the specs for the test peice
3 Multiple-run welds are permissible
4 There is a requirement for stop/restart positions to be included and identified
5 Where BUTT WELDS are required the following options are available square butt welded from one side
single vee-butt welded from one side
PLEASE NOTE again that for ALL BUTT welds in Low Carbon Steel AND Austenitic Stainless Steel the use of a backing purge is an ESSENTIAL REQUIREMENT
DOH...... So multi runs are allowed as well as single V . So what would be a good method for 2 passes on the v butt using 2.4 mm electrode . Would you use 1.6mm filler etc
I would take the v-groove down to a fairly sharp edge, very little land and use 1.6 mm filler for the root. I would up my amps and use 2.4 mm filler for the 2nd pass.
Will a purge box be provided or will you have to set up your own?
Will a purge box be provided or will you have to set up your own?

- Otto Nobedder
-
Weldmonger
-
Posts:
-
Joined:Thu Jan 06, 2011 11:40 pm
-
Location:Near New Orleans
While a back-purge is always helpful, it's not frequently used on mild steel. If it's available and permitted, though, give it a shot. It'll smooth out the root and help with flow-out.lazerbeam wrote:I would take the v-groove down to a fairly sharp edge, very little land and use 1.6 mm filler for the root. I would up my amps and use 2.4 mm filler for the 2nd pass.
Will a purge box be provided or will you have to set up your own?
Steve S
Cheers guys I will give that ago tomorrow . I wish I came across those specs earlier as I've been going crazy trying to achieve the weld. I though something must be wrong that's why I did hours of searching to find the specs, they weren't easy to find I can ell you . I will let you know how I get on many thanks
noddybrian
- noddybrian
-
Weldmonger
-
Posts:
-
Joined:Thu Jan 24, 2013 12:13 pm
One final thought - if your still using 20mm wide strip to practice on there is very little bulk of material to help with heat build up - I understand going to a wider piece will cost you more but it will help & I never saw a test piece even in that thickness less than 50mm - now that you have done some practice & have a better idea of the weld spec maybe get some wider stock that will behave more like the actual test piece.
All the best with your C&G
All the best with your C&G
Yes your so right, originally when I was doing it the weld would run away with itself, so when I did the halfway stop I would let it cool down . The actual test piece is two prices 50 mm (2 inch) x 200mm (8 inch) long so should be a breeze
Looking forward to trying it out tomorrow
Looking forward to trying it out tomorrow
Return to “Tig Welding - Tig Welding Aluminum - Tig Welding Techniques - Aluminum Tig Welding”
Jump to
- Introductions & How to Use the Forum
- ↳ Welcome!
- ↳ Member Introductions
- ↳ How to Use the Forum
- ↳ Moderator Applications
- Welding Discussion
- ↳ Metal Cutting
- ↳ Tig Welding - Tig Welding Aluminum - Tig Welding Techniques - Aluminum Tig Welding
- ↳ Mig and Flux Core - gas metal arc welding & flux cored arc welding
- ↳ Stick Welding/Arc Welding - Shielded Metal Arc Welding
- ↳ Welding Forum General Shop Talk
- ↳ Welding Certification - Stick/Arc Welding, Tig Welding, Mig Welding Certification tests - Welding Tests of all kinds
- ↳ Welding Projects - Welding project Ideas - Welding project plans
- ↳ Product Reviews
- ↳ Fuel Gas Heating
- Welding Tips & Tricks
- ↳ Video Discussion
- ↳ Wish List
- Announcements & Feedback
- ↳ Forum News
- ↳ Suggestions, Feedback and Support
- Welding Marketplace
- ↳ Welding Jobs - Industrial Welding Jobs - Pipe Welding Jobs - Tig Welding Jobs
- ↳ Classifieds - Buy, Sell, Trade Used Welding Equipment
- Welding Resources
- ↳ Tradeshows, Seminars and Events
- ↳ The Welding Library
- ↳ Education Opportunities