Page 1 of 1
When tack weld goes wrong---then what?
Posted: Sat Aug 02, 2014 5:24 pm
by Xtapolapocetl
What do you do when the two pieces, instead of fusing together nicely, violently separate, creating a hole? In my, ahem, experiments, the hole didn't get larger than a certain size, but it was still pretty hard to fill it in. I tried lowering the amps to an absolute minimum, and working around the perimeter to close the hole. It wasn't easy at all, but it seemed like a possible approach. What do experts do in such cases?
Or, is this that kind of thing that does not happen to you?

Re: When tack weld goes wrong---then what?
Posted: Sat Aug 02, 2014 5:36 pm
by dirtmidget33
Was this Aluminium?
Re: When tack weld goes wrong---then what?
Posted: Sat Aug 02, 2014 5:43 pm
by Oscar
Nowhere near enough information to make an educated guess. Are we talking 22ga sheet metal or 1/4" plate? catch my drift?

Re: When tack weld goes wrong---then what?
Posted: Sat Aug 02, 2014 5:54 pm
by Otto Nobedder
Xtapolapocetl wrote:What do you do when the two pieces, instead of fusing together nicely, violently separate, creating a hole? In my, ahem, experiments, the hole didn't get larger than a certain size, but it was still pretty hard to fill it in. I tried lowering the amps to an absolute minimum, and working around the perimeter to close the hole. It wasn't easy at all, but it seemed like a possible approach. What do experts do in such cases?
Or, is this that kind of thing that does not happen to you?
Yep. It happens.
Prevention, and fixes when it does happen, depend on the material and thickness, as stated above.
Steve S
Re: When tack weld goes wrong---then what?
Posted: Sat Aug 02, 2014 6:25 pm
by Xtapolapocetl
Sorry, I thought the exact details didn't matter that much.
Yes, it was aluminum, about 2mm in thickness, so rather thin. I just cut 2 small pieces, 1.5"x2.5" in size and tried to weld them together (butt weld). In several attempts, the two pieces developed two separate half-puddles, which then proceeded to separate. That was just a scrap, but the situation deteriorated so rapidly and so unexpectedly, that (1) it made me wonder what if this happens in a real weld, and (2) made me think that this is going to happen to me when I'm not working on scrap metal for a change...

I took two pics so you can see what I did.
I tried to repair this one, with some minor success. You can see the traces of the routine "touch the electrode with the rod"...

Here, the hole appeared when I tried to make a second tack, the first one seems to have worked:

Re: When tack weld goes wrong---then what?
Posted: Sat Aug 02, 2014 7:02 pm
by MinnesotaDave
Going slow, at low amps, is not your friend.
Plus, the pieces are so small they saturate with heat and then just blow apart.
Higher amps, faster tacking, much bigger test pieces.
For example, as an experiment I speed tacked this with no filler, at 230 amps, in about 3/4 sec.
An extreme example, but you get the idea.
Re: When tack weld goes wrong---then what?
Posted: Sat Aug 02, 2014 8:12 pm
by Xtapolapocetl
MinnesotaDave wrote:Going slow, at low amps, is not your friend.
I used the low amps when I was trying to fill the hole in. With normal welding current, the metal on the perimeter would melt and the filler rod would only add to the "donut" around the hole. I was trying to heat up tiny fragments of the edge to gradually close it in.
Re: When tack weld goes wrong---then what?
Posted: Sun Aug 03, 2014 1:33 am
by Mongol
I'll echo what MinnesotaDave said that hot and fast is usually the best way; insofar as my experiences.
If you do get an unusually/uncomfortably large gap, I've had success with bridging the gap. And with larger gaps don't focus too much on one area. Weaving tends to help. And you might try pulsing with aluminum.
Re: When tack weld goes wrong---then what?
Posted: Sun Aug 03, 2014 2:01 am
by Oscar
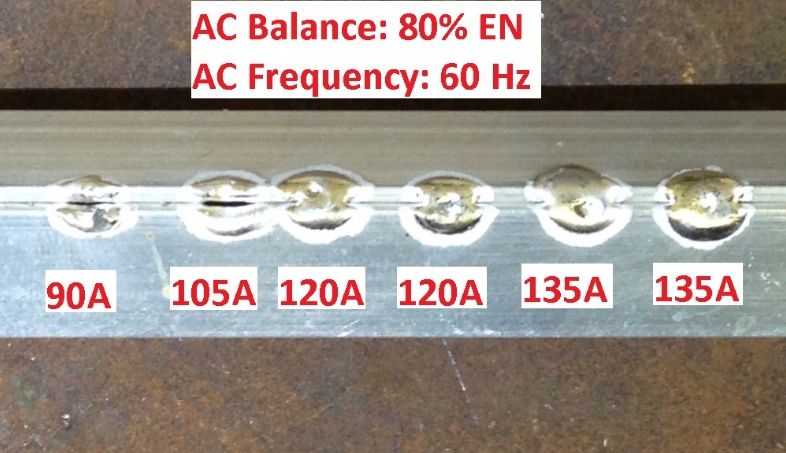
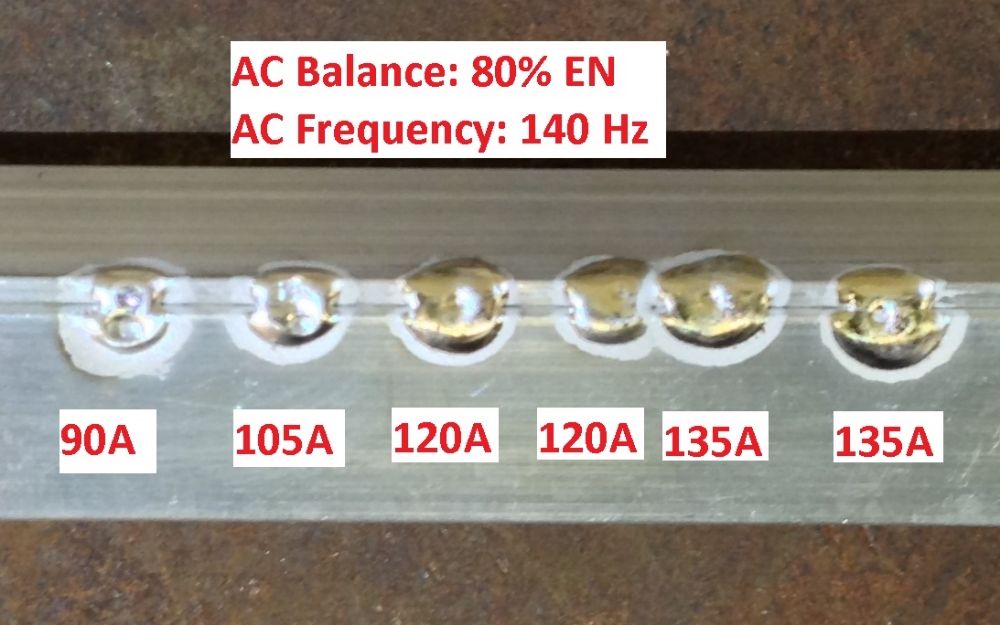
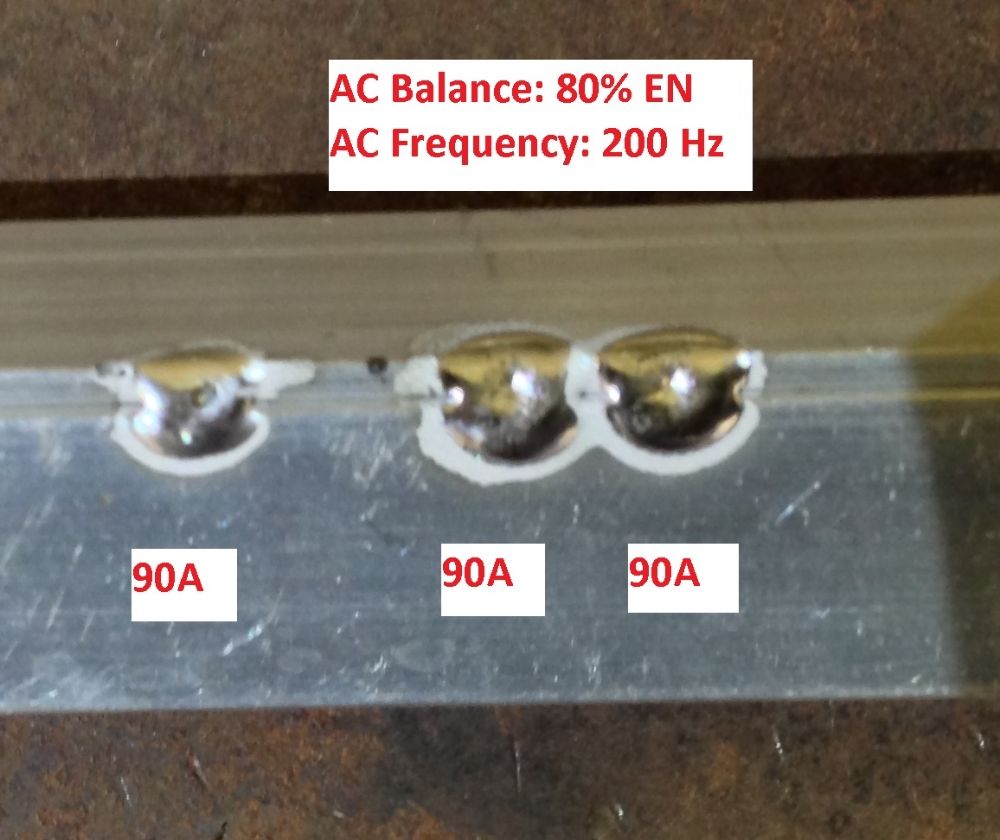
For 2mm pieces, depending on what you set your machine at in terms of the AC welding parameters, you might need anywhere from ~1.5 times the welding amperage and higher for the initial tacks. Minnesota Dave did those with 230A, but his machine is fixed at 50/50 balance with no other settings. If you have an inverter tig welder with balance settings and frequency setttings, you can get away with much less amperage on 2mm thick pieces. With increasing EN percentage on the AC balance and higher frequency, you can probably do that with anywhere from 80-150A if you time the tack just right, meaning blink of any fast. Try it and with a little bit of practice you will be pleasantly surprised.
For your viewing pleasure
Re: When tack weld goes wrong---then what?
Posted: Sun Aug 03, 2014 10:08 am
by rick9345
Oscar wrote:For 2mm pieces, depending on what you set your machine at in terms of the AC welding parameters, you might need anywhere from ~1.5 times the welding amperage and higher for the initial tacks. Minnesota Dave did those with 230A, but his machine is fixed at 50/50 balance with no other settings. If you have an inverter tig welder with balance settings and frequency setttings, you can get away with much less amperage on 2mm thick pieces. With increasing EN percentage on the AC balance and higher frequency, you can probably do that with anywhere from 80-150A if you time the tack just right, meaning blink of any fast. Try it and with a little bit of practice you will be pleasantly surprised.
For your viewing pleasure
VERY INFORMATIVE
Thanks
Re: When tack weld goes wrong---then what?
Posted: Sun Aug 03, 2014 10:41 pm
by danielbuck
rick9345 wrote:
VERY INFORMATIVE
Thanks
holy cow, yes, this is quite informative!
I've only been dabbling with aluminum, only running beads on flat metal, haven't tried joints yet. I will definitely remember this thread when it comes time to tack welding aluminum joints.
Re: When tack weld goes wrong---then what?
Posted: Mon Aug 04, 2014 8:36 am
by Xtapolapocetl
Oscar wrote:If you have an inverter tig welder with balance settings and frequency setttings, you can get away with much less amperage on 2mm thick pieces. With increasing EN percentage on the AC balance and higher frequency, you can probably do that with anywhere from 80-150A if you time the tack just right, meaning blink of any fast. Try it and with a little bit of practice you will be pleasantly surprised.
I can only set the AC balance, from 40% EN to 80% EN, but for my practice I set it to "auto". The frequency is fixed (60Hz?).
Thanks for the pictures---as others said, they are quite revealing. I was mostly getting the leftmost situation, where the two pieces would separate instead of joining.
I'll definitely try different settings and higher amps.
Re: When tack weld goes wrong---then what?
Posted: Mon Aug 04, 2014 12:03 pm
by Oscar
Now you know why details are important especially in tig welding
Since you can go as high as 80% EN, do it. Clean wire brush the aluminum real good, and wipe down with acetone. When your white rag stops picking up black crud, then it's ready. So much easier to weld this way, IMO. SInce your frequency is fixed at 60Hz, you'll definitely need upwards of 120A+. The "trick" is to hold a "super tight arc". I know that phrase gets thrown around a lot and no one ever defines what they mean by it, but I will: 1mm, no more. What I would do is touch the joint with the tungsten tip. Raise the tip off the joint, and as soon as I lift off, I floor the pedal to get the full amperage that I set. Turns out after actually measuring the tungsten-to-joint distance on a dry run, I was using around 1mm of arc length, sometimes even shorter. The tigher the arc, the higher the chances of getting a successful tack weld with not a super high amperage. Even then play around with 150A or even 160A to see how the joint reacts. It's definitely something that you have to experiment with if you want to get consistent results.
Re: When tack weld goes wrong---then what?
Posted: Mon Aug 04, 2014 12:29 pm
by AndersK
Thanks for the details Oscar.
Ive been fighting the same issues with 1,5mm sheet.
Gonna try your advices.
Re: When tack weld goes wrong---then what?
Posted: Mon Aug 04, 2014 7:19 pm
by Otto Nobedder
The amazing thing,
When it all comes together for you, you'll wonder why it was so hard before!
It took me a long time to realize the way to start an aluminum joint is "aggressively", then back off and "finesse" it.
Best description I can give after the sound advice given so far...
Steve S
Posted: Mon Aug 04, 2014 10:12 pm
by welditforyou
I can remember thinking that I needed to "baby" it so I didn't set the amperage up very high.
The sound that came from the torch upon start up sounded like a flatulent elephant sitting in a mud puddle.
I learned about this from that!
Jim
Re: When tack weld goes wrong---then what?
Posted: Tue Aug 05, 2014 7:41 am
by RPat
I'm trying to equate your settings to a Miller MIG and having difficulty. I've noticed that TIG was mentioned in this article. Were your samples ONLY done using TIG? I may be asking a dumb question but being a newbie, that's goes with that territory.
Re: When tack weld goes wrong---then what?
Posted: Tue Aug 05, 2014 8:25 am
by Oscar
RPat wrote:I'm trying to equate your settings to a Miller MIG and having difficulty. I've noticed that TIG was mentioned in this article. Were your samples ONLY done using TIG? I may be asking a dumb question but being a newbie, that's goes with that territory.
As far as I know, MIG doesn't have AC balance nor frequency control
Re: When tack weld goes wrong---then what?
Posted: Tue Aug 05, 2014 6:27 pm
by Otto Nobedder
RPat wrote:I'm trying to equate your settings to a Miller MIG and having difficulty. I've noticed that TIG was mentioned in this article. Were your samples ONLY done using TIG? I may be asking a dumb question but being a newbie, that's goes with that territory.
The forum heading is...
‹ Welding Discussion
‹ Tig Welding - Tig Welding Aluminum - Tig Welding Techniques - Aluminum Tig Welding
so TIG is the primary subject, and it will be hard to relate the discussion of settings to MIG aluminum, which would appear on the MIG-FCAW forum.
You'll get used to navigating the site in no time.
Steve S