Page 1 of 1
Aluminum drill what went wrong ?
Posted: Wed Apr 15, 2015 7:40 pm
by LIGOOMBA
I mostly look and read here.Dont post much cause my welds are not that good and I'm still very new.
Miller SD180 A/C balance set about half way.WP20 water called torch.
3/23 2% lanthinated
1/16 4043 filler
15 CFH
1/8 aluminum
Anyone tell me what went wrong.I really don't have any experience with aluminum.Maybe a week or two ,few hours.I actually attempted aluminum cans and decided I needed more help on thicker aluminum .LOL !
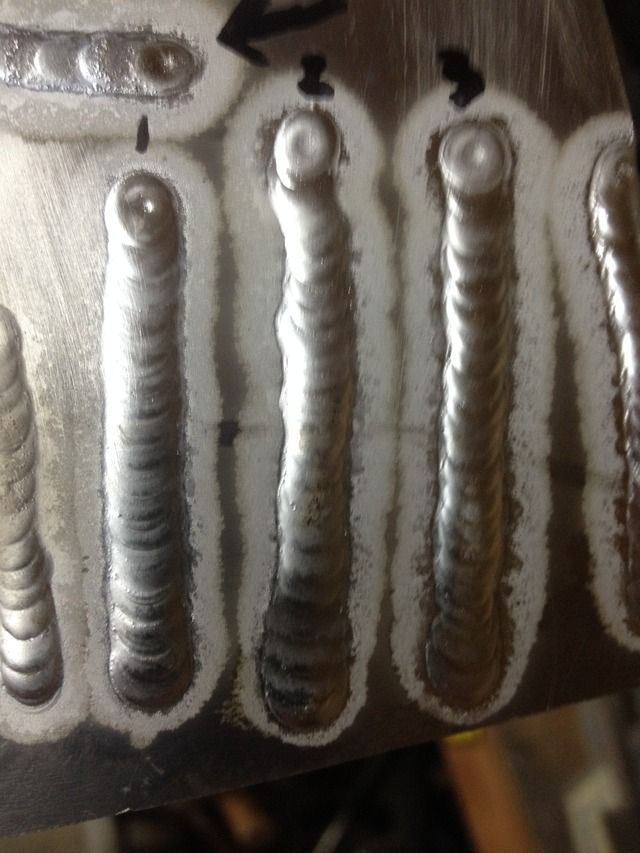
How come the ones I numbered appeared to come out really nice and smooth.The ones with the arrows pointing to them got all messed up.
All I can think of is it was dirty .
Cleaned it best I couod with acetone and dedicated S/S brush .
I KNOW I RAMPED OFF AT THE END TOO FAST CAUSE AND IT CAUSED A CRATER .IM STILL A ROOKIE WELDER

Re: Aluminum drill what went wrong ?
Posted: Wed Apr 15, 2015 10:35 pm
by BWR
The rest of your welds do not look to bad, dirty material could be part of your troubles. A aluminum flap wheel will work good to clean the material and they make an acid to clean aluminum that works to. But be careful that stuff is really bad if you get it on you. A few other things to consider is torch angle, tungsten contamination, filler metal contamination. I hope this helps.
-Brad
Re: Aluminum drill what went wrong ?
Posted: Wed Apr 15, 2015 10:44 pm
by dirtmidget33
Traveling to slow and overheating the aluminum causes that grainy appearance with 4043. also if you have to long an arc length which increases voltage causing more heat. I would say its travel speed, looks like those beads have more etching around them compared to some of the others. which if you slow down and dwell in an area to long you get more etching and heat input. Try setting you AC balance so you have 30% positive (cleaning) and 70% negative (penetration) your etch zone is pretty big around welds.
If I can make a suggestion run you beads right along side the previous bead. That way you maximize your practice space. remember you are doing this to practice running beads. Try different things as you run beads. Run each bead with a purpose pay attention to and try different variables of these as you alternate rows Arc length torch angle speed heat input dabbing rod pay attention to what works best for you.
Gonna tell you a problem I have. After I do a mess of cromoly I get used to really really close arc lengths. before I do aluminum I always have to run a few beads on scrap. otherwise first time I add filler I will crap up the tungsten cause of the way the bead height increases with aluminum. Jody teaches a great technique of increasing arc length just as you dab, I haven't mastered his technique but I'm in process of learning to do it that way.
Aluminum cans or a great way to practice I think after you get the aluminum drill down though. I like doing cans once in awile cause when things go wrong on a can it happens quick. teaches you fine control on pedal. my thoughts anyway so do go back to your cans some day.
Re: Aluminum drill what went wrong ?
Posted: Thu Apr 16, 2015 12:28 pm
by LIGOOMBA
Ok thanks guys ! Back to drawing board or the welding table that is ! I will play with a few more setting ,30 cleaning 70 penetration and report back.I am very new to this and learning something new every day .

