Hey all.
This is what I've been aiming for - welding an aluminium alloy motorcycle frame. This is the reason I started TIG welding.
Finally got my hands on a 'donor' frame (long story) and chopped a chunk out of it;
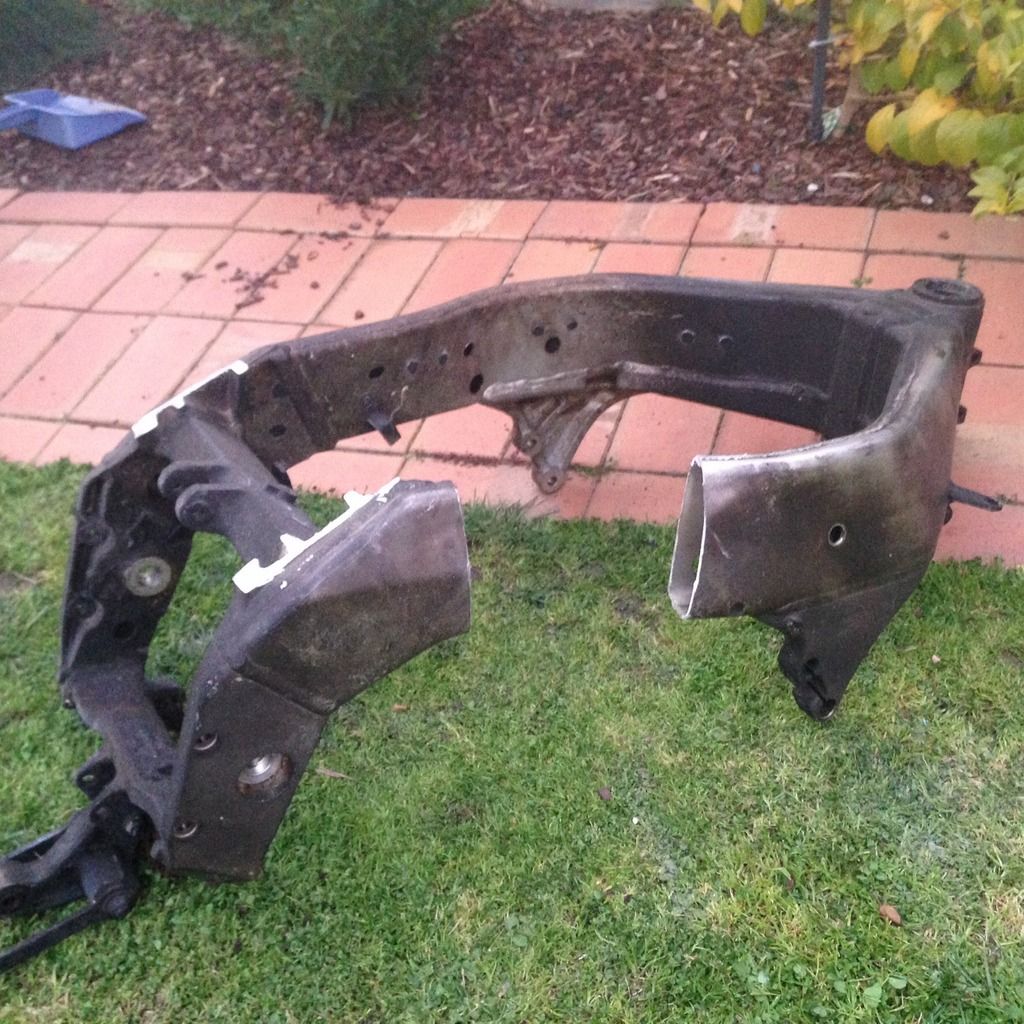
I don't know anything about the aluminium composition other than...it's aluminium. Ahem. Cleaned the section with a abrasive wheel and a good dose of acetone. I know, I know, could have been cleaner. Set about tacking it. Amps were 100, using 1.6mm zirconiated electrode and 2.4mm filler rods of 5356. Thought the amps felt a bit high as I tacked - had a puddle in almost no time.
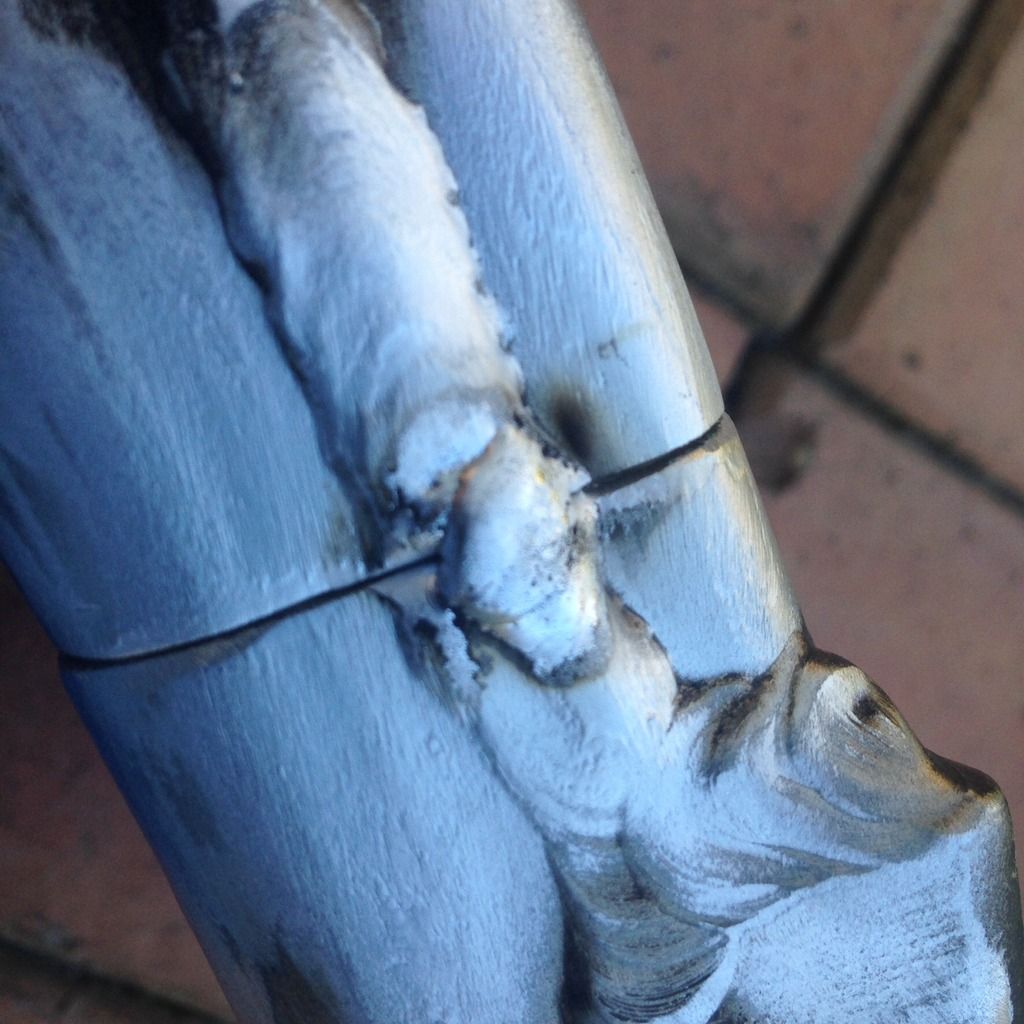
I then backed off to 85 amps for the main weld as the tack area had been pretty thick yet melted fast. The main alloy bead is about 2.4mm thick. Lit up on it and it melted fast. Used a 'laywire' kinda style with the rod. Bead seemed kinda ropey to me, think I may have been staying too cold after I lit up for fear of melt through.
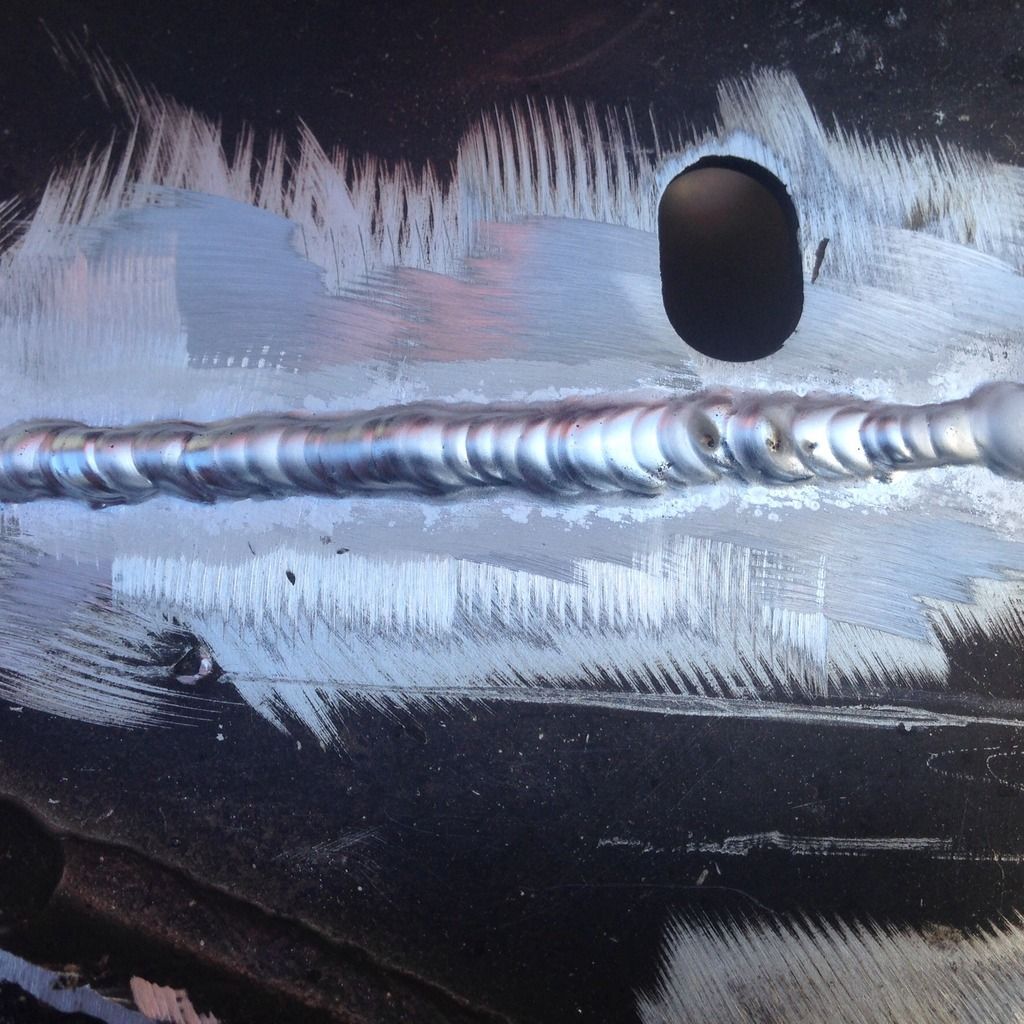
Then I flipped the beam over, only to find that a thin gap (1mm?) had, of course, opened up on the other side as I had only 'edge tacked' the beam. Newbie mistake! Lit up on it hoping to successfully fill the gap. Holy cow did that gap swallow some filler!
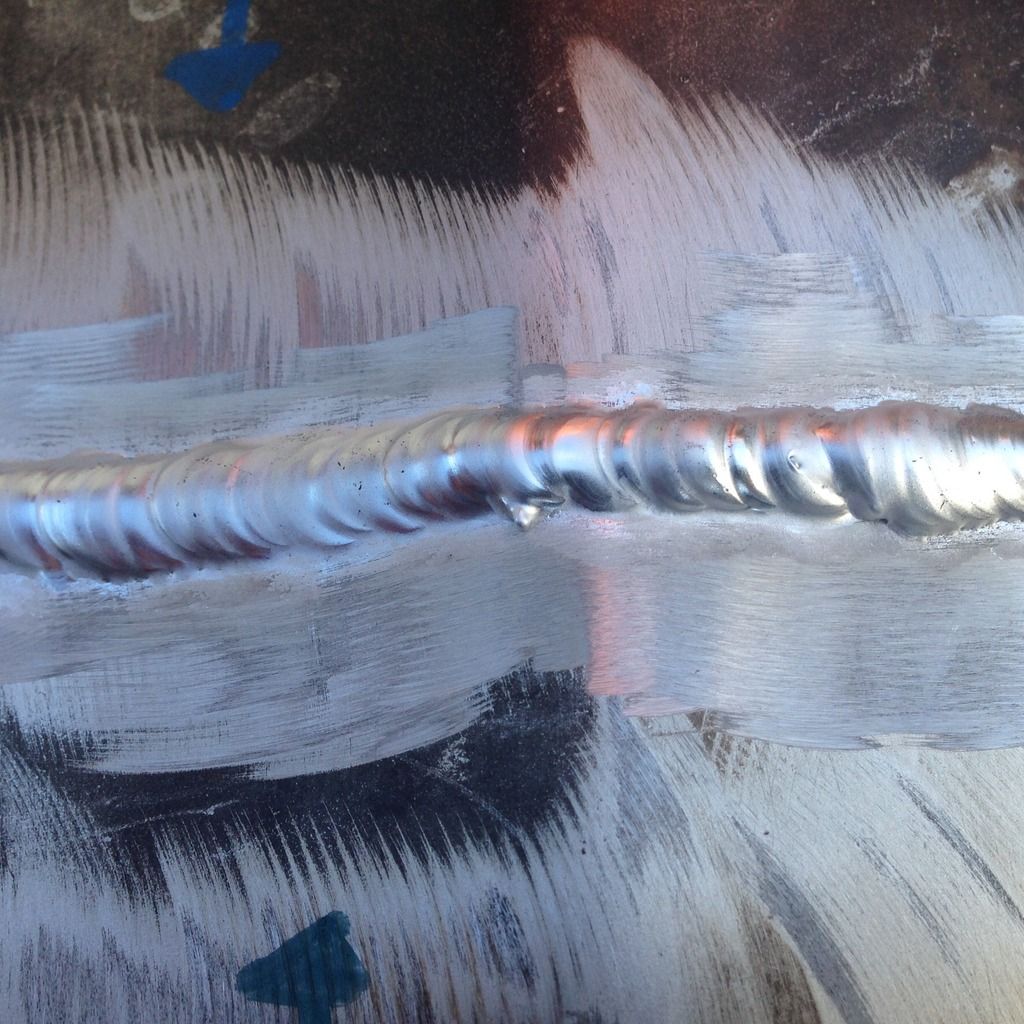
And that's the result. My feelings are that the weld isn't as tidy as it could be and on one side definitely too cold. I can see light peppering in the weld here and there - should have cleaned better. And I need to practise my filler feed hand for when things are moving fast.
Have to say I was a bit surprised at how quickly I got a puddle going, Miller guide online recommended more amps (the way I understand it.)
Sorry to be the forum pest and keep flooding you guys with this stuff, but you are my mentors and I am very eager to learn. The good news is...I have a whole frame to practise on!
Kym
Tig welding tips, questions, equipment, applications, instructions, techniques, tig welding machines, troubleshooting tig welding process
- MosquitoMoto
-
Weldmonger
-
Posts:
-
Joined:Sat Aug 01, 2015 8:38 am
-
Location:The Land Down Under
- Braehill
-
Weldmonger
-
Posts:
-
Joined:Sat Jul 06, 2013 11:16 am
-
Location:Near Pittsburgh,Pennsylvania. Steel Buckle of the Rust Belt
Kym,
If I could make a suggestion for while you're learning, pulse with your foot pedal and feed the rod as you depress the pedal, then leave off, advance maybe 3mm and repeat, it get's your timing better. There's a fine line while welding Aluminum between too cold and it being on your shoes. It all comes with hood time. I wish my first attempts looked as good as yours.
Set your balance to about 30% EN and your frequency in the 120 range to start out. You should be able to see about a 1-2 mm cleaning band around the weld. If you raise the frequency, you'll narrow the bead up and it will get ropey but with less chance of it melting through. Play with the settings until you find out what you can get away with.
You need to find that sweet spot where the bead stays shiny but doesn't build up too high. If the bead is grainy and dull, it's too hot. You'll have to learn to control the pedal and back off as the piece adsorbs heat, which is very fast on thin tubing.
You're doing good, and asking questions is what this forum is all about. When you ask questions it makes us all think back to what we learned in the beginning before we adopted too many bad habits, keeps us all fresh. I wish there would have been someplace like this 35 years ago while I struggled to teach myself to Tig weld.
Lose the Zirconiated and use the Lanthanated tungsten that you think is suspect for mild steel, just grind a steeper taper with a dull point, you'll find it easier to keep a narrow bead.
Len
Now go melt something.
Instagram @lenny_gforce
Len
Instagram @lenny_gforce
Len
- TRACKRANGER
-
Weldmonger
-
Posts:
-
Joined:Wed Aug 06, 2014 12:48 am
-
Location:Melbourne, Australia
Kym
I certainly endorse all of the comments Len has made, especially that you are well on the way. Your results are certainly quite good given your current seat time.
Nicely done, and I really like that fact that you have started with a 'donor' to experiment with. Great forward planning.
And it's rare that anyone is considered to have asked silly questions or too many questions here. Sharing skills is what it's all about.
Trev
EWM Phonenix 355 Pulse MIG set mainly for Aluminum, CIGWeld 300Amp AC/DC TIG, TRANSMIG S3C 300 Amp MIG, etc, etc
- Braehill
-
Weldmonger
-
Posts:
-
Joined:Sat Jul 06, 2013 11:16 am
-
Location:Near Pittsburgh,Pennsylvania. Steel Buckle of the Rust Belt
Kym,
Another suggestion I'd give is to grind or cut out the existing welds and re-weld them. Take a picture of the existing weld and compare it to your finished welds, it'll give you a baseline to build from. Someone got paid to weld all those welds that are on that frame. Weld out of position as often as possible because in the real world nothing is ever right side up on a bench. This will also give you some experience welding metals of two different thicknesses together, like where the castings meet the tubing.
I know I'll give a few folks here a rash with this statement, but I think cleaning is the least critical on Aluminum of all metals. Now paint, oil and power coat are a different animal and should be removed so it doesn't fume up into your cover gas. I've never wiped a piece of metal in my life with acetone unless I was going to glue something to it. That's just my opinion though and should be taken as that.
Len
Now go melt something.
Instagram @lenny_gforce
Len
Instagram @lenny_gforce
Len
- MosquitoMoto
-
Weldmonger
-
Posts:
-
Joined:Sat Aug 01, 2015 8:38 am
-
Location:The Land Down Under
Thanks guys.
Len, the pedal pulsing is a great tip. I had heard of it but had also heard that it was an 'advanced tip' for experienced welders. But I'll give it a go, for sure.
Oh, and after being really happy with the white tipped zirconiated electrode (it balled beautifully and really behaved well) I switched to the suspect Lanthanated electrode...only to have the damn thing create a ball that looked more like a parrot's beak than anything, and generally misbehave. Dammit. As I have mentioned before, will buy some 'name brand' Lanthanated electrodes and try again.
Trevor, the 'donor' frame was a bushfire victim. It gives me great opportunities to practise. Once I am happy with welding the beams, I am going to try welding the (very thick) engine mount tabs back onto the (quite thin) frame beams. Now that ought to really be a challenge.
Thank you both again for your help, it makes a huge difference. Len, I will try the settings you suggested, too. I also have a lot to learn about welding out of position, so for my next challenge I'm going to set about welding this beam frame chunk right back into the frame I sliced it out of!
This is such a great welding machine...for the money I can't believe how simple and smooth it is to use.
Cheers,
Kym
- Otto Nobedder
-
Weldmonger
-
Posts:
-
Joined:Thu Jan 06, 2011 11:40 pm
-
Location:Near New Orleans
I don't need the Boudreaux's Butt Paste (Look it up, it's a real product) from that statement.Braehill wrote:
I know I'll give a few folks here a rash with this statement, but I think cleaning is the least critical on Aluminum of all metals.
Len
I just patched a drip-pan on one of the older APCI trailers. Not a lick of acetone in sight on a pan that's spent 40 years being pounded by grease and road tar/debris.
I think there are places where the surgical cleanliness is important, and I can see a beginner taking the extra step to take a variable out of his equation, but aluminum tolerates more dirt and crap than the internet seems to believe.
Steve S
- MosquitoMoto
-
Weldmonger
-
Posts:
-
Joined:Sat Aug 01, 2015 8:38 am
-
Location:The Land Down Under
Interesting thoughts.
I've already turned down one request for a rough-and-ready repair on an aluminium cam chain cover as I assumed it would be oil contaminated and beyond my skills to weld.
I still won't do that job, but I think I will source some oil contaminated 'donor parts' and do some practising with them to see what happens.
Kym
- Otto Nobedder
-
Weldmonger
-
Posts:
-
Joined:Thu Jan 06, 2011 11:40 pm
-
Location:Near New Orleans
I actually made a point of posting some pictures here of welding "dirty" aluminum. Non-critical drip-pans. They were not "greasy", as that does require some cleaning of obvious surface contaminants, but were in "as arrived" condition.
I did get a lot of pepper on the weld. That's expected. It floats to the top. It wire-wheeled quite clean.
I'll dig a bit for those pictures.
Steve S
I did get a lot of pepper on the weld. That's expected. It floats to the top. It wire-wheeled quite clean.
I'll dig a bit for those pictures.
Steve S
- Otto Nobedder
-
Weldmonger
-
Posts:
-
Joined:Thu Jan 06, 2011 11:40 pm
-
Location:Near New Orleans
Kym,
Here are the pictures I referred to (with a good discussion following), experimenting with various cleanliness of aluminum, starting with very dirty "outdoor highway exposed" aluminum.
http://forum.weldingtipsandtricks.com/v ... inum+Steve
You'll see Jody's comments among the first.
Steve S
Here are the pictures I referred to (with a good discussion following), experimenting with various cleanliness of aluminum, starting with very dirty "outdoor highway exposed" aluminum.
http://forum.weldingtipsandtricks.com/v ... inum+Steve
You'll see Jody's comments among the first.
Steve S
- Otto Nobedder
-
Weldmonger
-
Posts:
-
Joined:Thu Jan 06, 2011 11:40 pm
-
Location:Near New Orleans
With that post shared, I, in your place, would be careful about clean aluminum because of what you want to build. I just want to emphasize what a small percentage of the overall result comes from that cleaning. You have bigger variables to control.
Steve S
Steve S
Very nice! Just looks a bit cold to me, but that's already been mentioned. Just keep going. Cut, clean prep, and tack up a dozen or so joints, and then weld them out. Repition is what helps me the most. And that goes for all of the steps. Doing one joint start to finish and then starting a new one doesn't help with the motor skills for me. I'll spend an hour just doing tacks on a bunch of scrap joints some days. It builds confidence for when you have a real workpiece in front of you. Keep going man!
- MosquitoMoto
-
Weldmonger
-
Posts:
-
Joined:Sat Aug 01, 2015 8:38 am
-
Location:The Land Down Under
Steve -
Interesting reading regarding aluminium cleaning. But for the moment I'm going to continue cleaning as I have been, simply because, as you mentioned, as a learner I have so many variables to get my head around that I might as well do my best to be sure that dirty material isn't one of them. And hey, it's no big deal, I don't have huge areas to prep, after all.
Mike, I hear you on practise and repetition. In fact last night I sat down to watch the Silverstone MotoGP race with my TIG glove on my left hand, practising filler rod feed as I cheered on Rossi and Marquez.
Kym
- TRACKRANGER
-
Weldmonger
-
Posts:
-
Joined:Wed Aug 06, 2014 12:48 am
-
Location:Melbourne, Australia
Yes, that's the spirit!MosquitoMoto wrote:...In fact last night I sat down to watch the Silverstone MotoGP race with my TIG glove on my left hand, practising filler rod feed as I cheered on Rossi and Marquez.
Kym
EWM Phonenix 355 Pulse MIG set mainly for Aluminum, CIGWeld 300Amp AC/DC TIG, TRANSMIG S3C 300 Amp MIG, etc, etc
Return to “Tig Welding - Tig Welding Aluminum - Tig Welding Techniques - Aluminum Tig Welding”
Jump to
- Introductions & How to Use the Forum
- ↳ Welcome!
- ↳ Member Introductions
- ↳ How to Use the Forum
- ↳ Moderator Applications
- Welding Discussion
- ↳ Metal Cutting
- ↳ Tig Welding - Tig Welding Aluminum - Tig Welding Techniques - Aluminum Tig Welding
- ↳ Mig and Flux Core - gas metal arc welding & flux cored arc welding
- ↳ Stick Welding/Arc Welding - Shielded Metal Arc Welding
- ↳ Welding Forum General Shop Talk
- ↳ Welding Certification - Stick/Arc Welding, Tig Welding, Mig Welding Certification tests - Welding Tests of all kinds
- ↳ Welding Projects - Welding project Ideas - Welding project plans
- ↳ Product Reviews
- ↳ Fuel Gas Heating
- Welding Tips & Tricks
- ↳ Video Discussion
- ↳ Wish List
- Announcements & Feedback
- ↳ Forum News
- ↳ Suggestions, Feedback and Support
- Welding Marketplace
- ↳ Welding Jobs - Industrial Welding Jobs - Pipe Welding Jobs - Tig Welding Jobs
- ↳ Classifieds - Buy, Sell, Trade Used Welding Equipment
- Welding Resources
- ↳ Tradeshows, Seminars and Events
- ↳ The Welding Library
- ↳ Education Opportunities