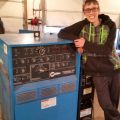
After running many beads on plate and getting familiar with the machine controls on my TIG welder. I started working on the cart for it. I feel I have some decent welds but still have lots of room for improvement.
The material is 11 gage 1-1/4 square tube. I was running a 1/16" 2% Lanthated Tungsten ground to a point. Machine was set at 110 amps #8 cup gas lense and 18CFH of argon.
Here are a few pictures for you guys to offer your suggestions.
Brian
Brian
Miller Thunderbolt 225 AC/DC
Everlast 255EXT with W300 cooler
Hobo Freight 170 MIG Welder
Thanks guys. I find that I am spending more time getting comfortable doing dry runs before i strike an arc than I am welding. By the time I feel I have a nice bead going I'm at the end. Lol. here is another picture. At the termination of all the welds I have a small black spot. Is this normal?
Brian
Last edited by melsdad on Mon Feb 15, 2016 8:04 pm, edited 1 time in total.
Brian
Miller Thunderbolt 225 AC/DC
Everlast 255EXT with W300 cooler
Hobo Freight 170 MIG Welder
melsdad wrote:Thanks guys. I find that I am spending more time getting comfortable doing dry runs before i strike an arc than I am welding. By the time I feel I have a nice bead going I'm at the end. Lol. here is another picture. At the termination of all the welds I have a black a small spot. Is this normal?
Brian
Yes, I believe that is silicon floating in the puddle, your bead looks very good and the dry run technique is the way to go. You have to be comfortable to make good welds (typically)
Looking at this photo I would suggest that the vertical weld be taken a little further into the corner of the joint, then when you finish the horizontal weld, end it right on top of the vertical weld, thereby you'll only see the one stop. This is not a criticism at all, just a suggestion to tie things in and look better.
I agree, each weld needs to wrap around the corner slightly so that they tie in completely. Start one weld on the end of another and end the weld on another. When you finish a joint it would look like there was only one end to the whole weld.
You can take a file and knock off that black spot before you start your next weld so that it doesn't float along with the next weld. Sometimes that spot can float over to the edge of the weld and get stuck there. While you are welding this spot will look bright red. Try to keep it floating in the puddle all the way to the end of the weld and then you can knock it off.
Looks good. Corner tie ins on square tube can take a while because your changing angle and direction at the same time as the heat just sort of soaks the whole piece. And you fight the fact that one side of the joint is usually cut straight and the other is the rounded corner of a tube making for an irregular bevel of sorts.
melsdad wrote:Thanks guys I get what your saying about tying the welds together to look better.
I guess I should have started with a few pictures of my tack welds. I am using .045 70S2 for the tacks and .062 for the welds.
Is this the best way to tack things together when building with square tube?
Brian
Brian, are you thinking that the .045 will leave a smaller tack which will be easier to consume in the weld? As long as the tacks are enough to keep it together before welding it's a good idea, and it also shows your thinking ahead as well. You're thinking about what you're doing and why, always a good idea, and the traits of a professional.
LtBad that is exactly what I was thinking. I started out tacking in the center of the tube on another small project. I found it messed up my rytheme when I was dabbing filler metal in and came to the tack in the middle of the bead. When I went to corner tacks I thought it helped with starts and stops of the weld.
Thanks for the compliment!
Brian
Brian
Miller Thunderbolt 225 AC/DC
Everlast 255EXT with W300 cooler
Hobo Freight 170 MIG Welder
I am kind of surprised your using 1/16" tungsten at that amperage. I know if I approach that amperage, my tungsten loses it's shape and I go to the 3/32 tungsten. So I kind of use 100 amps as my switch amperage. I do like the 1/16 filler in many cases instead of the 3/32 filler. Your welds look very smooth and steady.
bruce991 wrote:I am kind of surprised your using 1/16" tungsten at that amperage. I know if I approach that amperage, my tungsten loses it's shape and I go to the 3/32 tungsten. So I kind of use 100 amps as my switch amperage. I do like the 1/16 filler in many cases instead of the 3/32 filler. Your welds look very smooth and steady.
That seems odd...I've used 1/16" right up to 150
Attachments
capture20160103081239337.png (39.2 KiB) Viewed 600 times
bruce991 wrote:I am kind of surprised your using 1/16" tungsten at that amperage. I know if I approach that amperage, my tungsten loses it's shape and I go to the 3/32 tungsten. So I kind of use 100 amps as my switch amperage. I do like the 1/16 filler in many cases instead of the 3/32 filler. Your welds look very smooth and steady.
Make sure you have your Arc Force or Hot Start or whatever it's called set to zero. I recall that giving me some funk* issues with my Everlast