
Howdy folks. A new forum member her from the South.
I have a Miller 252 MIG welder along with a SpoolMatic gun attempting to weld aluminum. I've been able to lay somewhat decent beads on alum. so far but always seem to have a small crater with a pin hole in the middle of it at the end of every bead line I attempt. I've tried different things to alleviate it but nothing seems to help.
Any/all suggestions are appreciated.
RPat
mig and flux core tips and techniques, equipment, filler metal

Welcome to the site RP. As for your crater issue. Have a look at this video Jody just did. http://welding-tv.com/2014/07/08/scratc ... -practice/ It's tig but this idea might help your problem.
Good Luck!
Good Luck!
Go break something, then you can weld it back the right way.

Thanks again guys for the recommendation. After watching the video and applying some of their techniques, it has greatly helped to reduce my issue. I also tweaked the settings on the 252 as well. Now the only thing I'm seeing it much more black soot around my welds. Trying to find out why. Ideas?
New question for you: Laying aluminum beads on a test piece looked great so I assumed that I was ready to start on my "real" project. The first step was to weld a piece of angle to the top of a circular pipe. The pipe is old aluminum so I brushed it with a s/s brush along with the small piece of angle.
The result: The welding would bead appearing to look like marbles (of different sizes) instead of the stacked dimes look I was aiming for. Along with this the aluminum wire from the gun would melt to the tip. I played around with the voltage and wire speed along with gas flow but nothing seemed to work. I never could get the "stacked dimes" weld I was looking for. Luckily my grinder did a somewhat decent job grinding down the buildup of aluminum on the piece. I never could reach the end goal of a clean "stacked dimes" look. Any ideas what could be happening ?
The result: The welding would bead appearing to look like marbles (of different sizes) instead of the stacked dimes look I was aiming for. Along with this the aluminum wire from the gun would melt to the tip. I played around with the voltage and wire speed along with gas flow but nothing seemed to work. I never could get the "stacked dimes" weld I was looking for. Luckily my grinder did a somewhat decent job grinding down the buildup of aluminum on the piece. I never could reach the end goal of a clean "stacked dimes" look. Any ideas what could be happening ?

- Otto Nobedder
-
Weldmonger

-
Posts:
-
Joined:Thu Jan 06, 2011 11:40 pm
-
Location:Near New Orleans
RPat,
We're moving a bit past the "introduction" stage, so I hope you'll understand when I copy this topic wholesale to the MIG forum...
Thanks,
Steve S
We're moving a bit past the "introduction" stage, so I hope you'll understand when I copy this topic wholesale to the MIG forum...
Thanks,
Steve S

- Superiorwelding
-
Weldmonger
-
Posts:
-
Joined:Thu Jan 24, 2013 10:13 pm
-
Location:Eddy, TX
You didn't violate protocol, more members will read and answer your specific questions in their respective places.RPat wrote:hello Otto. No sir, I understand. Thanks for your help.
I wasn't sure how much time was involved during the "intro" stage.So that's why I went into the questions phase. Sorry if I violated protocol.
As for your questions, when you practiced, was that material thickness the same as your real pieces? This will have a huge effect to your weld characteristics. At this point I think a picture is in order as I can think of several things it could be. One is if it is balling up you do not have enough heat for the given material.
-Jonathan
Instagram- @superiorwelding/@learntotig
Twitter- @_JonathanLewis
https://www.learntotig.com
https://www.superiorweldandfab.com
https://www.youtube.com/+SuperiorWeldin ... ATHANLEWIS
Twitter- @_JonathanLewis
https://www.learntotig.com
https://www.superiorweldandfab.com
https://www.youtube.com/+SuperiorWeldin ... ATHANLEWIS
- Otto Nobedder
-
Weldmonger
-
Posts:
-
Joined:Thu Jan 06, 2011 11:40 pm
-
Location:Near New Orleans
Jonathan's right,
It wasn't "protocol". It's just easier to get answers when the question is moved to the appropriate forum.
Steve S
It wasn't "protocol". It's just easier to get answers when the question is moved to the appropriate forum.
Steve S
Regarding the issue: I increased the voltage and the wire speed, gas flow still at 25 but still seeing the same issues. I can't seem to get a smooth metal flow started. It will arc, deposit a marble and wire will melt up to the tip. Nothing so far that I try seems to help resolve this issue. Any thoughts are greatly appreciated.


- Braehill
-
Weldmonger
-
Posts:
-
Joined:Sat Jul 06, 2013 11:16 am
-
Location:Near Pittsburgh,Pennsylvania. Steel Buckle of the Rust Belt
RPat,
Check all your connections on your Argon lines and that the spoolgun is fully inserted into the machine and not restricting gas flow. The black soot and not being able to establish an arc makes gas flow a suspect in my mind. Low pressure on your Argon tank can cause moisture issues also, below 500# seems to be when these issues arrise. Loose connections can siphon Atmosphere into your Argon and cause all manner of issues.
This coming from a person with very little spoolgun expierence, so take other's advice if offered.
Len
Now go melt something.
Instagram @lenny_gforce
Len
Instagram @lenny_gforce
Len
Hi guys, thanks for the responses. I will check the gas lines. The argon bottle is new so low volume shouldn't be an issue but I'll check it anyway. I'm holding (or trying to hold) the tip around 3/4" away but that could vary. I called Miller directly, spoke to one of their experts there and he made me aware of a factor, and me being a newbie with this 212 and spoolgun along with a newbie regarding different factors of aluminum, that the piece of alum. ladder I'm having so many problems with is likely because of the grade of alunimum. I'm using 4043 wire in the gun and it's very likely the alum. ladder is the 5000 series alum. which won't work. I've made it work but it's very ugly. Thankfully I had a new alum. grinding wheel to correct some of the wire buildup.
So this weekend I'll look into buying the 5000 series alum. wire and attempt it again.
Thanks to all for the suggestions.
So this weekend I'll look into buying the 5000 series alum. wire and attempt it again.
Thanks to all for the suggestions.
Also, just to complete the troubleshooting loop I was embarked upon, I tried welding some of the alum. I've been practicing with and after tightening the spoolgun wire feed, I started laying some very decent beads again so the different grades of alum. has to be the factor with the ladder project.
BTW: I bought this ladder from a junk yard 15 years ago, haven't done anything with it till now. This ladder I was told was on a public fresh water treatment plant on one of the tanks so it's likely a higher grade alum. compared to what I've been using.
BTW: I bought this ladder from a junk yard 15 years ago, haven't done anything with it till now. This ladder I was told was on a public fresh water treatment plant on one of the tanks so it's likely a higher grade alum. compared to what I've been using.
noddybrian
- noddybrian
-
Weldmonger
-
Posts:
-
Joined:Thu Jan 24, 2013 12:13 pm
Welding on a ladder should sound alarm bells ! no disrespect on your ability but ladders very rarely have any welds on from the factory & are assembled by other methods - they are very often high strength alloys that can take the imposed loads while being very thin to keep weight down so welding on them is not a good idea - even if the weld is sound the HAZ will be a weak spot - if the ladder was a static type thing bolted to a structure where weight was unimportant then it may be weldable - are there any welds on it or are the rungs " expanded " / belled into the sides ( like boiler tubes ) ?

- AKweldshop
-
Weldmonger
-
Posts:
-
Joined:Wed Oct 23, 2013 3:30 pm
-
Location:Palmer AK
Yeah,
Most Aluminum ladders are 2000 or 7000 series Aluminum, and most are riveted.
To my knowledge, they are un-weldable, but I've never tried.
Most Aluminum ladders are 2000 or 7000 series Aluminum, and most are riveted.
To my knowledge, they are un-weldable, but I've never tried.
Just a couple welders and a couple of big hammers and torches.
Men in dirty jeans built this country, while men in clean suits have destroyed it.
Trump/Carson 2016-2024
Men in dirty jeans built this country, while men in clean suits have destroyed it.
Trump/Carson 2016-2024
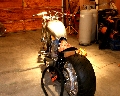
- First weld on my first real project
- first weld on a new project.jpg (28.2 KiB) Viewed 850 times
- Pic of the ladder
- Aluminumladder.jpg (48.38 KiB) Viewed 850 times
- AKweldshop
-
Weldmonger
-
Posts:
-
Joined:Wed Oct 23, 2013 3:30 pm
-
Location:Palmer AK
That looks like a tubing ladder, for a boat or something.
I thought we were talking an aluminum roofing ladder...
That looks like it was made with welds....
My bad.
I thought we were talking an aluminum roofing ladder...
That looks like it was made with welds....
My bad.
Just a couple welders and a couple of big hammers and torches.
Men in dirty jeans built this country, while men in clean suits have destroyed it.
Trump/Carson 2016-2024
Men in dirty jeans built this country, while men in clean suits have destroyed it.
Trump/Carson 2016-2024
That's exactly what this ladder will be used for, my boat. I will pin it to brackets on the boat and take it off or fold it up and secure it when not in use. Welding these pieces of angle to the top of the ladder was where I ran into big problems. Luckily a had a new alum. grinding wheel to make it look somewhat decent. The only thing I question now is the strength of the weld itself. I may end up making a new ladder but I wanted to try this first.
Thanks for the comments gentlemen..........
Thanks for the comments gentlemen..........
noddybrian
- noddybrian
-
Weldmonger
-
Posts:
-
Joined:Thu Jan 24, 2013 12:13 pm
Sorry - My comment was based on a roofing ladder also - if this was welded originally I see no problem altering it - only caution would be on thickness of tube - many clip together scaffold towers are tube of about 2" - but are very thin - although there are welds on the components most joints are mechanical ones & the weld just stop them pulling apart - if the material has sufficient thickness weld away - if it's real thin then a little planning of joints is required - but if it's only a short piece on a boat I expect you'll be fine if the weld is visually OK - ( whats the worst can happen ! you most likely already done worse once boat & beer get together ! )
No problem guys. This is the first alum. ladder I've seen that had welded rungs and the reason it caught my attention.
Now for another question that I need your expert opinions: I had the 212/spoolmatic gun tuned and welding well on pieces in preparation to weld them to the boat with the purpose of attaching the ladder to with pins. BUT, once I attempted to weld those brackets to the aluminum platform at the rear of the boat I started to see sputtering of weld being deposited and not the smooth flow of bead that I was seeing on my worktop. I placed the ground clamp very close to the weld site as well. Should I assume that the 4043 wire I'm using may not be suitable for this aluminum or should I play with the welder settings (ie: turn up the voltage and wire speed)?
Now for another question that I need your expert opinions: I had the 212/spoolmatic gun tuned and welding well on pieces in preparation to weld them to the boat with the purpose of attaching the ladder to with pins. BUT, once I attempted to weld those brackets to the aluminum platform at the rear of the boat I started to see sputtering of weld being deposited and not the smooth flow of bead that I was seeing on my worktop. I placed the ground clamp very close to the weld site as well. Should I assume that the 4043 wire I'm using may not be suitable for this aluminum or should I play with the welder settings (ie: turn up the voltage and wire speed)?
Return to “Mig and Flux Core - gas metal arc welding & flux cored arc welding”
Jump to
- Introductions & How to Use the Forum
- ↳ Welcome!
- ↳ Member Introductions
- ↳ How to Use the Forum
- ↳ Moderator Applications
- Welding Discussion
- ↳ Metal Cutting
- ↳ Tig Welding - Tig Welding Aluminum - Tig Welding Techniques - Aluminum Tig Welding
- ↳ Mig and Flux Core - gas metal arc welding & flux cored arc welding
- ↳ Stick Welding/Arc Welding - Shielded Metal Arc Welding
- ↳ Welding Forum General Shop Talk
- ↳ Welding Certification - Stick/Arc Welding, Tig Welding, Mig Welding Certification tests - Welding Tests of all kinds
- ↳ Welding Projects - Welding project Ideas - Welding project plans
- ↳ Product Reviews
- ↳ Fuel Gas Heating
- Welding Tips & Tricks
- ↳ Video Discussion
- ↳ Wish List
- Announcements & Feedback
- ↳ Forum News
- ↳ Suggestions, Feedback and Support
- Welding Marketplace
- ↳ Welding Jobs - Industrial Welding Jobs - Pipe Welding Jobs - Tig Welding Jobs
- ↳ Classifieds - Buy, Sell, Trade Used Welding Equipment
- Welding Resources
- ↳ Tradeshows, Seminars and Events
- ↳ The Welding Library
- ↳ Education Opportunities