Is there any strategy to placement of tack welds? Do you put them at start and/or stop points and weld to them? Do you put them wherever and weld over them?
I'm going to be weldind a long, narrow, 3/16 plate to another and would like to tack it well. Lap joint.
mig and flux core tips and techniques, equipment, filler metal
yamahablue
- yamahablue
-
Workhorse

-
Posts:
-
Joined:Thu Apr 23, 2015 4:08 pm
-
Location:Central Coast Ca
- MinnesotaDave
-
Weldmonger

-
Posts:
-
Joined:Sun Oct 27, 2013 10:57 pm
-
Location:Big Lake/Monticello MN, U.S.A.
Really depends on the situation.
But for a narrow piece in a lap joint, make sure you tack both sides - it will want to pull the back side open as you weld.
For narrow, long welds - you may find warping becomes a major issue.
Experience will guide you in this.
By experience I mean - the #@$%# times it was too much and now has to be done over will guide you later.
Like installing a toilet - when you crack one you know that was 1/2 turn too much on the mounting bolts.
If a tack gets too big, I will thin it down with a grinder before I get to it - becomes invisible when I go over it that way.
Dave J.
Beware of false knowledge; it is more dangerous than ignorance. ~George Bernard Shaw~
Syncro 350
Invertec v250-s
Thermal Arc 161 and 300
MM210
Dialarc
Tried being normal once, didn't take....I think it was a Tuesday.
Beware of false knowledge; it is more dangerous than ignorance. ~George Bernard Shaw~
Syncro 350
Invertec v250-s
Thermal Arc 161 and 300
MM210
Dialarc
Tried being normal once, didn't take....I think it was a Tuesday.
yamahablue
- yamahablue
-
Workhorse
-
Posts:
-
Joined:Thu Apr 23, 2015 4:08 pm
-
Location:Central Coast Ca
yamahablue
- yamahablue
-
Workhorse
-
Posts:
-
Joined:Thu Apr 23, 2015 4:08 pm
-
Location:Central Coast Ca
What would cause my wire to stick sometimes to the tack weld when finished, and other times it doesn't? Ive tried to notice what I'm doing different but haven't figured it out.
Another strange thing happened, I ran some beads in the small circle cutouts of this plate, the last bead I ran, the arc started sputtering like I was losing power. I pushed the tip in really close and barely was able to finish. It looks cold too.
Another strange thing happened, I ran some beads in the small circle cutouts of this plate, the last bead I ran, the arc started sputtering like I was losing power. I pushed the tip in really close and barely was able to finish. It looks cold too.
yamahablue wrote:Is there any strategy to placement of tack welds? Do you put them at start and/or stop points and weld to them? Do you put them wherever and weld over them?
I'm going to be weldind a long, narrow, 3/16 plate to another and would like to tack it well. Lap joint.
How long is long and how wide is narrow?
What I'm picturing is gonna warp like mofo.
I'd probably tack it every foot or more. Weld one end 6" or so, move to other end weld same amount. Move to middle weld some. Jumping around like this will keep it from getting to hot and warpping.
If it's 3/16 thick then the center of the bead on a lap joint should be 3/16 of an inch thick. Measured like a fillet. Unless you need a solid bead for reasons like sealing up then weld it solid. I would tack about every 3-6 inches on 3/16. Have you concidered stitch welding it? I.e. Weld 3 inches and skip 3.
I have more questions than answers
Josh
Josh
yamahablue
- yamahablue
-
Workhorse
-
Posts:
-
Joined:Thu Apr 23, 2015 4:08 pm
-
Location:Central Coast Ca
What's strange is that it just started doing it while welding, wasnt happening the other day or even earlier today . I actually quit now because it's falling on its face. I'm afraid that something is wrong with the machine or worse, my house wiring. It's a miller 211 that I have barely used, not even through the small roll that came with it.Bsmith wrote:Your wire speed could be too high as well.
As far as wire speed and voltage, I set it to the door chart for 3/16, then backed off the wire speed a little and ended up turning the voltage up some. It was looking ok to me, the extremely new novice. Now it's acting like it's dropping voltage mid weld., badly.
yamahablue
- yamahablue
-
Workhorse
-
Posts:
-
Joined:Thu Apr 23, 2015 4:08 pm
-
Location:Central Coast Ca
Bsmith wrote:yamahablue wrote:Is there any strategy to placement of tack welds? Do you put them at start and/or stop points and weld to them? Do you put them wherever and weld over them?
I'm going to be weldind a long, narrow, 3/16 plate to another and would like to tack it well. Lap joint.
How long is long and how wide is narrow?
What I'm picturing is gonna warp like mofo.
I'd probably tack it every foot or more. Weld one end 6" or so, move to other end weld same amount. Move to middle weld some. Jumping around like this will keep it from getting to hot and warpping.
Here's a picture for reference. I ended up tack it twice in every hole, top and bottom outside at every hole and a few on each end. Started welding the holes first until it started sputtering.

yamahablue
- yamahablue
-
Workhorse
-
Posts:
-
Joined:Thu Apr 23, 2015 4:08 pm
-
Location:Central Coast Ca
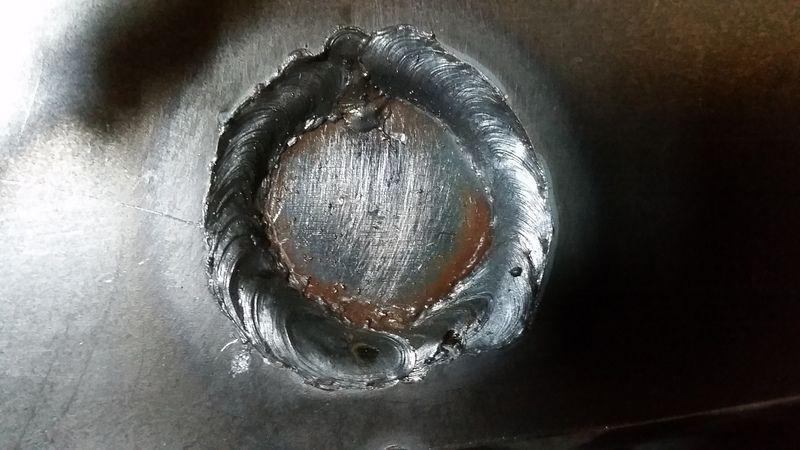
Go easy on me, to be blunt, I don't know what I'm doing. This is the hole I first noticed the arc sputtering, losing power. I ran it top to bottom, right side then left. The right side seemed to be run fine, the left is when it started falling on its face.

yamahablue
- yamahablue
-
Workhorse
-
Posts:
-
Joined:Thu Apr 23, 2015 4:08 pm
-
Location:Central Coast Ca
I just watched a trouble shooting video from miller, they said if the wire ever burns back to the contact tip to replace the tip. I had that happen but just freed up the wire from the tip. Do you think that could be the problem?
Unfortunately I can't remember if that happened before or after this issue.
Unfortunately I can't remember if that happened before or after this issue.


You may have been pinching your wire when you turned the nozzle to the left side. Migs are sometimes as finicky as a cat. Sometimes they weld fine when there's no way that the lead shouldn't be pinching the wire and sometimes the wire gets pinched from the slightest little angle.
Raymond
Everlast PowerTIG 255EXT
Everlast PowerTIG 255EXT
yamahablue
- yamahablue
-
Workhorse
-
Posts:
-
Joined:Thu Apr 23, 2015 4:08 pm
-
Location:Central Coast Ca
I didn't realize it was that touchy considering all the odd locations one might need to weld. I did move the machine after first experiencing this and welded another hole with similar results, both directions. The best I can describe it is like the voltage being turned down while welding. More spatter, having to push the nozzle all the way in just to keep it going.
You can have the lead line in a perfectly straight line and when you start to cock the torch to one side or the other the wire will begin to bind. Usually, in my experience you want to have the lead line in a bit of a rainbow arch to the opposite side of your body according to the direction that you are turning the nozzle so that the line and torch maintain a fluid arch. You constantly have to turn and move your machine and kick the lead line around to keep the feed wire from binding. It gets worse as you begin to work with the torch at higher elevations above the machine. Maybe they're not all like this but every one that I have ever used is.
Last edited by RamboBaby on Sat Jun 11, 2016 10:49 pm, edited 2 times in total.
Raymond
Everlast PowerTIG 255EXT
Everlast PowerTIG 255EXT
yamahablue
- yamahablue
-
Workhorse
-
Posts:
-
Joined:Thu Apr 23, 2015 4:08 pm
-
Location:Central Coast Ca
Thanks, that's good to hear. If you saw the other circles you probably wouldnt be saying that. The first circles didn't look like that haha. At first I had tried running the top half first and then bottom but was having a hard time. Running it top down turned out a little better.RamboBaby wrote:For someone who doesn't know what he's doing - that looks very good. No cold lap, fairly even travel speed through a radius. Nice.
I need to learn how to position myself in a way that my hand doesn't block my view of the puddle. That was happening on parts of those circles.
Try switching hands.yamahablue wrote: I need to learn how to position myself in a way that my hand doesn't block my view of the puddle. That was happening on parts of those circles.
Raymond
Everlast PowerTIG 255EXT
Everlast PowerTIG 255EXT
yamahablue
- yamahablue
-
Workhorse
-
Posts:
-
Joined:Thu Apr 23, 2015 4:08 pm
-
Location:Central Coast Ca
I don't have any more circles on this side to do, the whole outside edge to do though. I'm going to give it another try tonight, I put a new contact tip on and I'll try maneuvering the lead like you described.
yamahablue
- yamahablue
-
Workhorse
-
Posts:
-
Joined:Thu Apr 23, 2015 4:08 pm
-
Location:Central Coast Ca
The manufacturer intends it to be, every photo I can find of others, are fully welded.Bsmith wrote:But why are you welding it out? It doesnt look like it needs it.
Unfortunately the straight runs are giving me even more difficulty than the circles did. The bottom side especially, with the nozzle pointing up. I'm producing some horrible looking welds.
Make sure rhat you have adequate tension on your drive rollers. This video will show you how to tension them:
Watch "Mig Welding Basics" on YouTubeMig Welding Basics: http://youtu.be/5KrwmK7df-s
Watch "Mig Welding Basics" on YouTubeMig Welding Basics: http://youtu.be/5KrwmK7df-s
Raymond
Everlast PowerTIG 255EXT
Everlast PowerTIG 255EXT
yamahablue wrote:The manufacturer intends it to be, every photo I can find of others, are fully welded.Bsmith wrote:But why are you welding it out? It doesnt look like it needs it.
Unfortunately the straight runs are giving me even more difficulty than the circles did. The bottom side especially, with the nozzle pointing up. I'm producing some horrible looking welds.
Horrible looking how? Do you have a picture?
Drive rollers do wear out. If the flats on the wheels bottom out on each other before they grab the wire it can cause feed issues. But pictures of the finished weld will help you get the answers you want.
I have more questions than answers
Josh
Josh
Return to “Mig and Flux Core - gas metal arc welding & flux cored arc welding”
Jump to
- Introductions & How to Use the Forum
- ↳ Welcome!
- ↳ Member Introductions
- ↳ How to Use the Forum
- ↳ Moderator Applications
- Welding Discussion
- ↳ Metal Cutting
- ↳ Tig Welding - Tig Welding Aluminum - Tig Welding Techniques - Aluminum Tig Welding
- ↳ Mig and Flux Core - gas metal arc welding & flux cored arc welding
- ↳ Stick Welding/Arc Welding - Shielded Metal Arc Welding
- ↳ Welding Forum General Shop Talk
- ↳ Welding Certification - Stick/Arc Welding, Tig Welding, Mig Welding Certification tests - Welding Tests of all kinds
- ↳ Welding Projects - Welding project Ideas - Welding project plans
- ↳ Product Reviews
- ↳ Fuel Gas Heating
- Welding Tips & Tricks
- ↳ Video Discussion
- ↳ Wish List
- Announcements & Feedback
- ↳ Forum News
- ↳ Suggestions, Feedback and Support
- Welding Marketplace
- ↳ Welding Jobs - Industrial Welding Jobs - Pipe Welding Jobs - Tig Welding Jobs
- ↳ Classifieds - Buy, Sell, Trade Used Welding Equipment
- Welding Resources
- ↳ Tradeshows, Seminars and Events
- ↳ The Welding Library
- ↳ Education Opportunities