Hey,
Thats what they had at my OLD work, 2 2metre x2 metre HEAVY tables that could be bolted together to form a rectangle, mark out, tack stops on, once the job was done, knock em all off and unbolt to give a nice work table again.
Mick
What welding projects are you working on? Are you proud of something you built?
How about posting some pics so other welders can get some ideas?
How about posting some pics so other welders can get some ideas?

- weldin mike 27
-
Weldmonger

-
Posts:
-
Joined:Fri Apr 01, 2011 10:59 pm
-
Location:Australia; Victoria
delraydella
- delraydella
-
Weldmonger
-
Posts:
-
Joined:Mon Apr 25, 2011 7:35 pm
-
Location:Detroit, MI
That would be nice to have...and you always have a place for the ground to go. Sometimes it takes a little bit of creativity to ground something layed out on wood. I thought about making a steel top table, but then i went back and thought about how many times I built some wood structure on a wood topped template table and never bothered to check the length of the staples in the gun,only to find out that i stapled the whole thing down to the table! That's embarasing! And it's a big pain to pry it off the table, but it will still come off. But now what would happen if i managed to weld a project right onto the table?.......it could happen to me......I'll stick with wooden tops, thanks! 
Welding☞Syncrowave 250,Millermatic 252,30a Spoolgun Cutting☞12" Hi-speed Cutoff Saw, 9x 12 Horizontal Bandsaw Milling☞Gorton 8d Vertical Mill Turning☞Monarch EE Precision Lathe Grinding ☞Brown & Sharpe #5 Surface Grinder
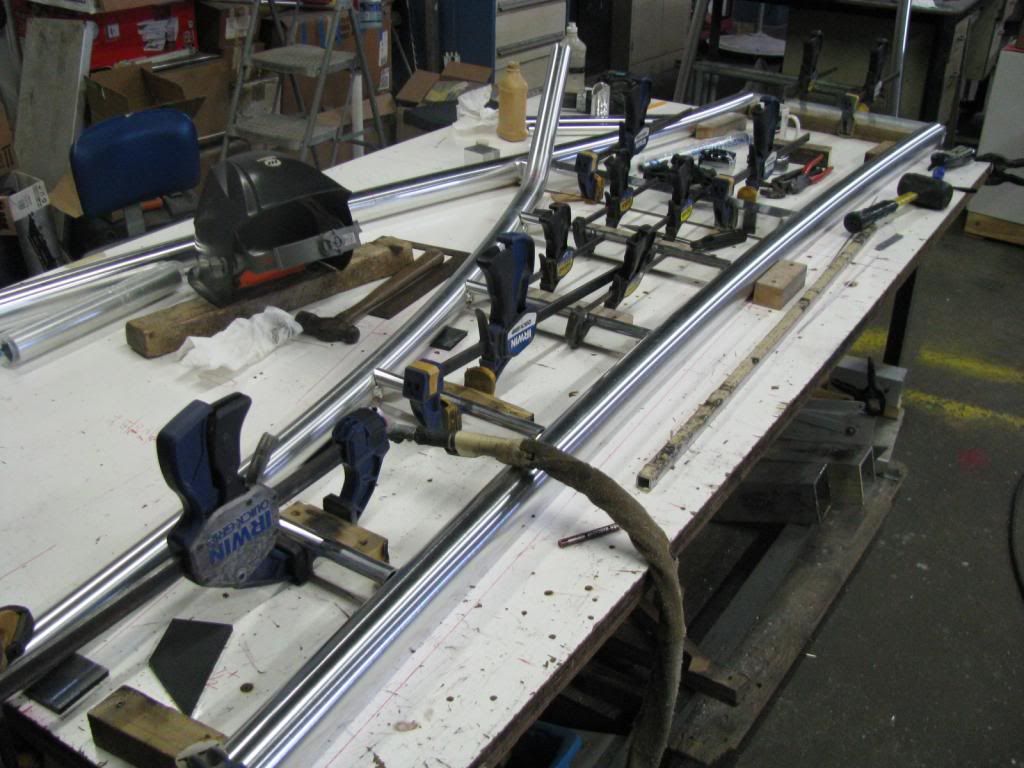
I have to use a wood top because we weld a lot of anodized and can't let it get scratched. This one has two layers of 3/4" cabinet ply. I have an assortment of hardwood blocks with predrilled holes. Still, welding will cause movements of the blocks so you have to keep track of where they were, and that they were on the layout lines. If I need to, I can double them up to help keep them in place better. This situation will take a mirror image in 3D so unless I want to make a separate layout for the opposite side, which will include errors when working strictly from a table of measurements, so I end up building as much of the 2nd part as I can in the same layout, and then completing it right on top of the other part. As long as the major control points are subdued and matched perfectly to each other and all the parts are cut exact, it will be within 1/16th or less.
Miller ABP 330, Syncrowave 250, Dynasty 300 DX.
Honorary member of the Fraternity of Faded Tee Shirts.
Honorary member of the Fraternity of Faded Tee Shirts.

- Otto Nobedder
-
Weldmonger
-
Posts:
-
Joined:Thu Jan 06, 2011 11:40 pm
-
Location:Near New Orleans
In that situation, the MDF top makes a great deal of sense. Rarely when building railing was I welding to a "finished surface" as with anodized, it was usually either carbon to be painted, or stainless to be dressed (brushed or dynafiled).
While the rigidity of the steel table was valuable, particularly for SS, I'd think MDF could easily handle the stresses of Aluminum draw.
While the rigidity of the steel table was valuable, particularly for SS, I'd think MDF could easily handle the stresses of Aluminum draw.
The table handles it. It's the slack in the screw holes in the blocks more than anything. Either way, they are just tapped back to their line if need be. I end up welding it, resetting the blocks that move then tweak the frame so that it falls effortlessly back in between the lines and blocks. Anything trapped is just welded and counter welded strategically to keep from bamboo'ng the pipe in between weld zones. That chunk of wood under my hood is the mighty whapper. It's a solid chunk of white oak heartwood that will either move the metal or destroy it. I have been wailing on weldments with that whapper for maybe 20 years by now and it hasn't changed much. It's other charm is that it's too ugly for anyone to steal.
Miller ABP 330, Syncrowave 250, Dynasty 300 DX.
Honorary member of the Fraternity of Faded Tee Shirts.
Honorary member of the Fraternity of Faded Tee Shirts.
delraydella
- delraydella
-
Weldmonger
-
Posts:
-
Joined:Mon Apr 25, 2011 7:35 pm
-
Location:Detroit, MI
Do you buy the tube already anodized or do you send it out to be done? I'm asking because i need to have the pieces I'm making anodized in all sorts of different finishes and colours and am wondering how i need to treat the surface before i send them out.
Welding☞Syncrowave 250,Millermatic 252,30a Spoolgun Cutting☞12" Hi-speed Cutoff Saw, 9x 12 Horizontal Bandsaw Milling☞Gorton 8d Vertical Mill Turning☞Monarch EE Precision Lathe Grinding ☞Brown & Sharpe #5 Surface Grinder
We buy the pipe already done. Most places that anodize aluminum should have the means to polish it to a bright finish that is more to the chrome look and there is the brushed finish as well. There is others but this is the most common. I think the bright finish is chemically polished if I remember right. If you buy anodized material, it actually welds nicely without removing the anodized finish.

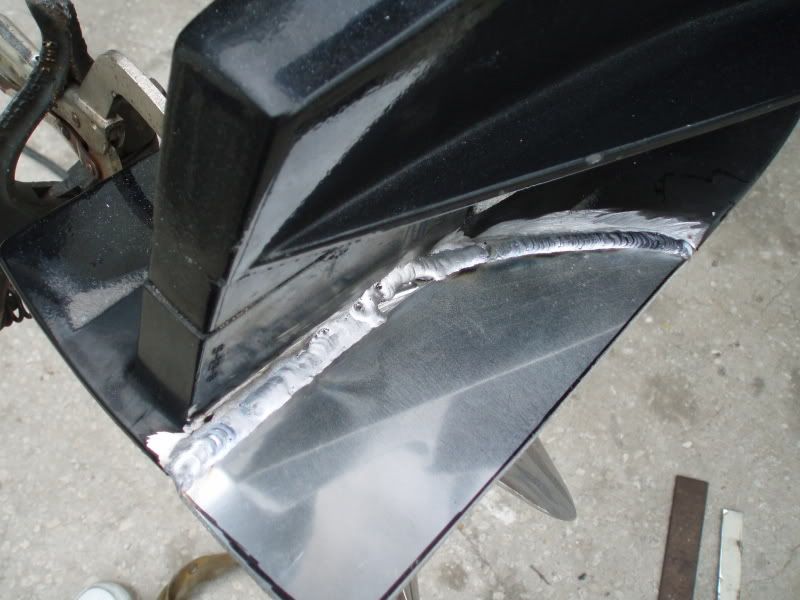
Companies such as Taco Metals and E-tec Marine have quite a broad selection of extrusions. In our use of it, the welds are merely painted with an acid brush and rustoleum aluminum paint. The welds in the above photo are not painted yet.
Here's one that has been painted. I actually like the look of the painted welds. It allows a certain showcasing of the weld itself when they are done neatly without detracting from the quality of the part. The paint can actually help blend the weld pattern. Some people weld anodized really badly. There is a fool proof way to weld it if aesthetics are of utmost importance, or if the piece by default of it's design, has little else to offer otherwise.
Miller ABP 330, Syncrowave 250, Dynasty 300 DX.
Honorary member of the Fraternity of Faded Tee Shirts.
Honorary member of the Fraternity of Faded Tee Shirts.
delraydella
- delraydella
-
Weldmonger
-
Posts:
-
Joined:Mon Apr 25, 2011 7:35 pm
-
Location:Detroit, MI
Very nice! What do you use to paint it with?
Welding☞Syncrowave 250,Millermatic 252,30a Spoolgun Cutting☞12" Hi-speed Cutoff Saw, 9x 12 Horizontal Bandsaw Milling☞Gorton 8d Vertical Mill Turning☞Monarch EE Precision Lathe Grinding ☞Brown & Sharpe #5 Surface Grinder
Thank you. Rustoleum aluminum silver. I use the spray because it dries quickly. I just spray it into a cut off soda can until it gets a puddle in there and brush that on. I cut the bristles on an acid brush on an angle and shorten them to about half so they don't hold too much paint. The good thing is after a few years and things start to look ratty, you can clean the paint off with acetone and redo it to freshen the part up.delraydella wrote:Very nice! What do you use to paint it with?
Miller ABP 330, Syncrowave 250, Dynasty 300 DX.
Honorary member of the Fraternity of Faded Tee Shirts.
Honorary member of the Fraternity of Faded Tee Shirts.
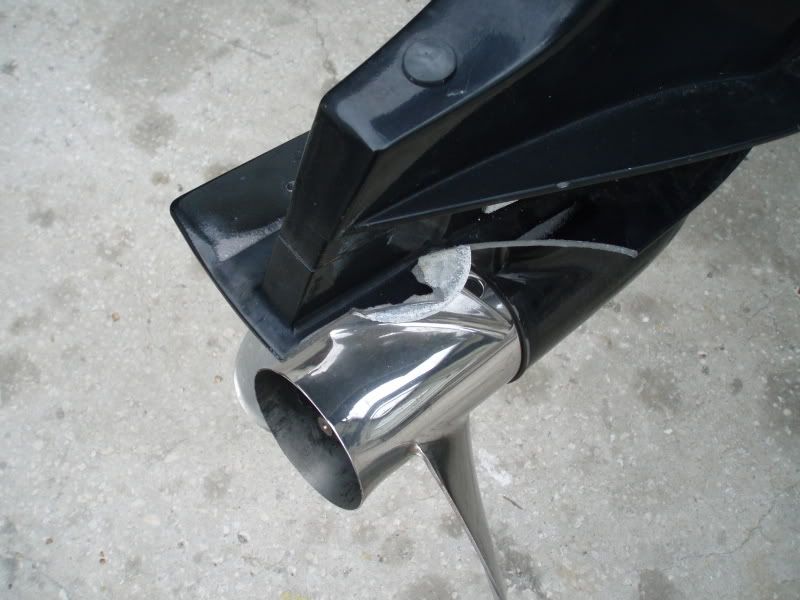
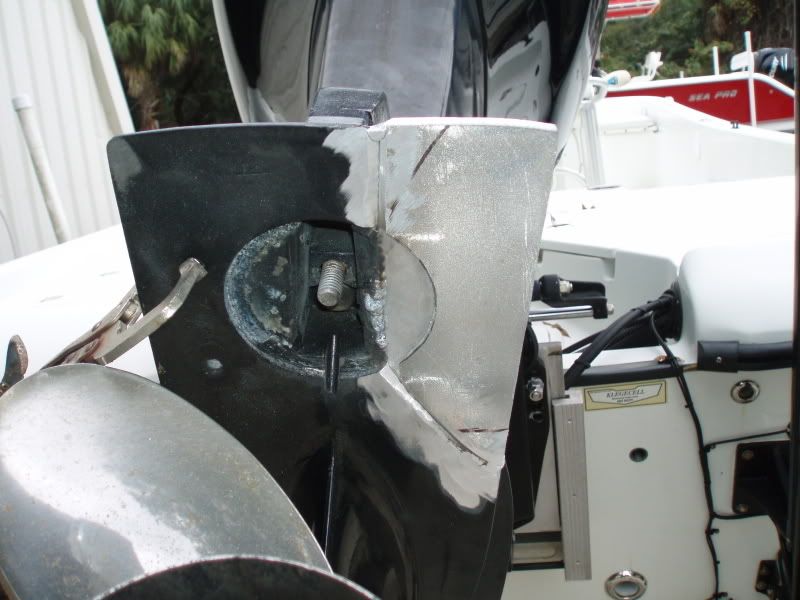
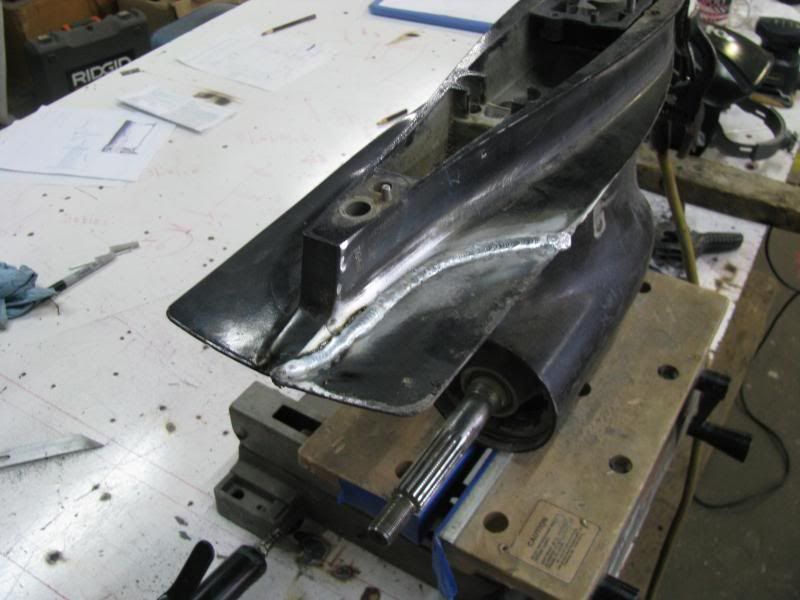
Look at this owwie! Things start getting precarious once you start getting near the actual gear case, where the often 'thin' casting is under a lot of tension. Anyone who has welded cast aluminum will know all too well that sound of the dreaded "TINK", after the weld has been completed. These gear cases are typically several thousand dollars to replace.
This broke around the anode cavity, which from a machining perspective, in a crude environment, lacking much in the way of milling machines, or the fixtures in which to set parts up in one, often leaves us going at it "commando style."
I used a hand held router with a carbide straight cutting bit, along with a measured bit of dexterity and multiple passes until the proper depth is achieved.
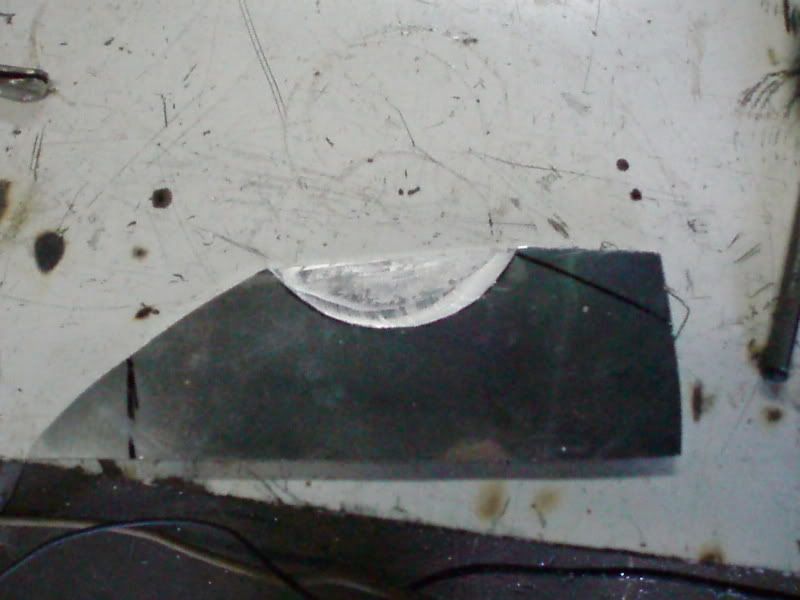
These are more challenging than they may appear at a glance. Nobody really bothers me when I am onto something like this because nobody else wants to mess with it, or even offer suggestions. Even other experienced welders. Mostly, they are just glad they don't have to do it.

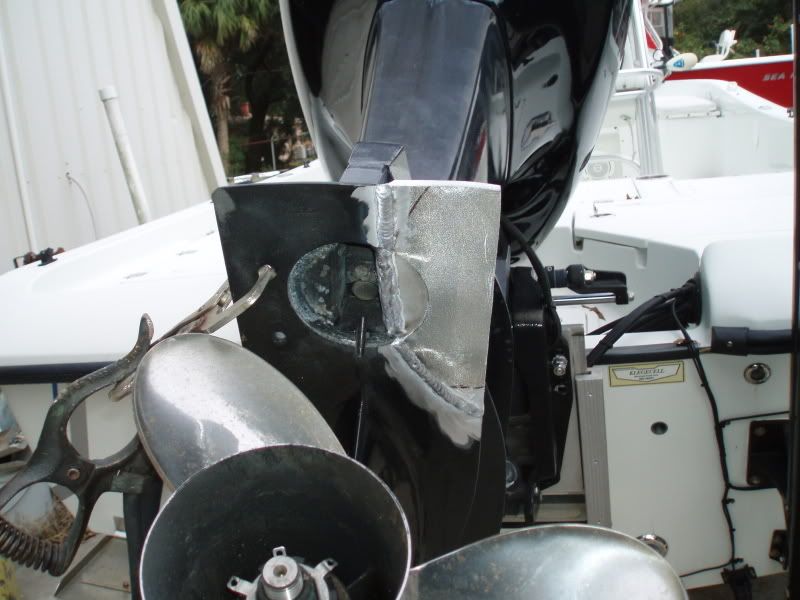
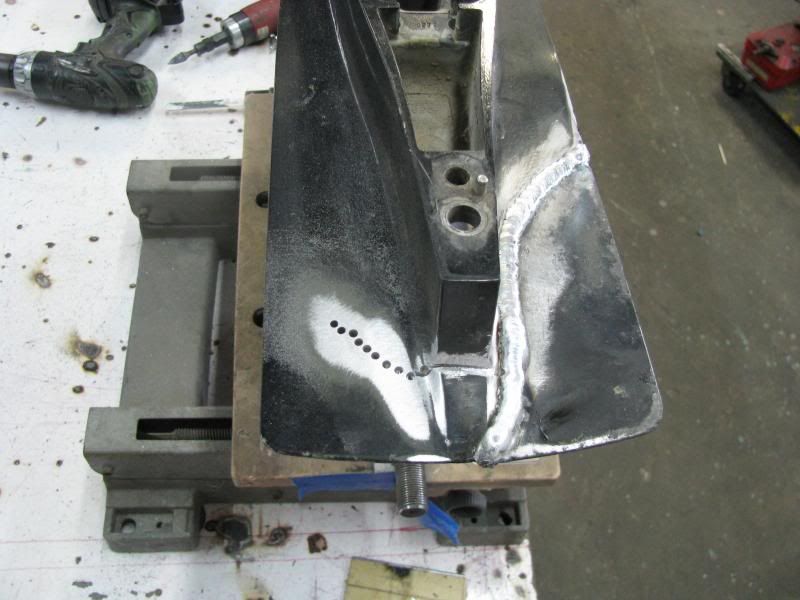
Weld placement strategy with regard to shrinking and drawing in order that such forces are exerted favorably. Notice that I am closing in on the center in this particular situation. This is something you really have to think about when welding cast, especially from two sides. In other words, get it wrong and you may find out the instant you strike an arc on the opposite side near the actual gear cavity.
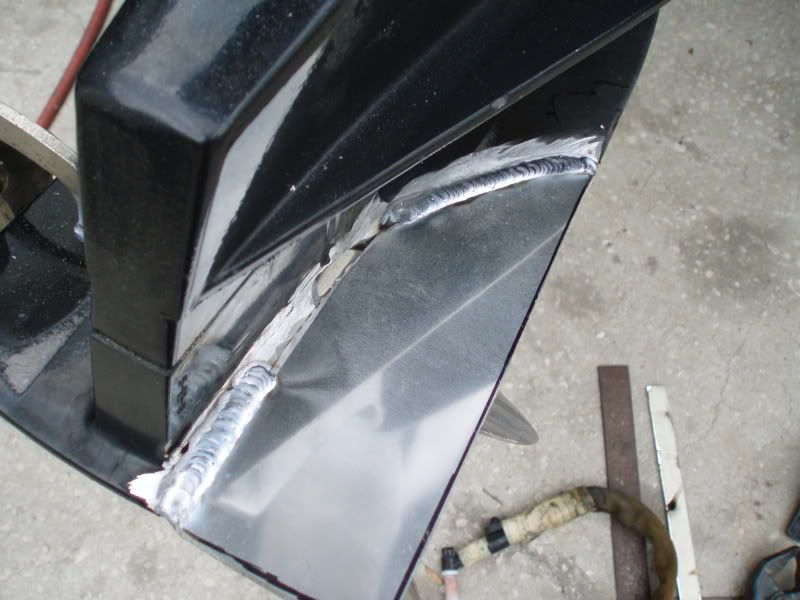
There is an odd shard missing in this area that I had to 'fudge' in with a colder weld before bringing it to the repair patch.Trying to fill this in all at once with enough heat to get full penetration in such an area would have likely been met with that dreaded aforementioned sound. The picture after the following will show where this was headed. The fill is now accessible to the under weld without a lot of heat needed to marry it all together. Just heat wash and add filler as needed.
You get the idea and can tell by the previous welds without me adding redundant finished photos that it turned out well, and in the event that these take up too much bandwidth, the moderator may delete at his discretion.
This broke around the anode cavity, which from a machining perspective, in a crude environment, lacking much in the way of milling machines, or the fixtures in which to set parts up in one, often leaves us going at it "commando style."
I used a hand held router with a carbide straight cutting bit, along with a measured bit of dexterity and multiple passes until the proper depth is achieved.
These are more challenging than they may appear at a glance. Nobody really bothers me when I am onto something like this because nobody else wants to mess with it, or even offer suggestions. Even other experienced welders. Mostly, they are just glad they don't have to do it.
Weld placement strategy with regard to shrinking and drawing in order that such forces are exerted favorably. Notice that I am closing in on the center in this particular situation. This is something you really have to think about when welding cast, especially from two sides. In other words, get it wrong and you may find out the instant you strike an arc on the opposite side near the actual gear cavity.
There is an odd shard missing in this area that I had to 'fudge' in with a colder weld before bringing it to the repair patch.Trying to fill this in all at once with enough heat to get full penetration in such an area would have likely been met with that dreaded aforementioned sound. The picture after the following will show where this was headed. The fill is now accessible to the under weld without a lot of heat needed to marry it all together. Just heat wash and add filler as needed.
You get the idea and can tell by the previous welds without me adding redundant finished photos that it turned out well, and in the event that these take up too much bandwidth, the moderator may delete at his discretion.
Miller ABP 330, Syncrowave 250, Dynasty 300 DX.
Honorary member of the Fraternity of Faded Tee Shirts.
Honorary member of the Fraternity of Faded Tee Shirts.
ajlskater1
- ajlskater1
-
Ace

-
Posts:
-
Joined:Thu Feb 02, 2012 5:32 am
Jeff you do some really cool work. I have a similiar project coming on. I have to repair both both of the skags on my moms boat and the props, but I believe the props are past repair. Do you know if they make replacement snags or do you just make custom pieces?
They do make replacements in cast to boot. I don't recall the company but maybe can find out for you? It would save a lot of shaping perhaps. Typically I use what is on hand because these jobs are usually unexpected and for the sake of turn around time. You know how that goes.
Miller ABP 330, Syncrowave 250, Dynasty 300 DX.
Honorary member of the Fraternity of Faded Tee Shirts.
Honorary member of the Fraternity of Faded Tee Shirts.
- Otto Nobedder
-
Weldmonger
-
Posts:
-
Joined:Thu Jan 06, 2011 11:40 pm
-
Location:Near New Orleans
Working toward the thinner material at the gearcase makes perfect sense in minimizing the final stress on the thinnest and most critical area.
Do you ever, in a case like this, peen the welds as you approach the thin section, say, a good working over with a pneumatic needle-scaler? I would think in a material as pliable as aluminum this would have a planishing effect, but I've never experimented with it. I suppose for an exposed part, a body hammer and dolly might be more practical, if it's actually useful.
Steve S
Yes I do relieve stresses in various ways and also employ heat sinks at times. I do have hammers, shrinkers, slappers and dollies. Sometimes, I will fill these cavities part way with water to act as a sink, or to use the steam as an indicator of when to give something a rest or a slower cure.
I have used a cold chisel with a dolly as a backer to expand welds and tacks as well.
I have used a cold chisel with a dolly as a backer to expand welds and tacks as well.
Miller ABP 330, Syncrowave 250, Dynasty 300 DX.
Honorary member of the Fraternity of Faded Tee Shirts.
Honorary member of the Fraternity of Faded Tee Shirts.
ajlskater1
- ajlskater1
-
Ace
-
Posts:
-
Joined:Thu Feb 02, 2012 5:32 am
Ya if you could find that for me that would be a huge help
Do I need to get you the make and model number for the motors?
Do I need to get you the make and model number for the motors?
If I find the name of the outfit that sells them. they would likely list the specific profiles. I think it's called T. H. marine or T-H marine.
Miller ABP 330, Syncrowave 250, Dynasty 300 DX.
Honorary member of the Fraternity of Faded Tee Shirts.
Honorary member of the Fraternity of Faded Tee Shirts.
ajlskater1
- ajlskater1
-
Ace
-
Posts:
-
Joined:Thu Feb 02, 2012 5:32 am
Thanks! Finding a casting instead of making one would be easier, cause I have never done shaping like that.
I use a milk wheel ( white grinding wheel for nonferrous metals) on the 5" angle grinder and then finish with the DA and fresh 80 grit. Some skegs have a specific foil shape. It can be nearly flat on one side and noticeably more convex on the opposite. This is true with some of the more high performance outboards. Close counts. Usually by the time you get to repairing one, they have been without it so long that anything is going to be an improvement. I then use an etching primer followed by a factory matched top coat of spray enamel.
Cut your patch pieces slightly oversize. Makes it easier to fill in the ends of the welds, and allows room for blending to the final shape.
Cut your patch pieces slightly oversize. Makes it easier to fill in the ends of the welds, and allows room for blending to the final shape.
Miller ABP 330, Syncrowave 250, Dynasty 300 DX.
Honorary member of the Fraternity of Faded Tee Shirts.
Honorary member of the Fraternity of Faded Tee Shirts.
ajlskater1
- ajlskater1
-
Ace
-
Posts:
-
Joined:Thu Feb 02, 2012 5:32 am
I am waiting to get the make and model ill probly start this project in a couple weeks, going to Texas for a fishing trip soon, ill post some pics. Think you can walk me through the process?
I will if I can from here. Most important is to keep it straight. If you see it starting to "free Willy" on you, you will need to alternate to the other side, overcompensate a bit and back and forth etc. They are somewhat malleable after the fact. Couple 3# sledgehammers. One as a dolly, the other a persuader.ajlskater1 wrote:I am waiting to get the make and model ill probly start this project in a couple weeks, going to Texas for a fishing trip soon, ill post some pics. Think you can walk me through the process?
Miller ABP 330, Syncrowave 250, Dynasty 300 DX.
Honorary member of the Fraternity of Faded Tee Shirts.
Honorary member of the Fraternity of Faded Tee Shirts.
Here's some more odd cast bits along with a trick for welding thin castings.
Broken anti-ventilation plate prepped and ready to weld. Thickness is variable, from 3/8" to an 1/8". There is also an adjoining crack but no need to worry about that yet. The fist weld will tie the end of the other crack, so that my subsequent prep doesn't change after the fact.
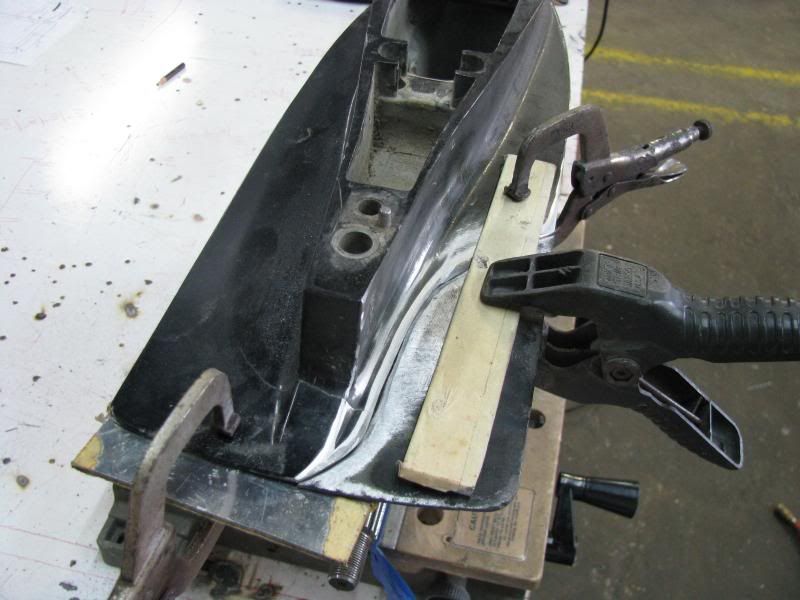
Piece welded back on and ends of the crack at the edges of the plate capped beyond the edges to be ground down later with no under cut. This is achieved by pointing the torch one way towards the edge outside of the bead, letting the soft/build part of the arc stream fill the thin edge while the undercut portion gets absorbed by the thicker weld bead, then pointed the other way to take away any undercut of the edge from the weld. It's pulsed, while simultaneously adding filler at exactly the time the arc is struck.
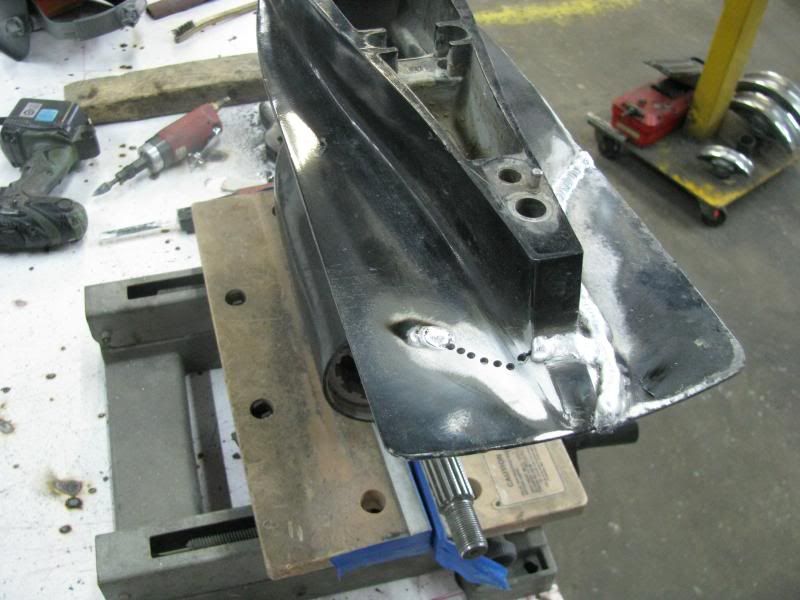
Here's the trick for thin. It's about an 1/8" thick, maybe 3/16ths in some places. It's drilled instead of cut, using the between, undrilled sections as shims of sorts to restrict movement with the heat associated with full penetration of such situations. The arc will punch these out of the way as the weld progresses.
Then just close it on itself, so that the tension gets corralled in towards the thicker metal.
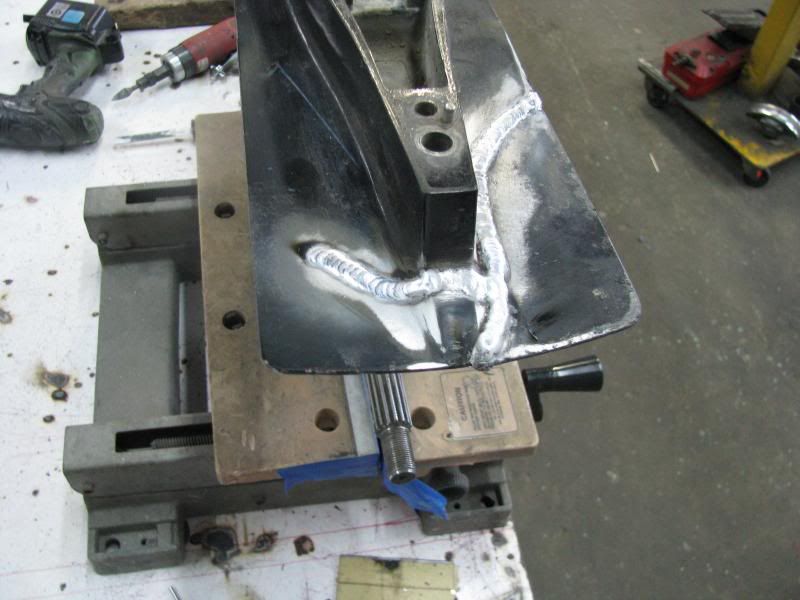
Not the prettiest weld but it all gets ground off. The thicker glob is where I cooked some trash out of the weld and floated it onto some extra filler on top of the working part of the bead.
Broken anti-ventilation plate prepped and ready to weld. Thickness is variable, from 3/8" to an 1/8". There is also an adjoining crack but no need to worry about that yet. The fist weld will tie the end of the other crack, so that my subsequent prep doesn't change after the fact.
Piece welded back on and ends of the crack at the edges of the plate capped beyond the edges to be ground down later with no under cut. This is achieved by pointing the torch one way towards the edge outside of the bead, letting the soft/build part of the arc stream fill the thin edge while the undercut portion gets absorbed by the thicker weld bead, then pointed the other way to take away any undercut of the edge from the weld. It's pulsed, while simultaneously adding filler at exactly the time the arc is struck.
Here's the trick for thin. It's about an 1/8" thick, maybe 3/16ths in some places. It's drilled instead of cut, using the between, undrilled sections as shims of sorts to restrict movement with the heat associated with full penetration of such situations. The arc will punch these out of the way as the weld progresses.
Then just close it on itself, so that the tension gets corralled in towards the thicker metal.
Not the prettiest weld but it all gets ground off. The thicker glob is where I cooked some trash out of the weld and floated it onto some extra filler on top of the working part of the bead.
Miller ABP 330, Syncrowave 250, Dynasty 300 DX.
Honorary member of the Fraternity of Faded Tee Shirts.
Honorary member of the Fraternity of Faded Tee Shirts.
Return to “Welding Projects - Welding project Ideas - Welding project plans”
Jump to
- Introductions & How to Use the Forum
- ↳ Welcome!
- ↳ Member Introductions
- ↳ How to Use the Forum
- ↳ Moderator Applications
- Welding Discussion
- ↳ Metal Cutting
- ↳ Tig Welding - Tig Welding Aluminum - Tig Welding Techniques - Aluminum Tig Welding
- ↳ Mig and Flux Core - gas metal arc welding & flux cored arc welding
- ↳ Stick Welding/Arc Welding - Shielded Metal Arc Welding
- ↳ Welding Forum General Shop Talk
- ↳ Welding Certification - Stick/Arc Welding, Tig Welding, Mig Welding Certification tests - Welding Tests of all kinds
- ↳ Welding Projects - Welding project Ideas - Welding project plans
- ↳ Product Reviews
- ↳ Fuel Gas Heating
- Welding Tips & Tricks
- ↳ Video Discussion
- ↳ Wish List
- Announcements & Feedback
- ↳ Forum News
- ↳ Suggestions, Feedback and Support
- Welding Marketplace
- ↳ Welding Jobs - Industrial Welding Jobs - Pipe Welding Jobs - Tig Welding Jobs
- ↳ Classifieds - Buy, Sell, Trade Used Welding Equipment
- Welding Resources
- ↳ Tradeshows, Seminars and Events
- ↳ The Welding Library
- ↳ Education Opportunities