What welding projects are you working on? Are you proud of something you built?
How about posting some pics so other welders can get some ideas?
jakeru
  • Posts:
  • Joined:
    Sun Apr 25, 2010 3:30 pm

I made up a couple "welder's fingers" today. AKA "Welder's third hands".

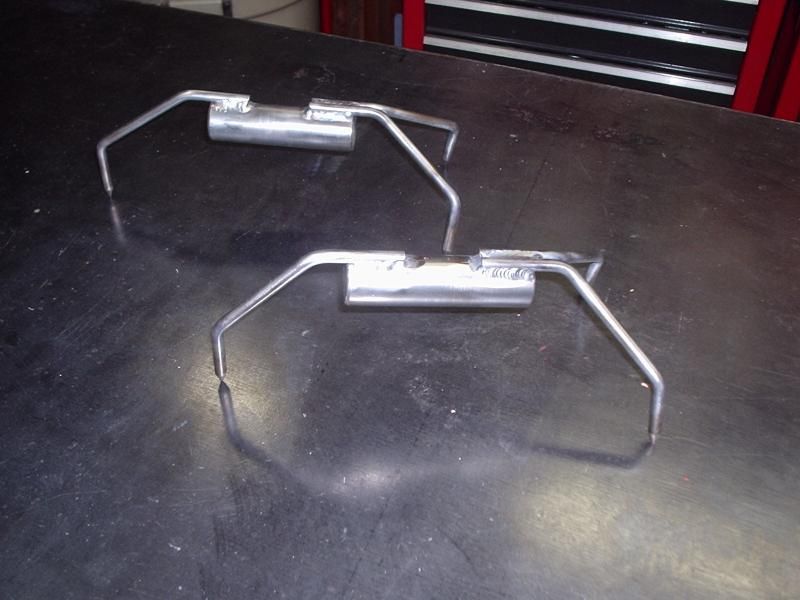
Each uses a 3" long piece of 1" diameter mild steel for the "weight", 1/4" mild steel rod for the two "legs", (each about 6" long), and a bent, sharpened 3/8" rod for the "neck" (I was thinking I'd want some extra weight up there, but in hindsight, 1/4" would have been easier to bend and probably would have been about as functional. ;) )

A tried a small variation on the design between the two. I ended up putting a little bend in the legs, to try and make an improvement in "table traction". (I will probably also end up sharpening the legs, for yet more traction.)

I used E70S6 filler for the first one with a small cup (looks like nothing special...) and for the second, tried some 309L stainless filler with a #8 gas lens cup and about 15 cfh. They were my first stainless TIG weld beads. The stainless filler made some real purdy looking weld beads, with neat color!

I am hopeful that these prove helpful in holding some small pieces in position for tack welding (especially aluminum pieces, because they are sometimes real hard to tack with one hand!) There is a forum post relating to these I made previously in this thread: http://forum.weldingtipsandtricks.com/v ... 1313#p1313
Attachments
IMG_0026_small.JPG
IMG_0026_small.JPG (71.74 KiB) Viewed 24284 times
IMG_0027_small.JPG
IMG_0027_small.JPG (61.01 KiB) Viewed 24284 times
stainless_weld_beads.JPG
stainless_weld_beads.JPG (110.25 KiB) Viewed 24284 times
kevn
  • Posts:
  • Joined:
    Sun Aug 08, 2010 3:21 pm
  • Location:
    North Bay, Ontario

Really nice job Man.
I got to make me some of those too. Its such a pita to weld ic and exhaust pipes together.

Now it would be cool to find a way to hold a pipe in position on the car while trying to tack it on.
DWRIGHT
  • Posts:
  • Joined:
    Mon Mar 01, 2010 12:37 am

[quote][/quote]jakeru: that is some trick tools you made there. I can see where that would would really come in handy.great job!
jakeru
  • Posts:
  • Joined:
    Sun Apr 25, 2010 3:30 pm

Thanks guys - they have already indeed come in handy for me!

Check this out... I had to tack weld some thin, miter-cut aluminum tubing. These little "welder's fingers" let me set this up perfectly, nicely grounded, with great access for vision, torch, and filler rod, in about one minute.

I am finding them real handy for quickly and effectively grounding parts too. (I got lucky that my ground clamp latches onto one of them quite nicely!)
Attachments
IMG_0036_small.JPG
IMG_0036_small.JPG (108.3 KiB) Viewed 24242 times
jakeru
  • Posts:
  • Joined:
    Sun Apr 25, 2010 3:30 pm

FYI - I found some other examples of "weldors fingers", "welding finger" in this thread on the miller welding forum:
http://www.millerwelds.com/resources/co ... &p=9#post9
ogorir
  • Posts:
  • Joined:
    Tue Feb 23, 2010 9:04 pm
  • Location:
    Waco, TX

I made one a while ago out of scrap. I never thought about making two, but I probably should've. I didn't have much of anything heavy around, so I had to maximize it's effectiveness. for normal applications*, the farther you get the weight towards the tip, the more effective it is.


*if you've got the 'feet' higher than the tip, then it doesn't matter as much where the weight is as gravity is directing most of the force towards the tip anyway.

I have an idea in my head for a slick folding and telescoping finger that I'll try to build and post eventually. that's about the only problem I've had with mine is sometimes the fixed location of the legs and the length from tip to legs is a issue with stuff on the bench, ect.
jakeru
  • Posts:
  • Joined:
    Sun Apr 25, 2010 3:30 pm

Adjustable geometry sounds nice. I find the head sometimes interferes with where I want to hold the TIG torch during the welding operation.

At first I was thinking I also wanted to maximize the weight over the head as much as possible, but after using this for a little bit, I now appreciate having some weight at the feet. The more weight there is pushing down on the feet, (and the wider the feet are spaced apart, and the closer they are to the head,) the more sideways force and "torque" they can hold against without slipping (useful for allowing force to be applied to a sloped surface, where it otherwise might slip sideways and fall down.)
ogorir
  • Posts:
  • Joined:
    Tue Feb 23, 2010 9:04 pm
  • Location:
    Waco, TX

good point, i hadn't really thought about that. I suppose, though, you could make one with a big magnetic base and a heavy hinge instead of feet. that would keep the base from moving on you and you could put more force down on the point.
kevn
  • Posts:
  • Joined:
    Sun Aug 08, 2010 3:21 pm
  • Location:
    North Bay, Ontario

ogorir wrote:good point, i hadn't really thought about that. I suppose, though, you could make one with a big magnetic base and a heavy hinge instead of feet. that would keep the base from moving on you and you could put more force down on the point.

Thats a good idea too you could also include a bolt or threaded rod to pull the finger tighter to the base instead of just gravity
User avatar
  • Posts:
  • Joined:
    Tue Dec 14, 2010 6:46 pm

I went with a welder's finger system.
System? I should be in Marketing. After researching what other folks have made, I decided to make something I could 'adjust' a bit depending on a particular job's needs. A quick look in my metal stash showed no useable scraps (culls, drops, shorts- pick your term) for weights, legs, etc.. So, my options were wide open.

Starting with Platinum at the top of my "metal weights" list, I scrolled down to the first metal I could remotely afford- copper. I skipped lead. Copper's not cheap these days, but it's down a bit lately and it's easier to cut, drill, thread and bend than steel. Shiny is good too. Being a 'Gentleman Welder', shiny is always a plus. I also figured the copper would help avoid marking my projects with arc strikes due to better grounding.

So I got onto OnlineMetal.com's web site and selected some 1 1/2" and some 5/16" rod. 2" rod was really expensive. And by ordering a 3" piece and a 4" piece of 1 1/2", I didn't have to cut them myself. It cost me like $1.73 per cut. A bargain.
A word about OnlineMetals: These guys and their website are great. Fun site, lots of information, good selection, reasonable prices, easy to order and deal with. The only downside applies to all online metal suppliers (and everything else for that matter)- shipping costs. I finally got a break. They're in Seattle... only 30 miles from me so I could Will Call my stuff. And a good excuse to visit my favorite burger joint nearby.

I can adjust the width and length of the legs, change points, raise or lower the weights and points, etc. If I need a special shape for the legs or point, it's pretty quick and easy to whip something up with the leftover 5/16” rod.
I ended up paying about $60 for materials & gas + $10 for burgers. Not a cheap 'system' initially, but cost is low to add components. Currently, 5/16" C110 (ETP) COPPER ROUND ROD is $4.28/foot. Steel would have been cheaper, maybe by 1/2, but not as heavy per square inch and, as mentioned, harder to fab.
IMG_4278.JPG
IMG_4278.JPG (86.31 KiB) Viewed 20896 times
IMG_4272.JPG
IMG_4272.JPG (101.16 KiB) Viewed 20896 times
IMG_4269.JPG
IMG_4269.JPG (88.16 KiB) Viewed 20896 times
Seattle, WA area
Rastas
  • Posts:
  • Joined:
    Sat Sep 15, 2012 9:51 pm

Hi, all the way from Australia!
Fascinated with the "third hand system" and would like to have a go at making one for myself. My question is how do you weld the stainless steel nuts, (I presume they're stainless) to the copper rod as per picture on the website?
Cheers
Rastas
RonSII
  • Posts:
  • Joined:
    Mon Sep 17, 2012 5:53 pm

Hello and welcome Rastas, I am new here myself (been lurking for a while)

I am guessing that the rod is threaded long and the weights are drilled and tapped so the nuts are just jamb nuts
Ultralow787
  • Posts:
  • Joined:
    Fri Apr 29, 2011 11:30 pm
  • Location:
    Ontario, Canada

Some really nice looking work there guys! Both the ones by jakeru and qubit look equally impressive!
Perfection is impossible, but if you strive for perfection, excellence is obtainable!

1983 Canox "Sparkler" 225 AC Stick Welder
Hobart 210 MVP MIG Welder
Harris "Spitfire" Oxy-Acetylene Set
rahtreelimbs
  • Posts:
  • Joined:
    Mon Jun 14, 2010 10:39 pm

Threw these together the other night .....all stainless.

Image
Image
User avatar
  • Posts:
  • Joined:
    Tue Dec 14, 2010 6:46 pm

Rastas-
I know it's only been 3 years since you asked (Geeez. Wish I'd been notified of your question), but for posterity...
RonII is/was on the nose. Large copper bars are tapped and the rods are threaded so I can change lengths, angles, etc. Hex nuts serve to lock-in position, which maybe makes the project more suitable for a machining site. :D

As a long-term review, the fingers have worked out great. I use them regularly and have made a few more, um, arms from the copper leftovers for special situations. Being a Gentleman Weldor and, apparently, also a Gentleman Machinist, I can fuss around with such things. Welding would have been faster, but, then I'd have several bits instead of a 'System'. Hope you see this before 2018!
Seattle, WA area
User avatar
  • Posts:
  • Joined:
    Sat Nov 29, 2014 6:30 pm
  • Location:
    Farmington, MN

Here is the one I made 3 days ago.
Image
Image
Image
soutthpaw
  • Posts:
  • Joined:
    Thu Sep 18, 2014 12:14 pm
  • Location:
    Sparks, NV

Here is a similar thread, mine is post #18 http://weldingweb.com/showthread.php?t=549491
Post Reply