Now as I slowly build my man-cave, the time has come for a proper welding table.
I always liked the buildpro, demmeler etc type of tables but they were too expensive for me so I thought about making one myself.
So far I have ordered 8pcs of 198x1000mm 20mm thick plate as well as the square tubing (1pc 6m 60x60x5mm and 1pc 60x60x3.2mm).
I got an estimate to have the plates cut and drilled on a water jet but the price was really high (understandably) so I figured I would get myself a magnetic drill for the same price and I get to keep it in the end. :p
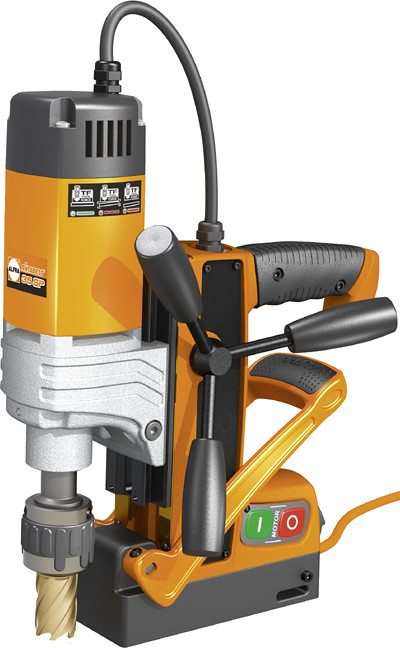
Alfra RB 35 SP by Taz00, on Flickr
I want to drill 16mm holes in a 50mm square pattern. This equates to 4x20=80 holes per plate so 640 holes for the whole table
Here is an initial sketch of the table. Do not be too hard on me, I started learning to use solidworks last week (boy is it completely different to autocad...)
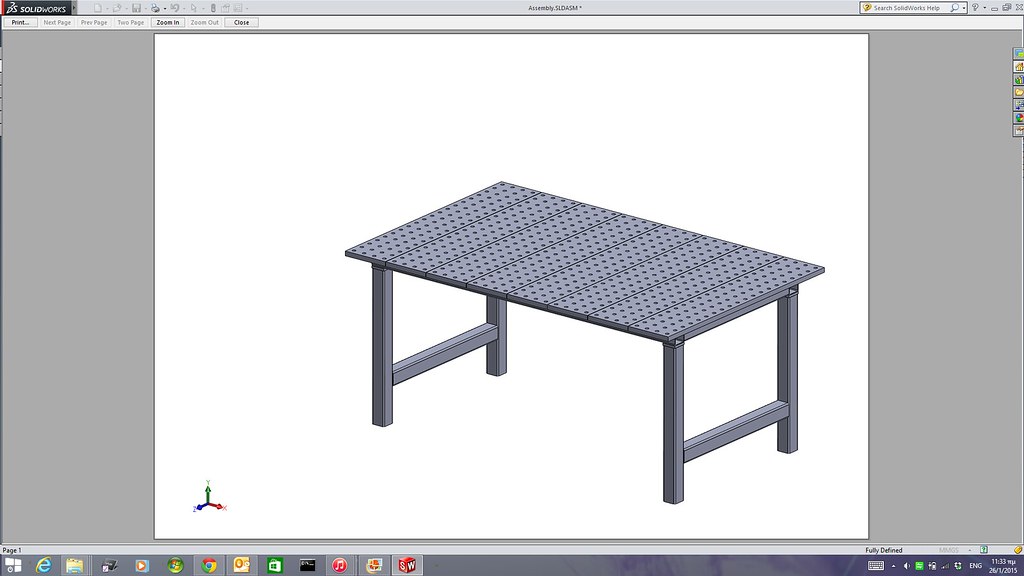
Screenshot 2015-01-26 11.33.58 by Taz00, on Flickr
The plates will be bolted on the top of the table and I will make an insert with strips and water tray that could be placed on top instead of 2-3 plates and be used for plasma cutting (no drawing on that so far, I will figure out the exact configuration after the table is built.
As far as tooling is concerned for starters I intend on modifying a lot of clamps to something like this http://www.stronghandtools.com/build...rta_clamps.php
I have a lathe (and a vertical milling slide) so it should not be difficult at all.
I also want to make some stops and rest buttons and go from there.
Generally the idea is to make most of the accessories myself. The 16mm diameter was selected since both buildpro and demmeler use it so I could buy a particular accessory from them if I need it and cannot make it myself.
Holes will not be threaded.
I will try to take some pictures as the build progresses
What welding projects are you working on? Are you proud of something you built?
How about posting some pics so other welders can get some ideas?
Mag drill. I have ordered the mag drill on the photo. It uses a permanent magnet instead of an electromagnet so it can be used also on very thin stock (3mm or even less). When I finish with the table I intend on making a base for it that will allow it to be used as a drill press.
Something similar to this:
d0GGsKu1v4I
I have a vertical milling slide that I use to do some milling on my (small) lathe but it is limited to small pieces.
Something similar to this:
d0GGsKu1v4I
I have a vertical milling slide that I use to do some milling on my (small) lathe but it is limited to small pieces.
- weldin mike 27
-
Weldmonger
-
Posts:
-
Joined:Fri Apr 01, 2011 10:59 pm
-
Location:Australia; Victoria
If your drill can handle it, consider stack drilling 2 plates a time. Tack weld 2 slats together and get two holes for the price of one.
Hey, have you been into my computer?
Almost as one I have started to design.
I also plan to use a mag drill.
Can rent one for about 45 euros/day.
Look forward to see it being built
Almost as one I have started to design.
I also plan to use a mag drill.
Can rent one for about 45 euros/day.
Look forward to see it being built
Pictures from my scrap collection:
http://forum.weldingtipsandtricks.com/v ... f=9&t=5677
Very sweet build, and I can't say I'm not green with envy...those Build-Pro tables are incredible, I sure wish I'd thought of that myself, he he. I think my whole house would be furnished with Build-Pro tables and counter-tops. Even one in the bathroom so you could clamp your razor and toothbrush into their own holes with some fixturing! Soap-dish with it's own post, wash cloth fixture...Too much?
Well, back to reality, I did come for more than congratulations and dreams, I also have a question about your milling attachment. Is it like the '10-502' that I have on my Atlas? If so, I'm just curious of how well you like it, and what you use to mill with as far as attaching your endmills and keyway cutters, etc?
Thanks for the info and sorry to get off-topic...If it's more appropriate on another thread I will gladly move it? Aloha...Chuck
Well, back to reality, I did come for more than congratulations and dreams, I also have a question about your milling attachment. Is it like the '10-502' that I have on my Atlas? If so, I'm just curious of how well you like it, and what you use to mill with as far as attaching your endmills and keyway cutters, etc?
- Not my lathe, just a pic from the web. It's still too cold to go outside, or more precisely I'm just not dressed for yet. I have an Atlas TH54 10X36.
- verticalslide.jpg (288.01 KiB) Viewed 7180 times
Hood Time is a Good Time!
Avatar photo is from 1992, on Maui.
The drill arrived today and I also got the square tubing.
Did not get to do any serious work, just got to try out the drill.
So here are a few pictures:
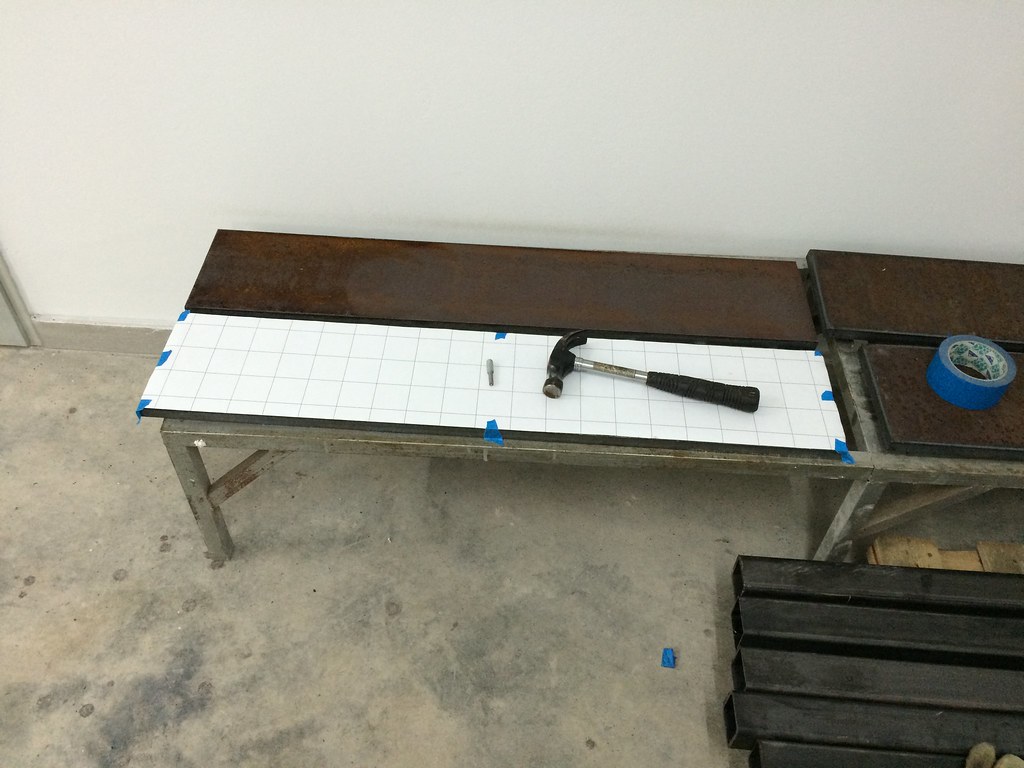
What is the easiest way to mark the centre locations of the holes? Print the grid on your plotter and stick the paper on the top of the plate and then use a centre punch to mark them.
Untitled by Taz00, on Flickr
The centre punch is actually a bolt I turned down on my lathe with a hole drilled and a red tungsten inserted in it.
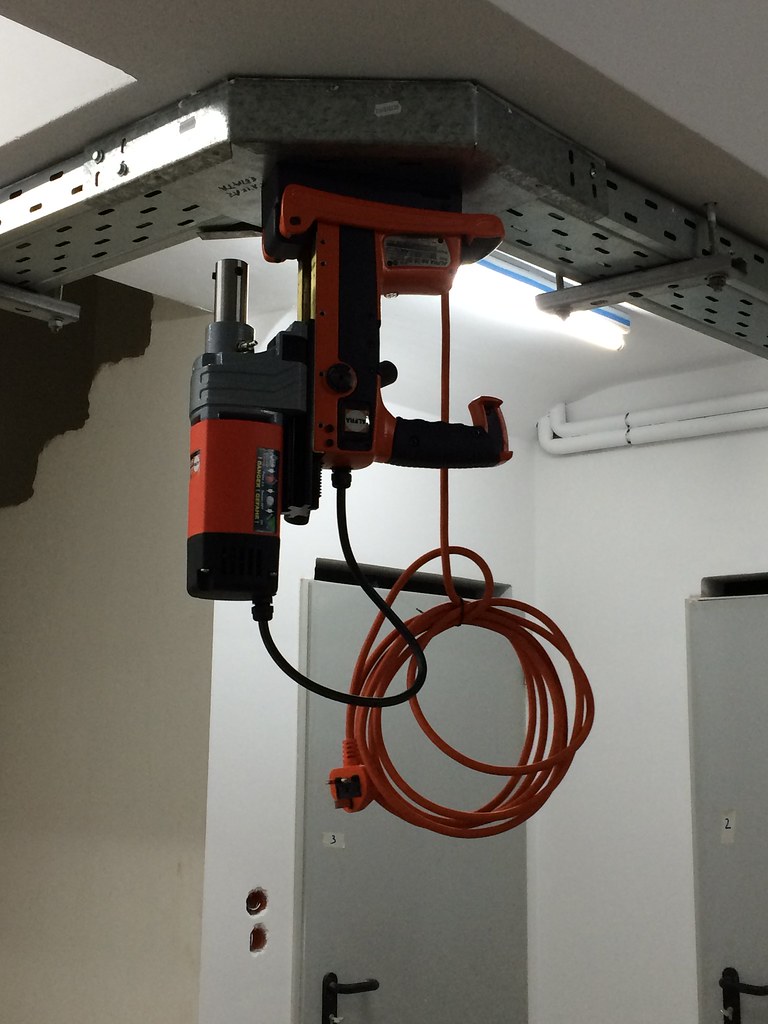
The new drill is awesome. The permanent magnet makes it able to be used on very thin material.
Q: What usually happens when you drill a hole with the mag drill upside down and someone stumbles on your cord and pulls it out of the socket?
A: NOTHING
Alfra RB35 SP by Taz00, on Flickr
It takes very little effort to drill the holes, it is a lot easier than I anticipated. I need a lot more time to position the drill accurately than to drill the hole.
Here is a short video of the second hole being drilled
Y6nayNEJMgU
The coolant makes a mess of everything so I have to find some other area in my basement to do the drilling.
Will try and post more pics as I get it done.
Awesome tool! I must have one
Cheers.
-Eldon
Cheers.
-Eldon
We are not lawyers nor physicians, but welders do it in all positions!
Miller Dynasty 280DX
Lincoln 210 MP
Miller 625 X-Treme
Hobart Handler 150
Victor Oxygen-acetylene torch
Miller/Lincoln Big 40-SA200 hybrid
Miller Dynasty 280DX
Lincoln 210 MP
Miller 625 X-Treme
Hobart Handler 150
Victor Oxygen-acetylene torch
Miller/Lincoln Big 40-SA200 hybrid
Haha, it's not like we are designing something never seen before.AndersK wrote:Hey, have you been into my computer?
Almost as one I have started to design.
I also plan to use a mag drill.
Can rent one for about 45 euros/day.
Look forward to see it being built
I asked about renting a mag drill but they wanted 300€ per week for a crappy mag drill.
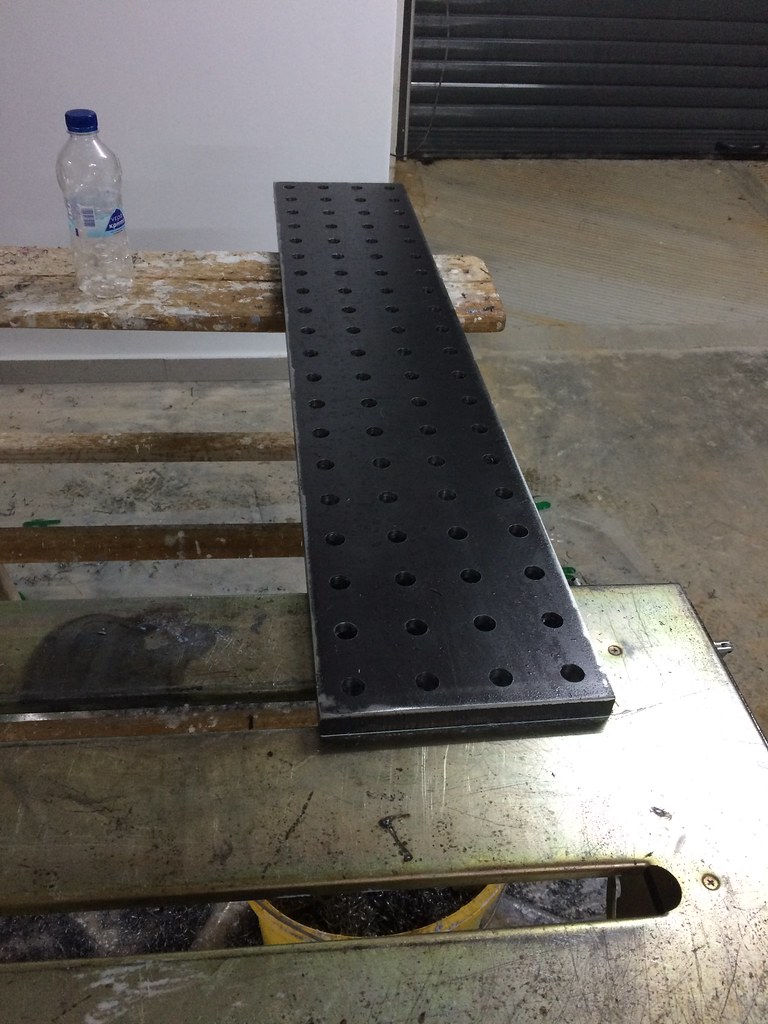
One down, seven to go I still need to countersink the holes though.
Untitled by Taz00, on Flickr
A few observations:
I have regretted the fact I did not ask for the plates to be sandblasted. I spent all morning wire brushing the plates and they still look like sh!t. At least in the future I could always have them ground if I wanted to.
The fact that the centre pin has a small amount of play, combined with the accuracy of my centre punch marks (or lack of it) has lead to a variation in hole location up to 1mm. I guess if someone wants a better accuracy he would have to have the holes opened by cnc.
- weldin mike 27
-
Weldmonger
-
Posts:
-
Joined:Fri Apr 01, 2011 10:59 pm
-
Location:Australia; Victoria
- weldin mike 27
-
Weldmonger
-
Posts:
-
Joined:Fri Apr 01, 2011 10:59 pm
-
Location:Australia; Victoria
- weldin mike 27
-
Weldmonger
-
Posts:
-
Joined:Fri Apr 01, 2011 10:59 pm
-
Location:Australia; Victoria
GreinTime
- GreinTime
-
Weldmonger
-
Posts:
-
Joined:Fri Nov 01, 2013 11:20 am
-
Location:Pittsburgh, PA
Point taken. I'd say the funniest tooling calamity I've ever seen was watching someone struggle using mag clamps to hold their aluminum work pieces together... For 20 minutes.
#oneleggedproblems
-=Sam=-
-=Sam=-
- weldin mike 27
-
Weldmonger
-
Posts:
-
Joined:Fri Apr 01, 2011 10:59 pm
-
Location:Australia; Victoria
exnailpounder
- exnailpounder
-
Weldmonger
-
Posts:
-
Joined:Thu Dec 25, 2014 9:25 am
-
Location:near Chicago
I have seen that! I had a laborer once that broke a window and I told him to clean it up. I handed him a suction cup for glass and told him it was a "glass magnet" after I showed him how it stuck to glass. Watching that poor kid pumping on that cup trying to lift that glass off the ground was pricelessGreinTime wrote:Point taken. I'd say the funniest tooling calamity I've ever seen was watching someone struggle using mag clamps to hold their aluminum work pieces together... For 20 minutes.
Ifyoucantellmewhatthissaysiwillbuyyouabeer.
Just like a bucket of prop wash and a roll of flight line eh?
We are not lawyers nor physicians, but welders do it in all positions!
Miller Dynasty 280DX
Lincoln 210 MP
Miller 625 X-Treme
Hobart Handler 150
Victor Oxygen-acetylene torch
Miller/Lincoln Big 40-SA200 hybrid
Miller Dynasty 280DX
Lincoln 210 MP
Miller 625 X-Treme
Hobart Handler 150
Victor Oxygen-acetylene torch
Miller/Lincoln Big 40-SA200 hybrid
The first slab looks excellent...would be epic to have them surface ground, and epically expensive I'd wager. Keep on truckin' and don't be too sour when you need a new bit, that's allot of steel to chew through!
I always enjoyed the black strip of paper on the lens of the hood you loan the helper who bugs you to show them "How to weld"..."How can you guys see through that?!?"
Sadly with auto-darkening hoods nowadays it doesn't work anymore...and neither do sandwich baggies of Oxy-Acetylene dropped at your buddies feet.
What are the new devil's pranks in the field now that everyone is so uptight?
Hood Time is a Good Time!
Avatar photo is from 1992, on Maui.
You guys are just mean
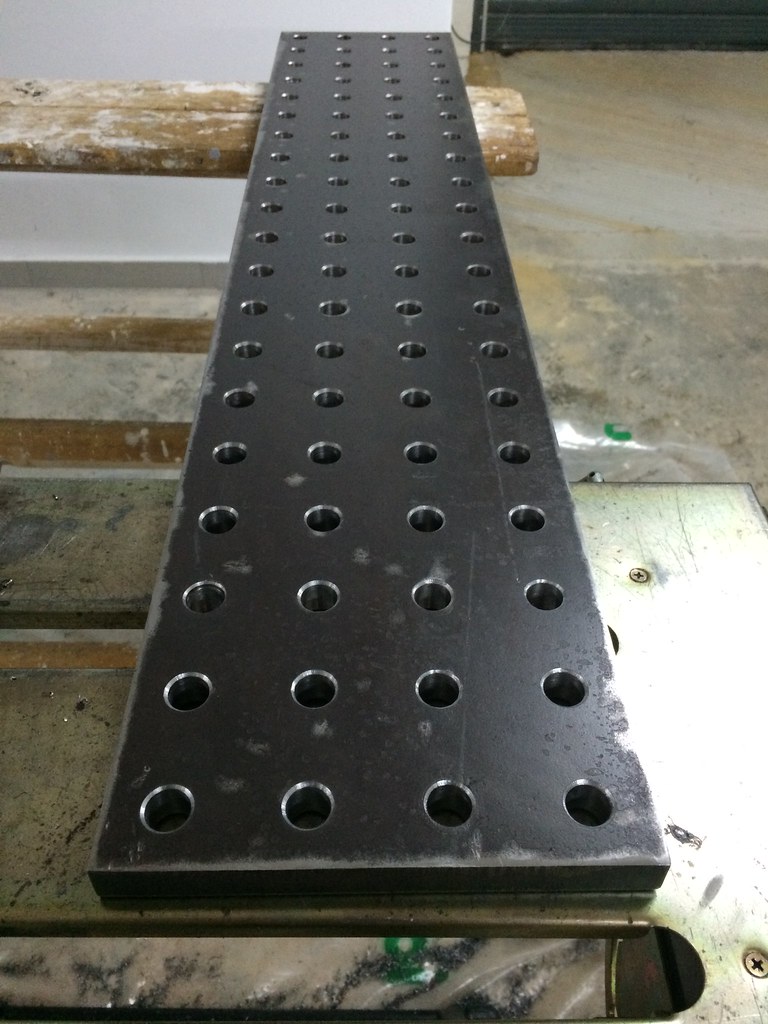
Today all I managed was to countersink the holes of the first plate (both sides) and mark the second plate.
Untitled by Taz00, on Flickr
The good news, my marking was not off as much as I thought . It turns out the steel ruler I used to check the location of my holes was not straight
Not that if it was off by 1mm would mean the end of the world, I would just live with it.
Return to “Welding Projects - Welding project Ideas - Welding project plans”
Jump to
- Introductions & How to Use the Forum
- ↳ Welcome!
- ↳ Member Introductions
- ↳ How to Use the Forum
- ↳ Moderator Applications
- Welding Discussion
- ↳ Metal Cutting
- ↳ Tig Welding - Tig Welding Aluminum - Tig Welding Techniques - Aluminum Tig Welding
- ↳ Mig and Flux Core - gas metal arc welding & flux cored arc welding
- ↳ Stick Welding/Arc Welding - Shielded Metal Arc Welding
- ↳ Welding Forum General Shop Talk
- ↳ Welding Certification - Stick/Arc Welding, Tig Welding, Mig Welding Certification tests - Welding Tests of all kinds
- ↳ Welding Projects - Welding project Ideas - Welding project plans
- ↳ Product Reviews
- ↳ Fuel Gas Heating
- Welding Tips & Tricks
- ↳ Video Discussion
- ↳ Wish List
- Announcements & Feedback
- ↳ Forum News
- ↳ Suggestions, Feedback and Support
- Welding Marketplace
- ↳ Welding Jobs - Industrial Welding Jobs - Pipe Welding Jobs - Tig Welding Jobs
- ↳ Classifieds - Buy, Sell, Trade Used Welding Equipment
- Welding Resources
- ↳ Tradeshows, Seminars and Events
- ↳ The Welding Library
- ↳ Education Opportunities