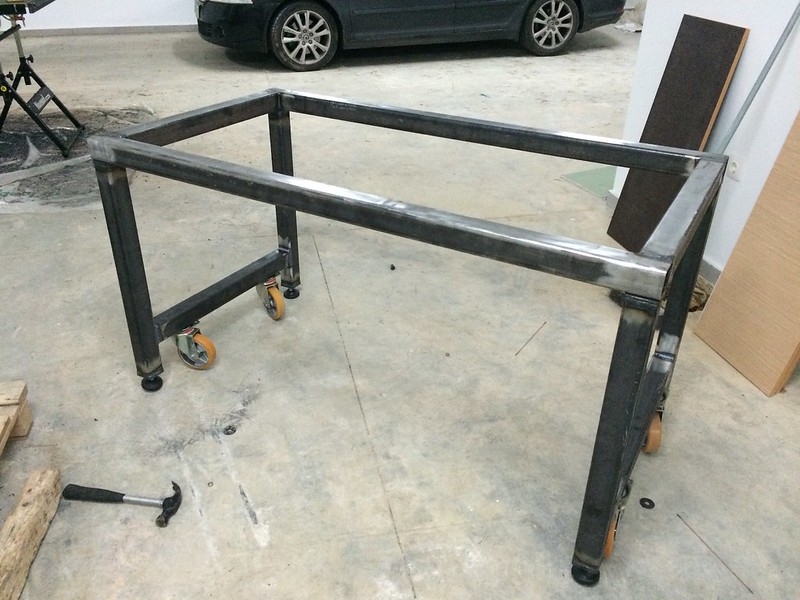
I gotta say, that sure looks nice...heck, I'd be hapy with just one section of table like that, I'm still using a Craftsman vise anchored to a folding picnic table,
I used almost all of the steel that was left from the trailers that my folk's pre-fabbed home was towed to the property on for a utility trailer. I now realize it has the most over-built frame on the highway for the 3500# axle kit I mated to it,
Should have saved some of that I-beam, but you live and learn. I sure had fun refreshing my 7018 uphill on the 10 long corner joints
P.S. Just practicing my emoticons so I can utilize all of the functions that Jody was so kind in providing us with
What welding projects are you working on? Are you proud of something you built?
How about posting some pics so other welders can get some ideas?
- weldin mike 27
-
Weldmonger
-
Posts:
-
Joined:Fri Apr 01, 2011 10:59 pm
-
Location:Australia; Victoria
No reason why you couldn't do two with holes and set the the rest of the slats to take t-nuts.
exnailpounder
- exnailpounder
-
Weldmonger
-
Posts:
-
Joined:Thu Dec 25, 2014 9:25 am
-
Location:near Chicago
And down she goes!!taz wrote:As a guy I am more attracted to holes than nuts .weldin mike 27 wrote:No reason why you couldn't do two with holes and set the the rest of the slats to take t-nuts.
Second down, five and a half to go.
Ifyoucantellmewhatthissaysiwillbuyyouabeer.
- Otto Nobedder
-
Weldmonger
-
Posts:
-
Joined:Thu Jan 06, 2011 11:40 pm
-
Location:Near New Orleans
My coworkers used to sharpen a welding rod to a point and using another welder, stab it into my stinger lead and give me an instant 200 amp boost. Probably not good for the machines but it sure can screw with your weld.Stirmind wrote:The first slab looks excellent...would be epic to have them surface ground, and epically expensive I'd wager. Keep on truckin' and don't be too sour when you need a new bit, that's allot of steel to chew through!
I always enjoyed the black strip of paper on the lens of the hood you loan the helper who bugs you to show them "How to weld"..."How can you guys see through that?!?"
Sadly with auto-darkening hoods nowadays it doesn't work anymore...and neither do sandwich baggies of Oxy-Acetylene dropped at your buddies feet.
What are the new devil's pranks in the field now that everyone is so uptight?
We are not lawyers nor physicians, but welders do it in all positions!
Miller Dynasty 280DX
Lincoln 210 MP
Miller 625 X-Treme
Hobart Handler 150
Victor Oxygen-acetylene torch
Miller/Lincoln Big 40-SA200 hybrid
Miller Dynasty 280DX
Lincoln 210 MP
Miller 625 X-Treme
Hobart Handler 150
Victor Oxygen-acetylene torch
Miller/Lincoln Big 40-SA200 hybrid
Like table
EFFORT=Reward
EFFORT=Reward
Everlast 250EX
Miller 250 syncrowave
Sharp LMV Vertical Mill
Takisawa TSL-800-D Lathe
Coupla Bandsaws,Grinders,surface grinder,tool/cutter grinder
and more stuff than I deserve(Thanks Significant Other)
Miller 250 syncrowave
Sharp LMV Vertical Mill
Takisawa TSL-800-D Lathe
Coupla Bandsaws,Grinders,surface grinder,tool/cutter grinder
and more stuff than I deserve(Thanks Significant Other)
I got to do a little work yesterday.
Four down, four to go. Amazingly I am still on the original cutter. 320 holes on 20mm steel and the thing shows no signs of wear. Of course after that comment, the cutter will most likely explode on the 321st hole
After the second slab I made a guard that goes around the cutter. This prevents chips and coolant flying in all directions.
Also I bought a countersink bit that fits in my hand drill. This made countersinking the holes A LOT FASTER .
Me tooRider wrote:I'd like to see the finished table!!
Let's see:Rider wrote:What do you think you'll have in it Money and time??
Plates = 250Euro
Square tubes = 70Euro
4pcs 125mm casters (350kg capacity each)= 85Euro
Various stuff (drill bits, countersink bits, levelling feet, flap wheels etc, screws etc) = 100Euro
Total = 505 Euros (ca. 575 USD)
I have not included the cost of the magnetic drill.
Right now it takes me 4 hours to mark, drill and countersink one slab. So let's say 40 hours just for the slabs if you count cleaning time, the fact that in the beginning it took a little more etc.
My guess is I will need another 40 hours to complete the table frame the way I want it so it can disassembled. On the other hand if I built it as one piece it would take no more than 8-10 hours.
So let's just say 80 hours total and that does not include the water tray for the plasma cutter.
It's a good thing I do not get paid on my spare time otherwise it would be more cost effective to just buy the d@mn thing
Yup, you'll have the satisfaction and pride of craftsmanship that someone who bought and assembled will never havemotox wrote:taz
anyone can go out and buy one.
can't say the same about building one
craig
Hood Time is a Good Time!
Avatar photo is from 1992, on Maui.
Today I took the day off and worked on the table frame.
I only have one more slab to drill but I got fed up with drilling holes, so I needed the change.
The top frame in done as well as the legs, I guess I need another 8-10 hours to complete the frame.
I will post some pictures when it is up and standing.
I bought some of these disks to clean the mill scale http://www.dronco.com/xist4c/web/Polish ... 17883_.htm
THEY ARE AWESOME!!!
I could not believe how fast these remove mill scale.
I saw four types on that page...did you use the 2nd one down? I tried to cut and paste the "Course Fleece Cleaning Wheels" and was also sent to the preceding page, so it isn't your link that's bad, just how they route the incoming web traffic.
Those remind me of a Norton wheel I use called "Rapid Strip" and they are awesome, especially when you are smart enough not to drive them into an edge the wrong way and tear a hunk out of them, LOL! Have you tried those, and if so are the "Dronco" products better?
http://www.nortonindustrial.com/uploade ... 281%29.pdf
Hood Time is a Good Time!
Avatar photo is from 1992, on Maui.
Yes, I got the second one.
I have not tried the Norton ones so cannot compare.
I know that 3M also has a similar product but have not tried it either.
The reason I tried the Dronco was that it was what my local hardware store could supply me in short notice.
I have not tried the Norton ones so cannot compare.
I know that 3M also has a similar product but have not tried it either.
The reason I tried the Dronco was that it was what my local hardware store could supply me in short notice.
I love supporting the local hardware store, and I go there about 2X's a week, but sadly all they supply in the way of welding and grinding comes from the "Forney" company, and they might as well be called Phony!
I'm not sure if you've ever tried that brand, but they have the "looks like it should work" department down, but I don't think they don't pay anyone else in the company, LOL! Avoid it if you can, and use caution and safety gear if you can't.
I tried talking to the manager about getting in some better products, but now that they are owned by Ace his hands are tied. So I still shop there for the things that are good, but it seems like they specialize in the cheap stuff for most departments and I have to order quality stuff online or drive an hour each way to a city.
Being that the closest city to me(Stockton, CA) also happens to be the murder and auto theft capitol of California, I usually just get things by driving my mouse. Kind of a bummer as that cycle is usually self perpetuating and we'll likely never have a quality supplier here.
Man, I'm sorry to sound so negative, I really love that you took a break from monotony and rerouted your energy into something more interesting, and I'll bet your productivity will show.
Thanks for the update, and still yearning for more photos ...Aloha, Chuck
Hood Time is a Good Time!
Avatar photo is from 1992, on Maui.
The Norton stripper discs are great, I have both the blue and orange ones.
Once tried the Norton discs you dont want to go back to Dronco. Specially not cutting discs.
Pictures from my scrap collection:
http://forum.weldingtipsandtricks.com/v ... f=9&t=5677
Taking a break from monotony was a good thing but I have become impatient and want to finish it.
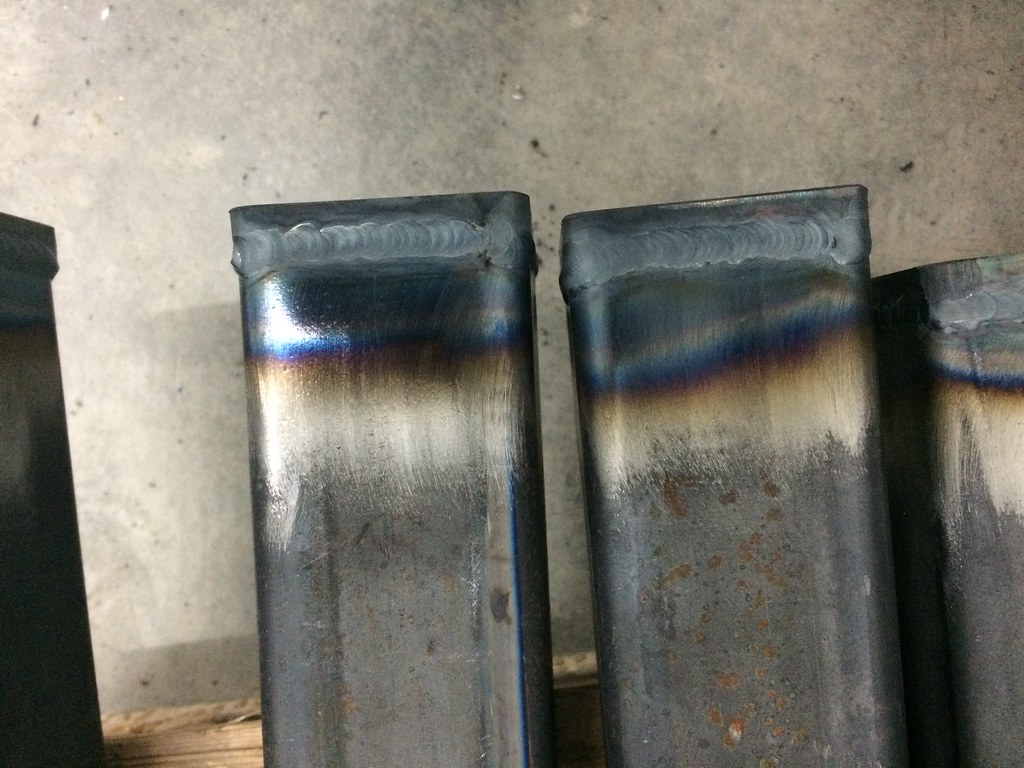
I started with the intention of laying some beautiful tig beads but in the end I set the welder at 160A put the foot pedal away and let it rip.
I will put some pics of the welds tomorrow, I am not proud of them but I got them done really fast and it's not like anyone will see them on the finished product.
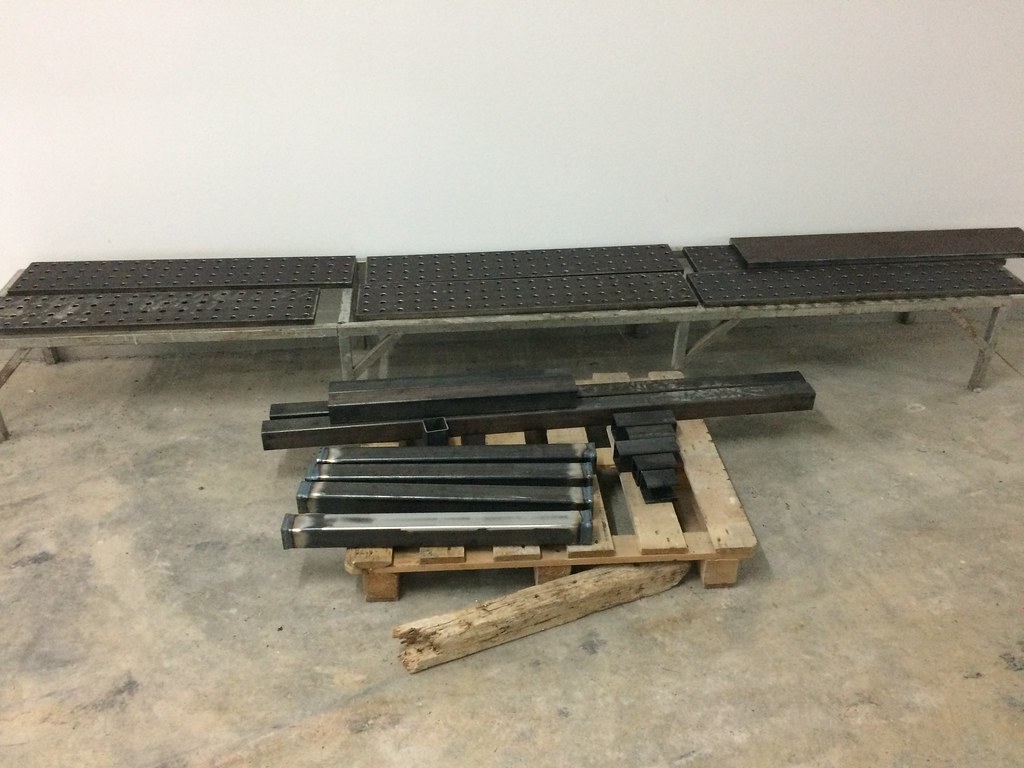
Slats and legs almost finished
Welding table by Taz00, on Flickr
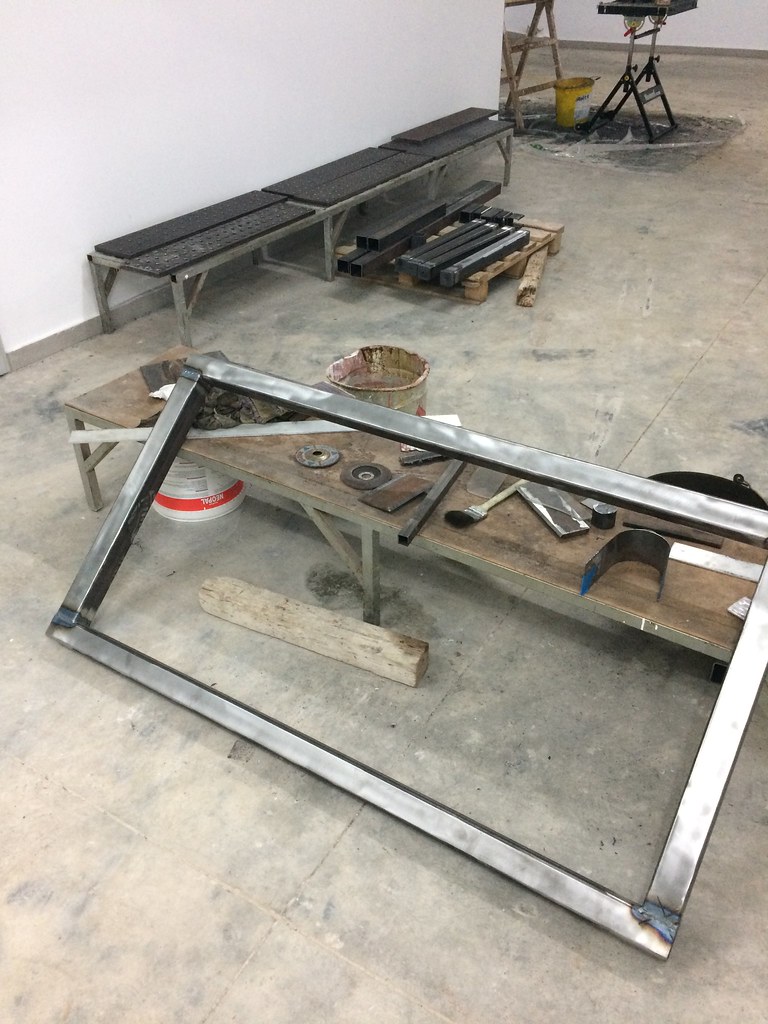
Top frame almost finished
Welding table by Taz00, on Flickr
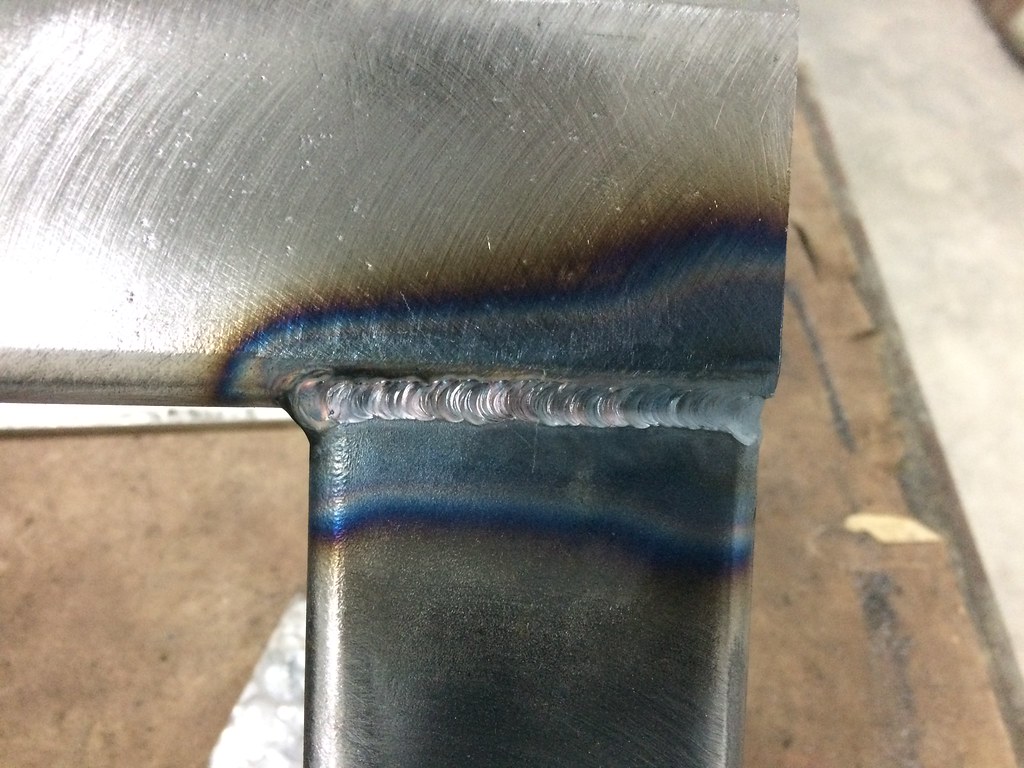
Some pics of the welds as I said I want to finish the table so went for speed before quality
Welding table by Taz00, on Flickr
The last weld is below flush on purpose, I wanted to keep filler to a minimum since it would interfere with the slats.
Even that way I had some problems with distortion since I do not have a big welding table to build my big welding table .
I had to cut and reweld 1-2 welds to straighten the top frame.
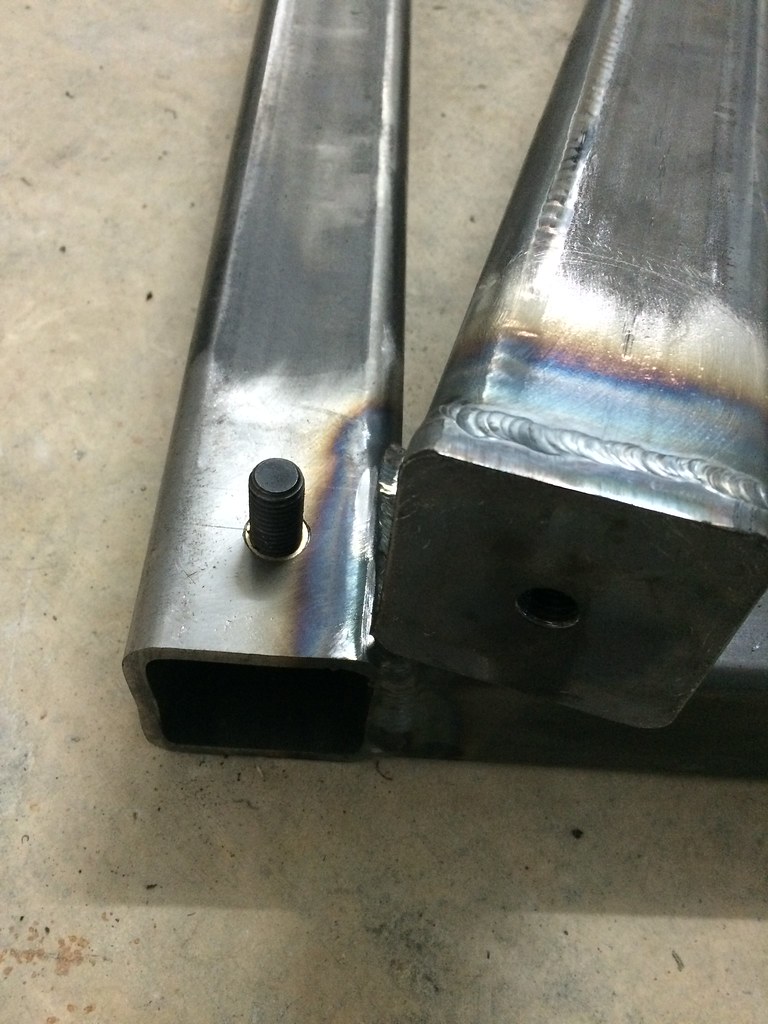
The legs have a 10mm plate welded on top and bottom with a 12mm threaded hole each.
The bottom will be used for the levelling feet and the top to attach the legs to the top frame.
Welding table by Taz00, on Flickr
Top frame almost finished
Welding table by Taz00, on Flickr
Some pics of the welds as I said I want to finish the table so went for speed before quality
Welding table by Taz00, on Flickr
The last weld is below flush on purpose, I wanted to keep filler to a minimum since it would interfere with the slats.
Even that way I had some problems with distortion since I do not have a big welding table to build my big welding table .
I had to cut and reweld 1-2 welds to straighten the top frame.
The legs have a 10mm plate welded on top and bottom with a 12mm threaded hole each.
The bottom will be used for the levelling feet and the top to attach the legs to the top frame.
- Otto Nobedder
-
Weldmonger
-
Posts:
-
Joined:Thu Jan 06, 2011 11:40 pm
-
Location:Near New Orleans
Taz,
I have to disagree about your description, "speed before quality."
They look fine to me.
I'd call it, "speed before cosmetics."
Different animal...
Steve S
I have to disagree about your description, "speed before quality."
They look fine to me.
I'd call it, "speed before cosmetics."
Different animal...
Steve S
taz
by the time you finish they build you will be a mater at
boring and welding 2" stretches.
i really like your work.
craig
by the time you finish they build you will be a mater at
boring and welding 2" stretches.
i really like your work.
craig
htp invertig 221
syncrowave 250
miller 140 mig
hypertherm plasma
morse 14 metal devil
syncrowave 250
miller 140 mig
hypertherm plasma
morse 14 metal devil
Thank you, I really appreciate it.
Today I managed to put in 4 hours after work.
Here is the frame in its current status.
Welding table by Taz00, on Flickr
It looks almost finished but there is still a lot of work to do.
A small detail. The hole that the 12mm bolt that attaches the top frame to the legs passes through is 14mm. In order to keep it exactly centered during welding the cross braces, I made 2 small brass bushings. These were removed after welding and the threaded holes are now perfectly aligned to the holes on the top of the table for easy assembly/disassembly.
Welding table by Taz00, on Flickr
Return to “Welding Projects - Welding project Ideas - Welding project plans”
Jump to
- Introductions & How to Use the Forum
- ↳ Welcome!
- ↳ Member Introductions
- ↳ How to Use the Forum
- ↳ Moderator Applications
- Welding Discussion
- ↳ Metal Cutting
- ↳ Tig Welding - Tig Welding Aluminum - Tig Welding Techniques - Aluminum Tig Welding
- ↳ Mig and Flux Core - gas metal arc welding & flux cored arc welding
- ↳ Stick Welding/Arc Welding - Shielded Metal Arc Welding
- ↳ Welding Forum General Shop Talk
- ↳ Welding Certification - Stick/Arc Welding, Tig Welding, Mig Welding Certification tests - Welding Tests of all kinds
- ↳ Welding Projects - Welding project Ideas - Welding project plans
- ↳ Product Reviews
- ↳ Fuel Gas Heating
- Welding Tips & Tricks
- ↳ Video Discussion
- ↳ Wish List
- Announcements & Feedback
- ↳ Forum News
- ↳ Suggestions, Feedback and Support
- Welding Marketplace
- ↳ Welding Jobs - Industrial Welding Jobs - Pipe Welding Jobs - Tig Welding Jobs
- ↳ Classifieds - Buy, Sell, Trade Used Welding Equipment
- Welding Resources
- ↳ Tradeshows, Seminars and Events
- ↳ The Welding Library
- ↳ Education Opportunities