"Off-road only"...
Where are these EVER going to be street legal? India?
Are you really planning a street-legal lighting scheme?
Tell your tire supplier to shut the hell up and sell you what you want to buy!
What welding projects are you working on? Are you proud of something you built?
How about posting some pics so other welders can get some ideas?
How about posting some pics so other welders can get some ideas?

- Otto Nobedder
-
Weldmonger

-
Posts:
-
Joined:Thu Jan 06, 2011 11:40 pm
-
Location:Near New Orleans
I should have! The width was not as important as the height. I really didn't want those teeny tires. Actually, he didn't have those other ones. I would have to buy them from Azusa and they're overpriced. I can get them from e-bay, but, shipping is expensive. Anyway, these will do, for now.
Ya know, after this, I layout for the engine. Then comes the hard part. Pricing!
Ya know, after this, I layout for the engine. Then comes the hard part. Pricing!
- Otto Nobedder
-
Weldmonger
-
Posts:
-
Joined:Thu Jan 06, 2011 11:40 pm
-
Location:Near New Orleans
You've taken it all in stride, so far.
I'm sure you'll work out pricing, as well. If you can sell them at prototype+profit, you'll only make more money as you streamline material/part sourcing, and reduce your own build time.
Steve S
I'm sure you'll work out pricing, as well. If you can sell them at prototype+profit, you'll only make more money as you streamline material/part sourcing, and reduce your own build time.
Steve S
delraydella
- delraydella
-
Weldmonger
-
Posts:
-
Joined:Mon Apr 25, 2011 7:35 pm
-
Location:Detroit, MI
Steve is right, tell your suppliers to STFU and give you what you want.
Have you ever considered getting a tax licence and buying parts wholesale? It can save quite a bit up front.
Have you ever considered getting a tax licence and buying parts wholesale? It can save quite a bit up front.
Welding☞Syncrowave 250,Millermatic 252,30a Spoolgun Cutting☞12" Hi-speed Cutoff Saw, 9x 12 Horizontal Bandsaw Milling☞Gorton 8d Vertical Mill Turning☞Monarch EE Precision Lathe Grinding ☞Brown & Sharpe #5 Surface Grinder
The first thing I'm gonna do, is a complete parts list. Then figure out how long it took to do one. Actually it took less than 40 hours to do one mini bike. According to the receipts, the parts were about $500. If I sell the bike for $1,750.00, @ 40 hours, that's about $31.50/hour. If I make 10 bikes and sell then for the same price, the profit goes up, tremendously. If I arrange my time effectively, I could make 10 bikes about the same or a little over 40 hours. Here's the thing. The bike is worth a lot more. Rivello is selling his bikes for alot more. True, that his parts are professionally made and has a web site. A web site would be a good idea. I may consider some of the parts made by others if the price is right. I would save alot on acetylene and oxygen if I didn't have to fill the tanks every three days. But, as I get close to that time, I will have a finished product to show. Like I mentioned before, a Taco 44 sold on e-bay for $1700 in heart beat. Something to think about.
- Otto Nobedder
-
Weldmonger
-
Posts:
-
Joined:Thu Jan 06, 2011 11:40 pm
-
Location:Near New Orleans
I've considered getting a plasma cutter. They're great for cutting and leave no drag lines. However, they cost alot. If I get a lot of orders, I will greatly consider buying one.
So, I went to R & R paint and spoke to Rich and he said they make a one step urethane that won't dissolve if you spill gas on it. They call it Emron. And I think they make it in gloss black. Anyway, he also said that he knows alot of forums, like this one, that there are alot of mini bike enthusiasts that buy and sell them. So, there doesn't seem to be a shortage of avenues for sales.
BTW, I got my HF coupon booklet and they had the welding helmet for 39 bucks. I went and got it. Man, it works great! I was laying down some primo welds. I have a small welding job to do in the morning, but, in the afternoon I should finish the front fork. I'll take some photos. Rich, at the paint store, was really interested in this mini bike. I shouldn't have too much trouble selling these bike, if I get all my ducks lined up .

You're talking about Imron. A paint widely used in the marine industry to paint boat hulls. Yes it's a tough hard finish, tack coat flashes off fairly fast to be ready for the wet coat but at a very high price. Well over $100 a can, 3-500 for a good gun to shoot it with and READ the MSDS! You need an air supplied respirator and full body suit. This stuff does extreme damage to the central nervous system (both inhaled and contact) you don't want. I had a friend that use to use it painting Corvettes because of the deep wet look he could create. He now lives in a nursing home and has NO idea where he is or what year it is let alone what day...point is, there are two part epoxies that are just as tough, look every bit as good and don't require the big bucks for high quality guns and PPE.CraigLam wrote:... one step urethane that won't dissolve if you spill gas on it. They call it Emron...
Just my two cents worth.
Go break something, then you can weld it back the right way.

- Otto Nobedder
-
Weldmonger
-
Posts:
-
Joined:Thu Jan 06, 2011 11:40 pm
-
Location:Near New Orleans
I built a paint booth in St. Louis (In the city... not the 'burbs) to spray Imron. I had to go through five layers of permitting just to get the plans approved. Imron is a cyanoacrylate... basically "Crazy Glue".
I'd talk to Jones-Blair about their two-part epoxy systems.
Steve S
I'd talk to Jones-Blair about their two-part epoxy systems.
Steve S
Imron and Awlgrip are great LPU paints. Ask anyone who has ever had to sand it. It is dangerous as has been noted. We used to use it on aluminum but now we find it more cost effective to get things powder coated instead, especially when considering primer as well as paint.
Miller ABP 330, Syncrowave 250, Dynasty 300 DX.
Honorary member of the Fraternity of Faded Tee Shirts.
Honorary member of the Fraternity of Faded Tee Shirts.
The advice is greatly appreciated. It looks like I'll have to give this more thought. Smith Paint is up the street from me, so, I'll head up there tomorrow and explain what I need. A two part epoxy that won't dissolve when gas spills on it.
So, my friend, Leo, calls me and asks me if my welder is portable. I said it's kind heavy, but, I can lift it, why? I need someone to re-weld the motor mount bracket on my drill press. After I welded it, which came out great BTW, he asked if I could use a generator. A GENERATOR! Someone gave him a generator that the motor runs, but, no juice coming from the outlets. It took me about a half a second to say yes. I called a friend of mine that owns Tool Works and he said it's probably a fuse and not the VR. When the voltage reg. goes out and the voltage spikes. He said he would look at it for free and let me know. It's an All-Power. 6.5HP, 25A/120V and 12.5A/240V. 3500W. Starts on the first pull!
Welding pays pretty good.
- Otto Nobedder
-
Weldmonger
-
Posts:
-
Joined:Thu Jan 06, 2011 11:40 pm
-
Location:Near New Orleans
delraydella
- delraydella
-
Weldmonger
-
Posts:
-
Joined:Mon Apr 25, 2011 7:35 pm
-
Location:Detroit, MI
That's a good trade!
There are water and acrylic based 2 part epoxy paints out there now also. They usually have pretty long pot lives and are very easy to clean up after. A lot less toxic, too. We've used some very durable ones on a lot of museum work. I can't think of the brand names right now, but I'll look when I go back in on monday.
I know one of them had a gloss clear coat that was impervious to oil and gas.
Welding☞Syncrowave 250,Millermatic 252,30a Spoolgun Cutting☞12" Hi-speed Cutoff Saw, 9x 12 Horizontal Bandsaw Milling☞Gorton 8d Vertical Mill Turning☞Monarch EE Precision Lathe Grinding ☞Brown & Sharpe #5 Surface Grinder
Here's an extreme duty powder coat. It's a base color coat with a clear atop that if I recall correctly. It's made for the marine/corrosive environment. The best thing about it is that it hides sanding scratches and other imperfections. We get the parts sandblasted by the same outfit. There is a choice of having it chemically prepared or blasted. I like a well keyed surface so I opt for blasting because I think it holds better. We used to use Imron before this. Don't know how practical it would be for your application, but the price goes down the more parts we have done at a time. There is also different textures such as hammered or wrinkle, matte etc.

Miller ABP 330, Syncrowave 250, Dynasty 300 DX.
Honorary member of the Fraternity of Faded Tee Shirts.
Honorary member of the Fraternity of Faded Tee Shirts.
It's Saturday morning and I'm headed out soon. I'm taking the generator to Tool Works to see if Manny can help and Smith Paint is literally around the corner. Anyway, I'll be in the shop today and I'm gonna take some photos of the front fork assembly. Actually, I could start to paint the bike now. I'm gonna use a flap sander to smooth everything out first.
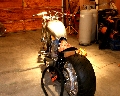
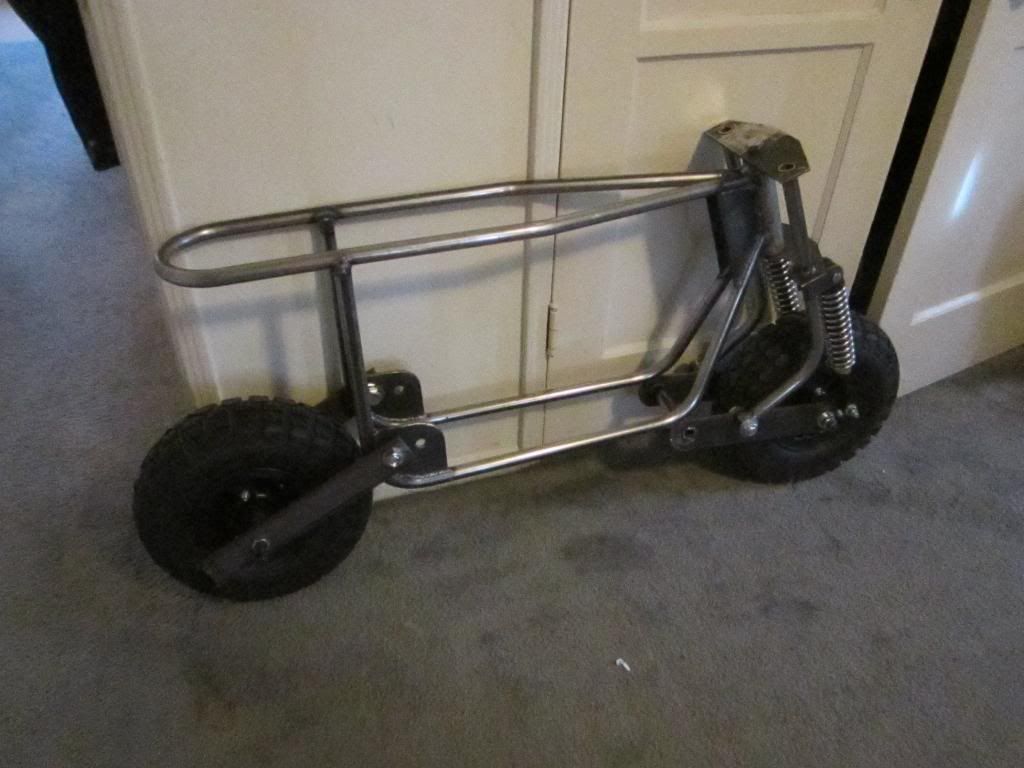
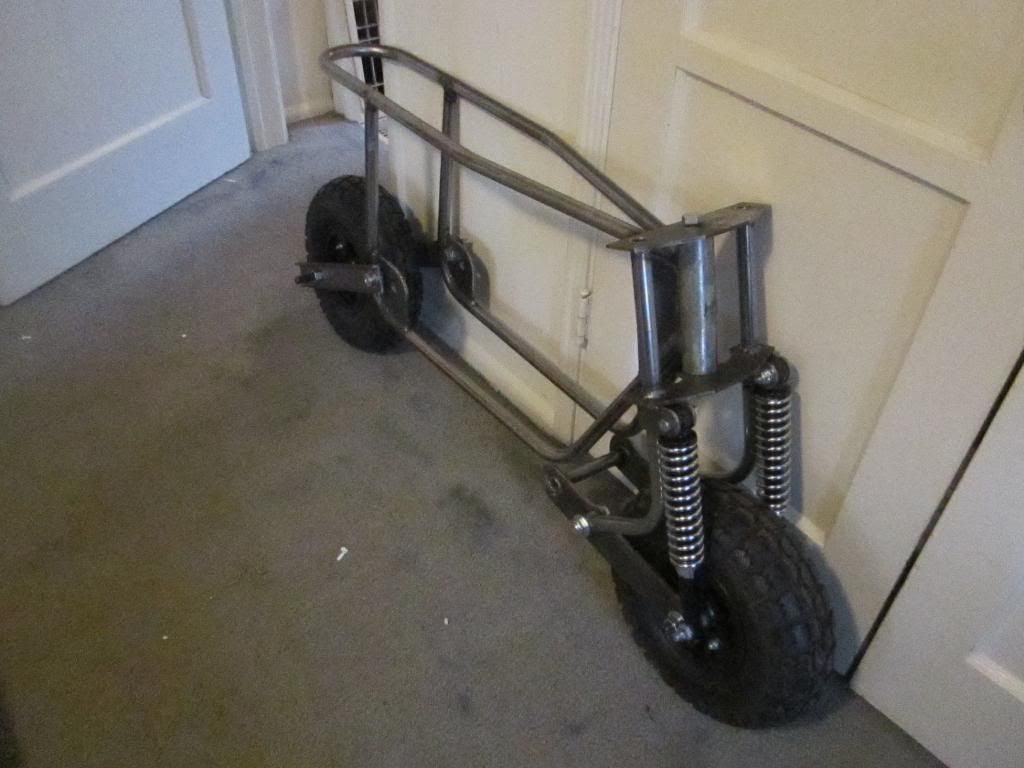
I just came in from the garage and I thought I'd share some photos.
The back of the swing arm brackets look like they are a little too close. They're not. However, I'm gonna cut away a little cove so that it should clear easily. A lot of little adjustments before she's ready to dis-assemble. There in lies the real work. I have to make a list of every nut and bolt and the cost so as to get an accurate count of all parts of this bike. That will actually give me the true cost of the bike. Next, the rear fork assembly. Also the support brackets that hold the bike together. That's an easy part.
The back of the swing arm brackets look like they are a little too close. They're not. However, I'm gonna cut away a little cove so that it should clear easily. A lot of little adjustments before she's ready to dis-assemble. There in lies the real work. I have to make a list of every nut and bolt and the cost so as to get an accurate count of all parts of this bike. That will actually give me the true cost of the bike. Next, the rear fork assembly. Also the support brackets that hold the bike together. That's an easy part.
- Otto Nobedder
-
Weldmonger
-
Posts:
-
Joined:Thu Jan 06, 2011 11:40 pm
-
Location:Near New Orleans
Ultralow787
- Ultralow787
-
Guide

-
Posts:
-
Joined:Fri Apr 29, 2011 11:30 pm
-
Location:Ontario, Canada
Way to go! That is looking real nice!
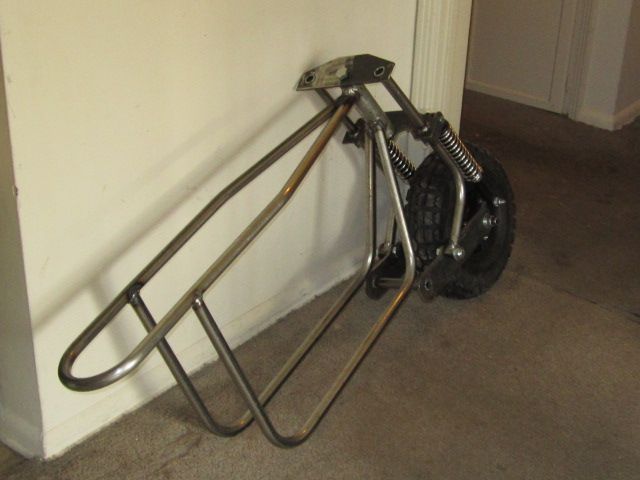
I like that suspension system on the front.
What I admire the most, is that you had an idea and a plan...and now you are making it happen! I envy you on that! I have a couple of ideas of projects in my head, but unfortunately, they are resting there! You sir, are an inspiration!
I like that suspension system on the front.
What I admire the most, is that you had an idea and a plan...and now you are making it happen! I envy you on that! I have a couple of ideas of projects in my head, but unfortunately, they are resting there! You sir, are an inspiration!
Perfection is impossible, but if you strive for perfection, excellence is obtainable!
1983 Canox "Sparkler" 225 AC Stick Welder
Hobart 210 MVP MIG Welder
Harris "Spitfire" Oxy-Acetylene Set
1983 Canox "Sparkler" 225 AC Stick Welder
Hobart 210 MVP MIG Welder
Harris "Spitfire" Oxy-Acetylene Set
Ultralow787
- Ultralow787
-
Guide
-
Posts:
-
Joined:Fri Apr 29, 2011 11:30 pm
-
Location:Ontario, Canada
Of course in fairness to myself, I am also frozen up to my arse in snow and ice this time of year. Now if I was in sunny and warm California......lookout! lol. At least that is my story and I'm sticking to it!
Perfection is impossible, but if you strive for perfection, excellence is obtainable!
1983 Canox "Sparkler" 225 AC Stick Welder
Hobart 210 MVP MIG Welder
Harris "Spitfire" Oxy-Acetylene Set
1983 Canox "Sparkler" 225 AC Stick Welder
Hobart 210 MVP MIG Welder
Harris "Spitfire" Oxy-Acetylene Set
Ultralow, thanks for the kind words. Ever since I was a kid, I knew people who started projects and never finished them. As a semi-retired contractor/cabinet maker, I got alot of work from other contractors who didn't finish their work. There is something to be said for a job not only well done, but, seen to completion. Thanks again for the kind words. Estimated time of completion - about the end of April.
I'm at a point now, where I've ordered the sprocket, jack shaft, and brakes. I have to find a place here where I can get handle bars. A few adjustments. I have to cut and re-weld the back part of the front fork. It sticks out to far and hits the frame. I'm going to re-position the rear forks so they're not so angled. I want them a little more level.
Then comes the hard part. I have to list every single nut, bolt and part with a price. Then calculate the number of hours and then estimate the cost of what this mini bike would sell for.
We're almost there.
Then comes the hard part. I have to list every single nut, bolt and part with a price. Then calculate the number of hours and then estimate the cost of what this mini bike would sell for.
We're almost there.
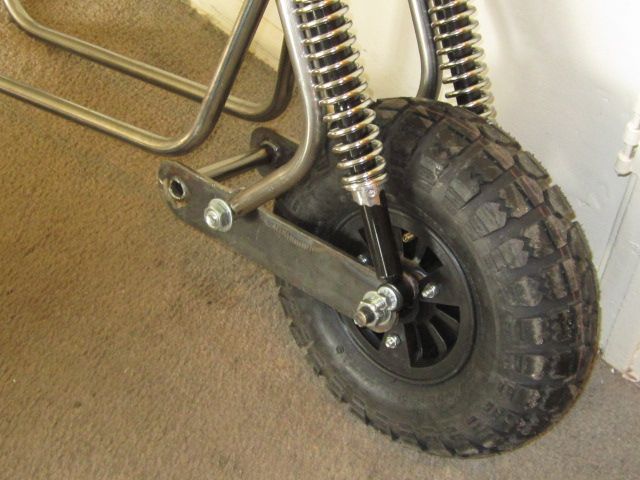
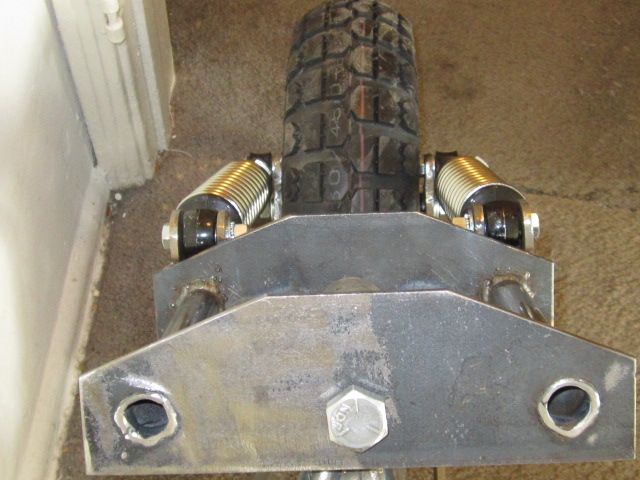
I was in the shop most of the day, an worked mostly on the rear fork assembly. I welded the tabs on the forks for the rear shocks and tomorrow will weld the tabs for the upper part of the shock to the frame. I'll take some photos. I also made a rear axle adjuster. It came out kind cool. I took a barrel nut and welded it just in front of the axle and put a bolt in it. When you tighten it, it pushes the axle back to tighten the chain. I'll post some photos of that, too. I'm starting a list of parts, metal, and material supplies(argon, wire, etc.). There's a lot of parts on this bike. I have to figure out price and then each metal part will have a drawing.
Sounds like you're on a roll, (sorryCraigLam wrote: I took a barrel nut and welded it just in front of the axle and put a bolt in it. When you tighten it, it pushes the axle back to tighten the chain.
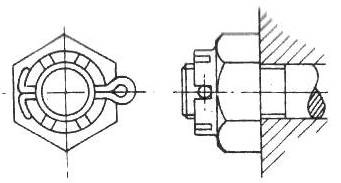
Something else I noticed in your above picture of the rear swing arm is the use of a standard hex nut on the axle. Because of the rotation the right side nut can have a tendency to come loose. You might want to think about using a slotted castle nut and pin them through the axle.
Go break something, then you can weld it back the right way.
Return to “Welding Projects - Welding project Ideas - Welding project plans”
Jump to
- Introductions & How to Use the Forum
- ↳ Welcome!
- ↳ Member Introductions
- ↳ How to Use the Forum
- ↳ Moderator Applications
- Welding Discussion
- ↳ Metal Cutting
- ↳ Tig Welding - Tig Welding Aluminum - Tig Welding Techniques - Aluminum Tig Welding
- ↳ Mig and Flux Core - gas metal arc welding & flux cored arc welding
- ↳ Stick Welding/Arc Welding - Shielded Metal Arc Welding
- ↳ Welding Forum General Shop Talk
- ↳ Welding Certification - Stick/Arc Welding, Tig Welding, Mig Welding Certification tests - Welding Tests of all kinds
- ↳ Welding Projects - Welding project Ideas - Welding project plans
- ↳ Product Reviews
- ↳ Fuel Gas Heating
- Welding Tips & Tricks
- ↳ Video Discussion
- ↳ Wish List
- Announcements & Feedback
- ↳ Forum News
- ↳ Suggestions, Feedback and Support
- Welding Marketplace
- ↳ Welding Jobs - Industrial Welding Jobs - Pipe Welding Jobs - Tig Welding Jobs
- ↳ Classifieds - Buy, Sell, Trade Used Welding Equipment
- Welding Resources
- ↳ Tradeshows, Seminars and Events
- ↳ The Welding Library
- ↳ Education Opportunities