What welding projects are you working on? Are you proud of something you built?
How about posting some pics so other welders can get some ideas?
TamJeff
  • Posts:
  • Joined:
    Tue Dec 04, 2012 4:46 am

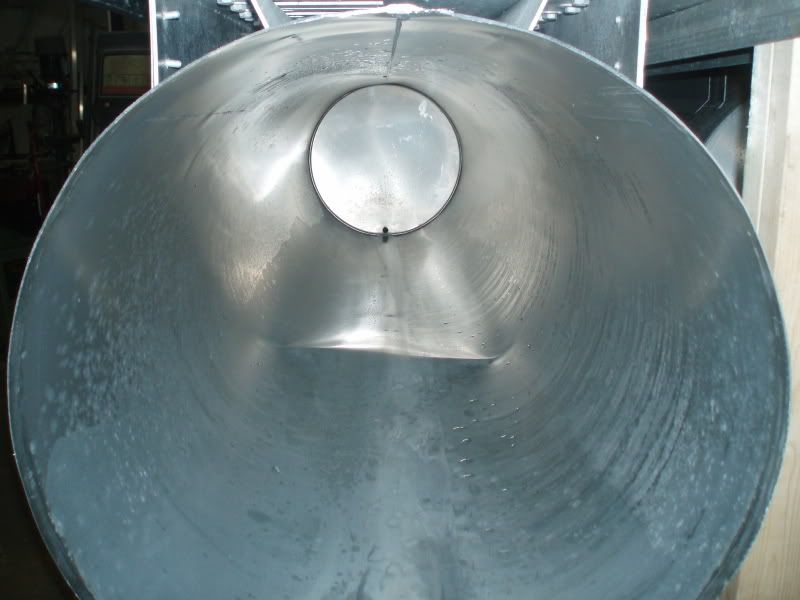
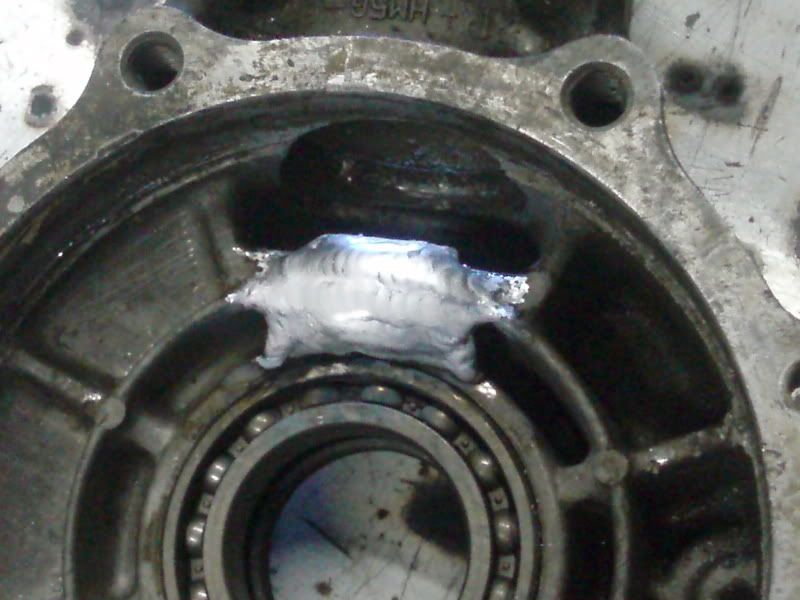
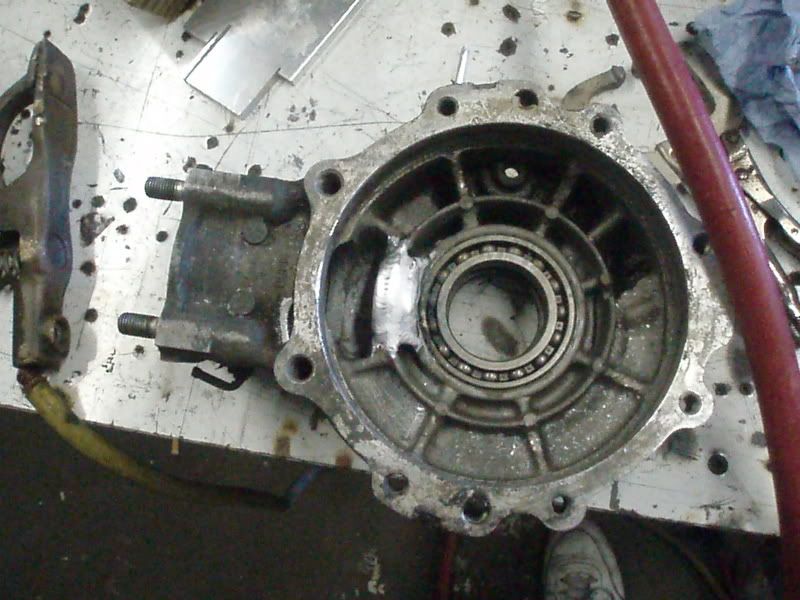
Tricky with respect that it has been filled with hypoid it's entire life. This typically involves cooking the oil out of the cast, tinning the area to be welded until all of the contaminate is brought to the surface and then ground back to new, fresh aluminum. This is a differential to a 4 wheeler that someone restored. The pilot bushing hole for the drive shaft pinion was worn through. He ordered another used differential and it had the exact same problem, perhaps even worse. Typically with cast, at least from my experience, you want to leave as much buildup as you can without being ridiculous. I ended up building this up larger and with tying it into surrounding structural webbing. Ring gear still clears well at any rate. I left the old bearing in there to help hold the shape and to keep from burning thru to the bearing cavity. It was still a nice fit with the new bearing being 'nearly' a press fit like you would expect in this situation.

Image

Some precision air saw machining :D
Image

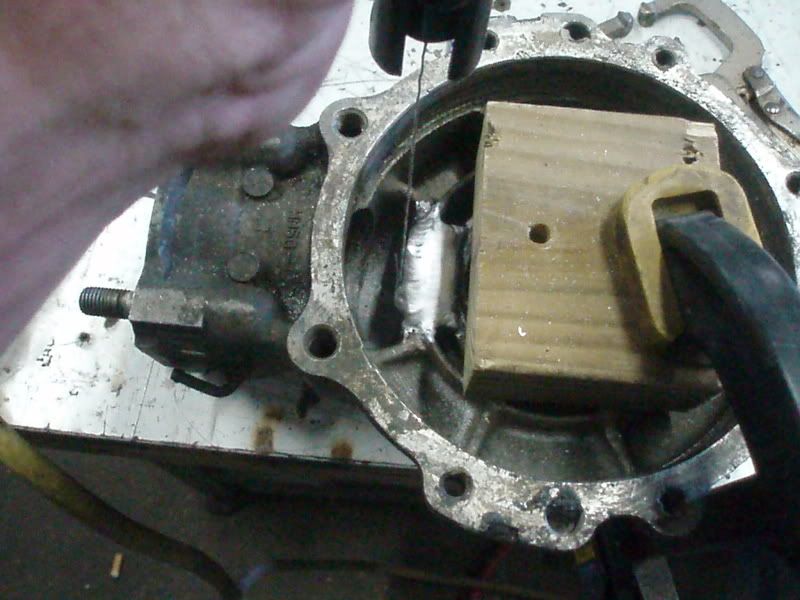
A little file work and it's good to go.
Image

It appears as if the little spider legs I have coming off the weld are not fused, but anyone who has ever welded contaminated cast, or even new cast for that matter, can attest that you could chase these end points indefinitely. Either a little cold overlap, pit or undercut. AC The other option would be to terminate it with a die grinder, but that just looks more 'patchy' than it is already. As long as "we" know it's done. This is almost always one of those, "It looks good, leave it alone" situations.

250 Syncrowave,175 amps, 1/8" tungsten, 5356 filler, hi-frequency set at 100, manually pulsed.
Miller ABP 330, Syncrowave 250, Dynasty 300 DX.
Honorary member of the Fraternity of Faded Tee Shirts.
User avatar
  • Posts:
  • Joined:
    Thu Jan 06, 2011 11:40 pm
  • Location:
    Near New Orleans

Leaving the old bearing in place was absolutely the right choice.

The harder material with the lower expansion rate forced the aluminum to retain it's designed shape.

This beat the hell out of allowing the bearing seat to shrink, then machining to design size.

I have a rare gift in cases like this; I have access to liquid nitrogen. I can heat the casting, and shrink the bearing, and simply drop one into the other. :D
TamJeff
  • Posts:
  • Joined:
    Tue Dec 04, 2012 4:46 am

I don't know the protocol here for posting too many projects. I see my name a lot around this forum and not a whole lot else in the projects section day to day. I see a lot of questions or problems revolving around cast aluminum elsewhere on the net so figured to post some here. I try to steer away from forums that have a host of armchair experts. What drew me to this one is, a video I saw of WT&T where he referred to "fusion welding." I have called filler free welding that for years, as has just about everyone else I have known that actually has to do it. But show up on the internet with such terminology and people that have zero examples of their own work, are the first to jump in with a correction. I have been corrected quite a few times actually, one by, of all people, a self proclaimed welding inspector. I say "self proclaimed" because that's all I had to go on was his word. No job site photos, nada. More like a drone spawned off from a welding dictionary.

At any rate, if I post too many. . .just sound off, or bump me down the list with projects of your own. I don't want to be a bandwidth hog. It would be nice to see this portion of the forum busy with topics. I like looking at everyone's work no matter what it is. I can't count the times I have found answers to my own questions searching archives on other forums, including some that I hadn't thought to ask yet.

I don't think I am an extraordinary welder by a long shot. I just love this stuff is all.

In my short time here, I have already seen answers to my posts by people of experience and ideas I would be familiar with, such as your cold vs heat scenario mentioned above. I could see myself doing something just like that.
Miller ABP 330, Syncrowave 250, Dynasty 300 DX.
Honorary member of the Fraternity of Faded Tee Shirts.
TamJeff
  • Posts:
  • Joined:
    Tue Dec 04, 2012 4:46 am

Ok, here's a good one. I say it's good. It's one of those McGyver things.

A pontoon boat that the owner bent the tube on either his trailer or his boat lift. I don't recall. My partner, the guy with all the (eyeroll) ideas. . . has it figured that "I" should crawl up into this tube with a 3lb sledge and 'pound' this out. I admit I may look a little slow but even I know not to crawl into a bell and ring it from the inside. Can you imagine what that would be like inside this thing, even with ear protection?
Image
Image

This thread is centered around a 4 wheeler part rebuild. Well, just so happens that the same 4 wheeler had extra wheels and tires. The old cinch strap around the middle of the tire trick to shrink it a bit.
Image

No hammers or eardrums were harmed with making these photos. Added a bulkhead where the damage was after getting it most of the way out.
Image
Miller ABP 330, Syncrowave 250, Dynasty 300 DX.
Honorary member of the Fraternity of Faded Tee Shirts.
User avatar
  • Posts:
  • Joined:
    Thu Jan 06, 2011 11:40 pm
  • Location:
    Near New Orleans

Pictures of your work are always welcome here. I wish this forum were more active, but at the same time, the slow pace keeps the trolls from attacking us.
User avatar
  • Posts:
  • Joined:
    Fri Apr 01, 2011 10:59 pm
  • Location:
    Australia; Victoria

Hey there,

Sometimes i think im in danger of becoming an arm chair expert, simply because i get little variety in my work. I sometimes post a reply, thinking im on the money, and the next response blows it completely out of the water. I hope to post some pics of a job i started at home a while back. Getting it going after it stalled.
By the ways, I love all the variety and differnt posters on here. And that tyre to push the dent out..... genius. Mick
TamJeff
  • Posts:
  • Joined:
    Tue Dec 04, 2012 4:46 am

Hammering metal takes a lot of skill with knowing how to shrink it properly. Attacking something like this with a hammer would have disfigured it to something quite ugly being it was creased. It was one of those, 'hey, that tire over there looks like it will fit.' Otherwise, I would have likely had to make a die to work with a bottle jack. It was neat watching the dent slowly getting pushed out as I massaged the exterior with a mallet. Then the dent just suddenly popped out and didn't try to oil can afterward. The hardest part, believe it or not, was getting the end cap back on. Not welded, but fit back into the hole and it's a male/female arrangement of sorts, even with lifting the boat off of the trailer. I ended up flaring it ever so slightly with dollies and a hammer, getting the cap back in and then seating the flare back to the cap. The shrinking of the weld pulled the rest of it down nicely. Then everything is pressure tested to about 3-5 lbs psi.

I don't see folks on this board telling people they are doing it wrong. I see different ideas of approach, typically all good ones, but nothing ultimately condemning to the point of ridicule. If we could get all of us under one roof with the varying types of expertise, that would be one hell of a welding shop.
Miller ABP 330, Syncrowave 250, Dynasty 300 DX.
Honorary member of the Fraternity of Faded Tee Shirts.
User avatar
  • Posts:
  • Joined:
    Fri Apr 01, 2011 10:59 pm
  • Location:
    Australia; Victoria

Hey,

true. I to have never seen any ridicule i only meant that other people with more experience give a more accurate answer than my, uh, i think this might be it, ummm. Anyway. I'll bring the rum to the new shop. Merry Christmas everyone.

Mick
TamJeff
  • Posts:
  • Joined:
    Tue Dec 04, 2012 4:46 am

I went to welding school with my ex-wife. She wasn't my ex then. Now to have someone that truly doesn't know tell you a better way, each and every day. . .I think I have been there in triplicate. Anything outside of that is like water off a ducks back these days. Call it. . ."conditioning". :D

When I graduated welding school, my instructor gave me my certificate. . .and a sympathy card. lol
Miller ABP 330, Syncrowave 250, Dynasty 300 DX.
Honorary member of the Fraternity of Faded Tee Shirts.
User avatar
  • Posts:
  • Joined:
    Thu Jan 06, 2011 11:40 pm
  • Location:
    Near New Orleans

In reply to part of an earlier post,

I've always called it "fusion welding", too. There is a nifty $5 word for it, but few people beyond instructors seem to recognize it... "autogenous welding".

It's a cumbersome word, and not worth the $5.

;)
User avatar
  • Posts:
  • Joined:
    Thu Jan 06, 2011 11:40 pm
  • Location:
    Near New Orleans

I've used the air-pressure ting to get dents out of fuel tanks (though obviously not with a tire. That was good thinking for your purpose).

I didn't acually use air, as these were gasoline tanks; I used 75/25, purged the tank with it, sealed the filler neck with a plumber's test-ball, and pressured the tank until it began to bulge a bit (about 3-4 psi, if I recall), then began working the edges of the dent with a small body hammer. (It didn't have to be pretty, it was interfering with the pickup and guage float). There was a crease fore and aft, and I worked from the center toward each crease, raising the dent a bit at a time, until suddenly it oil-canned out at me. I worked it a bit longer hoping to lock the metal into this position, and it held.

Not perfect, but it served the purpose.

Steve S
TamJeff
  • Posts:
  • Joined:
    Tue Dec 04, 2012 4:46 am

That's a good approach, even if just incase it might work before moving on to more drastic and irreversible measures. I really had nothing to lose, even if I had beat it out and it was somewhat ugly because his option was to replace the tube. The owner was actually surprised that it came out as good as it did and he paid me a bonus on the side. Figure I saved him a couple grand at least.
Miller ABP 330, Syncrowave 250, Dynasty 300 DX.
Honorary member of the Fraternity of Faded Tee Shirts.
TamJeff
  • Posts:
  • Joined:
    Tue Dec 04, 2012 4:46 am

Some more cast welding on an outboard motor. Also had to weld the skeg on this motor as well. The idea is not to use blending putty after the fact, or to have to use up a lot of abrasives. I don't do much in the way of reshaping the break itself. With cast, there is usually enough strength in the shape of the break. Some use a saw tooth puzzle fit, whereas I prefer to use through penetration of the weld itself.

Image

I often cut the patch larger than the parent metal to save from having to feather in a buildup at the end of the joint. Seems that's where a porosity will always show up. I profiled the patch directly from the fin below this one and just left the line when I cut it.
Image

I also profiled the flat face on the band saw to save even more grinding and to keep the weld more consistent with regard to the variable thickness of the part itself.
Image

Creative positioning with scraps of 11 gauge or whatever and R 6's for initial tacking.
Image

One fully penetrated hot pass. Just a one sided bevel on both pieces, a 1/16" land and closed root. 200 amps AC with 1/8" pure tungsten. Argon at 15 CFH. The underside is just flame washed nearly flat and then sanded.
Image

No putty. Milk wheel followed by 80 grit on the DA, some etch primer and factory touchup paint is all that's required for an invisible repair. I have about an hour into it total.
Image
Miller ABP 330, Syncrowave 250, Dynasty 300 DX.
Honorary member of the Fraternity of Faded Tee Shirts.
delraydella
  • Posts:
  • Joined:
    Mon Apr 25, 2011 7:35 pm
  • Location:
    Detroit, MI

Nice!!
WeldingSyncrowave 250,Millermatic 252,30a Spoolgun Cutting12" Hi-speed Cutoff Saw, 9x 12 Horizontal Bandsaw MillingGorton 8d Vertical Mill TurningMonarch EE Precision Lathe GrindingBrown & Sharpe #5 Surface Grinder
User avatar
  • Posts:
  • Joined:
    Thu Jan 06, 2011 11:40 pm
  • Location:
    Near New Orleans

Excellent work, and some notions to keep.

The wash to close the underside likely minimized any draw distorting the piece, or at least balanced out the draw from the top.

I assume even with the closed root you had nearly 100%, so the wash was almost cosmetic in closing the last bits.

Steve S
TamJeff
  • Posts:
  • Joined:
    Tue Dec 04, 2012 4:46 am

Thank you, guys.

You would be correct, Otto. That and sinking the tacks in such a way that they act as wedges or wrap the end tacks around the bottom initially to give the weld on top something to draw against. When welding for full penetration on aluminum, if you don't tig aluminum a lot, one can underestimate the amount of filler it takes with regard to feeding the rod compared with steel. With a gap, it's going to take some rod, even when using 1/8th, if you are actually watching the feed with the amount aluminum shrinks comparatively. I use robust tacks for aluminum to start with.

Here's where the damage above started.

Image

Notice I wasn't too careful with the evenness of the gap. I knew I was going to tack this in a way that would almost be considered stitch welding. I use these larger gaps for cold starts sometimes. It ends up working out in my favor somehow. Second nature by now. I am sure you know what I mean. I figure you can tell by looking at the gaps in the below photo and tell what I was up to with regards to stitching and starting and then filling in once the piece was heated up. There is nothing nicer than having the piece end up close to straight once the final pass has cooled. I am not a fan of grinding. The dust from milk wheels gives my eyes a fit the following day. Also, you can see where I cut the point off on the patch piece closest to the propeller. There is no sense even bothering trying to fluff fill that area around a skinny point. Cut it back to a fatter portion and just fake it with beads.
Image

These outboard skegs have a foil shape to them that really should be maintained. After one has been broken off, one might think it best to use a saw tooth pattern fit up for additional strength, where I opt to just weld them well and hope it breaks off at the repair instead of further up, closer to, or even into the actual gear case, the cast in which is in such tension, just by the nature of the process that creates it, that you would be doing good to ever weld one without gutting it and preheating etc. With that said, my feelings are not hurt if my repair creates a breakaway zone that can be repaired again. This was welded from both sides and beveled on each. I probably used a 70/30 penetration/fill schedule on this part. \

Image
Miller ABP 330, Syncrowave 250, Dynasty 300 DX.
Honorary member of the Fraternity of Faded Tee Shirts.
User avatar
  • Posts:
  • Joined:
    Thu Jan 06, 2011 11:40 pm
  • Location:
    Near New Orleans

I do a lot more stainless than aluminum, and I agree there's an instinct one develops. I've learned how to fit my parts and pieces so that they are square AFTER the weld, but I can't properly explain it to anyone; It's a feel for the metal, a sense of the "draw" I expect.

I still don't get it right every time, of course, but I've got it close enough to be able to use heat-and-quench to put it where I want it with little fuss.

This is why I prefer to fit my own welds. It's difficult to find a fitter who has this feel. Most know the mechanics of it, but there's a certain alchemy in getting it right, and then the fitter has to work with the same welder for some time to learn his particular habits and know what to expect once the weld has cooled.

I do a lot of training at work, and I've found I get better results teaching tricks and tips than theory and method. Everyone has to come to the method on his or her own, as no two of us do it exactly the same, and the tips and tricks give a starting point for figuring the rest out.

Steve S
TamJeff
  • Posts:
  • Joined:
    Tue Dec 04, 2012 4:46 am

Yeah. You don't realize just how generalized welding school is until you get out in the field and start breaking all the rules.
Miller ABP 330, Syncrowave 250, Dynasty 300 DX.
Honorary member of the Fraternity of Faded Tee Shirts.
Ultralow787
  • Posts:
  • Joined:
    Fri Apr 29, 2011 11:30 pm
  • Location:
    Ontario, Canada

Hey TamJeff,
Don't worry about posting too many projects! We all appreciate seeing nice work around this forum...and yours is some sweet looking welding!
That is one of the nice things about this board compared to some others. You won't get blasted by critics here.
Keep on posting!
Perfection is impossible, but if you strive for perfection, excellence is obtainable!

1983 Canox "Sparkler" 225 AC Stick Welder
Hobart 210 MVP MIG Welder
Harris "Spitfire" Oxy-Acetylene Set
TamJeff
  • Posts:
  • Joined:
    Tue Dec 04, 2012 4:46 am

Thank you, Ultralow.
I have been welding most of my life by now and still love it. I still look, talk, dress and walk like a welder. I still put out a lot of work for one guy. Often at times, the shop I work at will be a sea of aluminum that takes up the entire shop and often faster than the other processes can move them out the door. I could literally fill these pages with projects. At our shop, I do it all. The consultation, design, layout, fabrication and the welding. Oftentimes, this will be hundreds of parts and multiple projects occurring simultaneously.

Image

There is at least 3 different jobs going on in this photo below. Many of us come from the land of piecework and very few wasted moves. The problem I have come across with many of the young guys these days is not getting them to throw down pretty beads, but to stop staring at the welds and to move their feet. That's all. Move your feet! lol

Image

None of the mess in the above photo is mine. That is the owner's mess. I intend to start the new year with an ultimatum. Clean it up, or I am out. I've already cleaned it up 10's of times by now. If there was ever any reason to strike off on my own, this would be the number one reason around the notions of doing things my own way. That would be to have a clean and organized environment.
Miller ABP 330, Syncrowave 250, Dynasty 300 DX.
Honorary member of the Fraternity of Faded Tee Shirts.
User avatar
  • Posts:
  • Joined:
    Fri Apr 01, 2011 10:59 pm
  • Location:
    Australia; Victoria

Hey there,

I believe that is my biggest problem, I spend 15 minutes to do a 5 minute job and well times that by 20 jobs it adds up. However, I never take 5 minutes to do a 15 minute job like some of my coworkers so I think im not too bad.

Mick
TamJeff
  • Posts:
  • Joined:
    Tue Dec 04, 2012 4:46 am

There is plenty of instances of ppl taking 5 minutes on a 15 minute job. Is why so much of our work these days ends up rivaling the quality of the worst of overseas manufacturing. I cannot make myself do a job wrong. I may at best have 20 years left in me for this trade. For all the up and coming, I intend going out as the one to beat quality wise. I also put my money where my mouth is in that regard. I buy the very best I can afford from someone else who practices the same.

For those handrails, I built a jig in under an hour. It included the layout marks, material cut list info, directions for use, holding clamps and multiple welding positioning options. Any welder could walk up to it and figure it out instantly. This is where I save time.
Miller ABP 330, Syncrowave 250, Dynasty 300 DX.
Honorary member of the Fraternity of Faded Tee Shirts.
User avatar
  • Posts:
  • Joined:
    Fri Apr 01, 2011 10:59 pm
  • Location:
    Australia; Victoria

Hey,

Sounds like a great system you have. where i work we have "Jigs" (Term loosely used) That you need a degree in rocket science to work out and can still be "used" wrong, leading to untold amounts of trouble later on. I know what you mean about the quality drop, some people should just hand their shields in and find a different vocation.

Mick
delraydella
  • Posts:
  • Joined:
    Mon Apr 25, 2011 7:35 pm
  • Location:
    Detroit, MI

Using jigs and stop blocks for jobs that require more than one identical piece is the only way to go. And another reason i like to use MDF or plywood table tops. You can screw down blocks where ever they are needed. Block in the wrong spot on the initial setup?....No problem, just unscrew it and put it where it's supposed to go. Even though i don't always do it, it's always a good idea to pre drill the screw holes though the blocks and table. Plywood and particle board have a funny way of catching the screw tip on an angle and pushing the block off on an angle in the wrong position :x .


Other Steve
WeldingSyncrowave 250,Millermatic 252,30a Spoolgun Cutting12" Hi-speed Cutoff Saw, 9x 12 Horizontal Bandsaw MillingGorton 8d Vertical Mill TurningMonarch EE Precision Lathe GrindingBrown & Sharpe #5 Surface Grinder
User avatar
  • Posts:
  • Joined:
    Thu Jan 06, 2011 11:40 pm
  • Location:
    Near New Orleans

Actually, years ago when I was building handrail, I used stops and blocks on one-off parts. Bannistrades and ballustrades have to be stright and precise.

I had a thick steel build table, and always had a box of 2X2X1/4 squares. After I'd laid out the design, I'd put a block where I wanted it, and give it two quick tacks with the MIG.

If I needed to move one, I'd give it one whack with the hammer, and move it.

If I were doing a side job at home, or even a small job-shop, I'd use your MDF idea, for sure, but it was SWEET having a heavy steel table for it.
Post Reply